Prepare to Sell
Prepare to Sell is the Step 3. Prepare to Sell tab of the Get Started page: a two-step checklist that takes you from adding what you sell to your first sale. Each card shows Done or Pending based on your store's data, and the second step unlocks once one card in the first step is done.
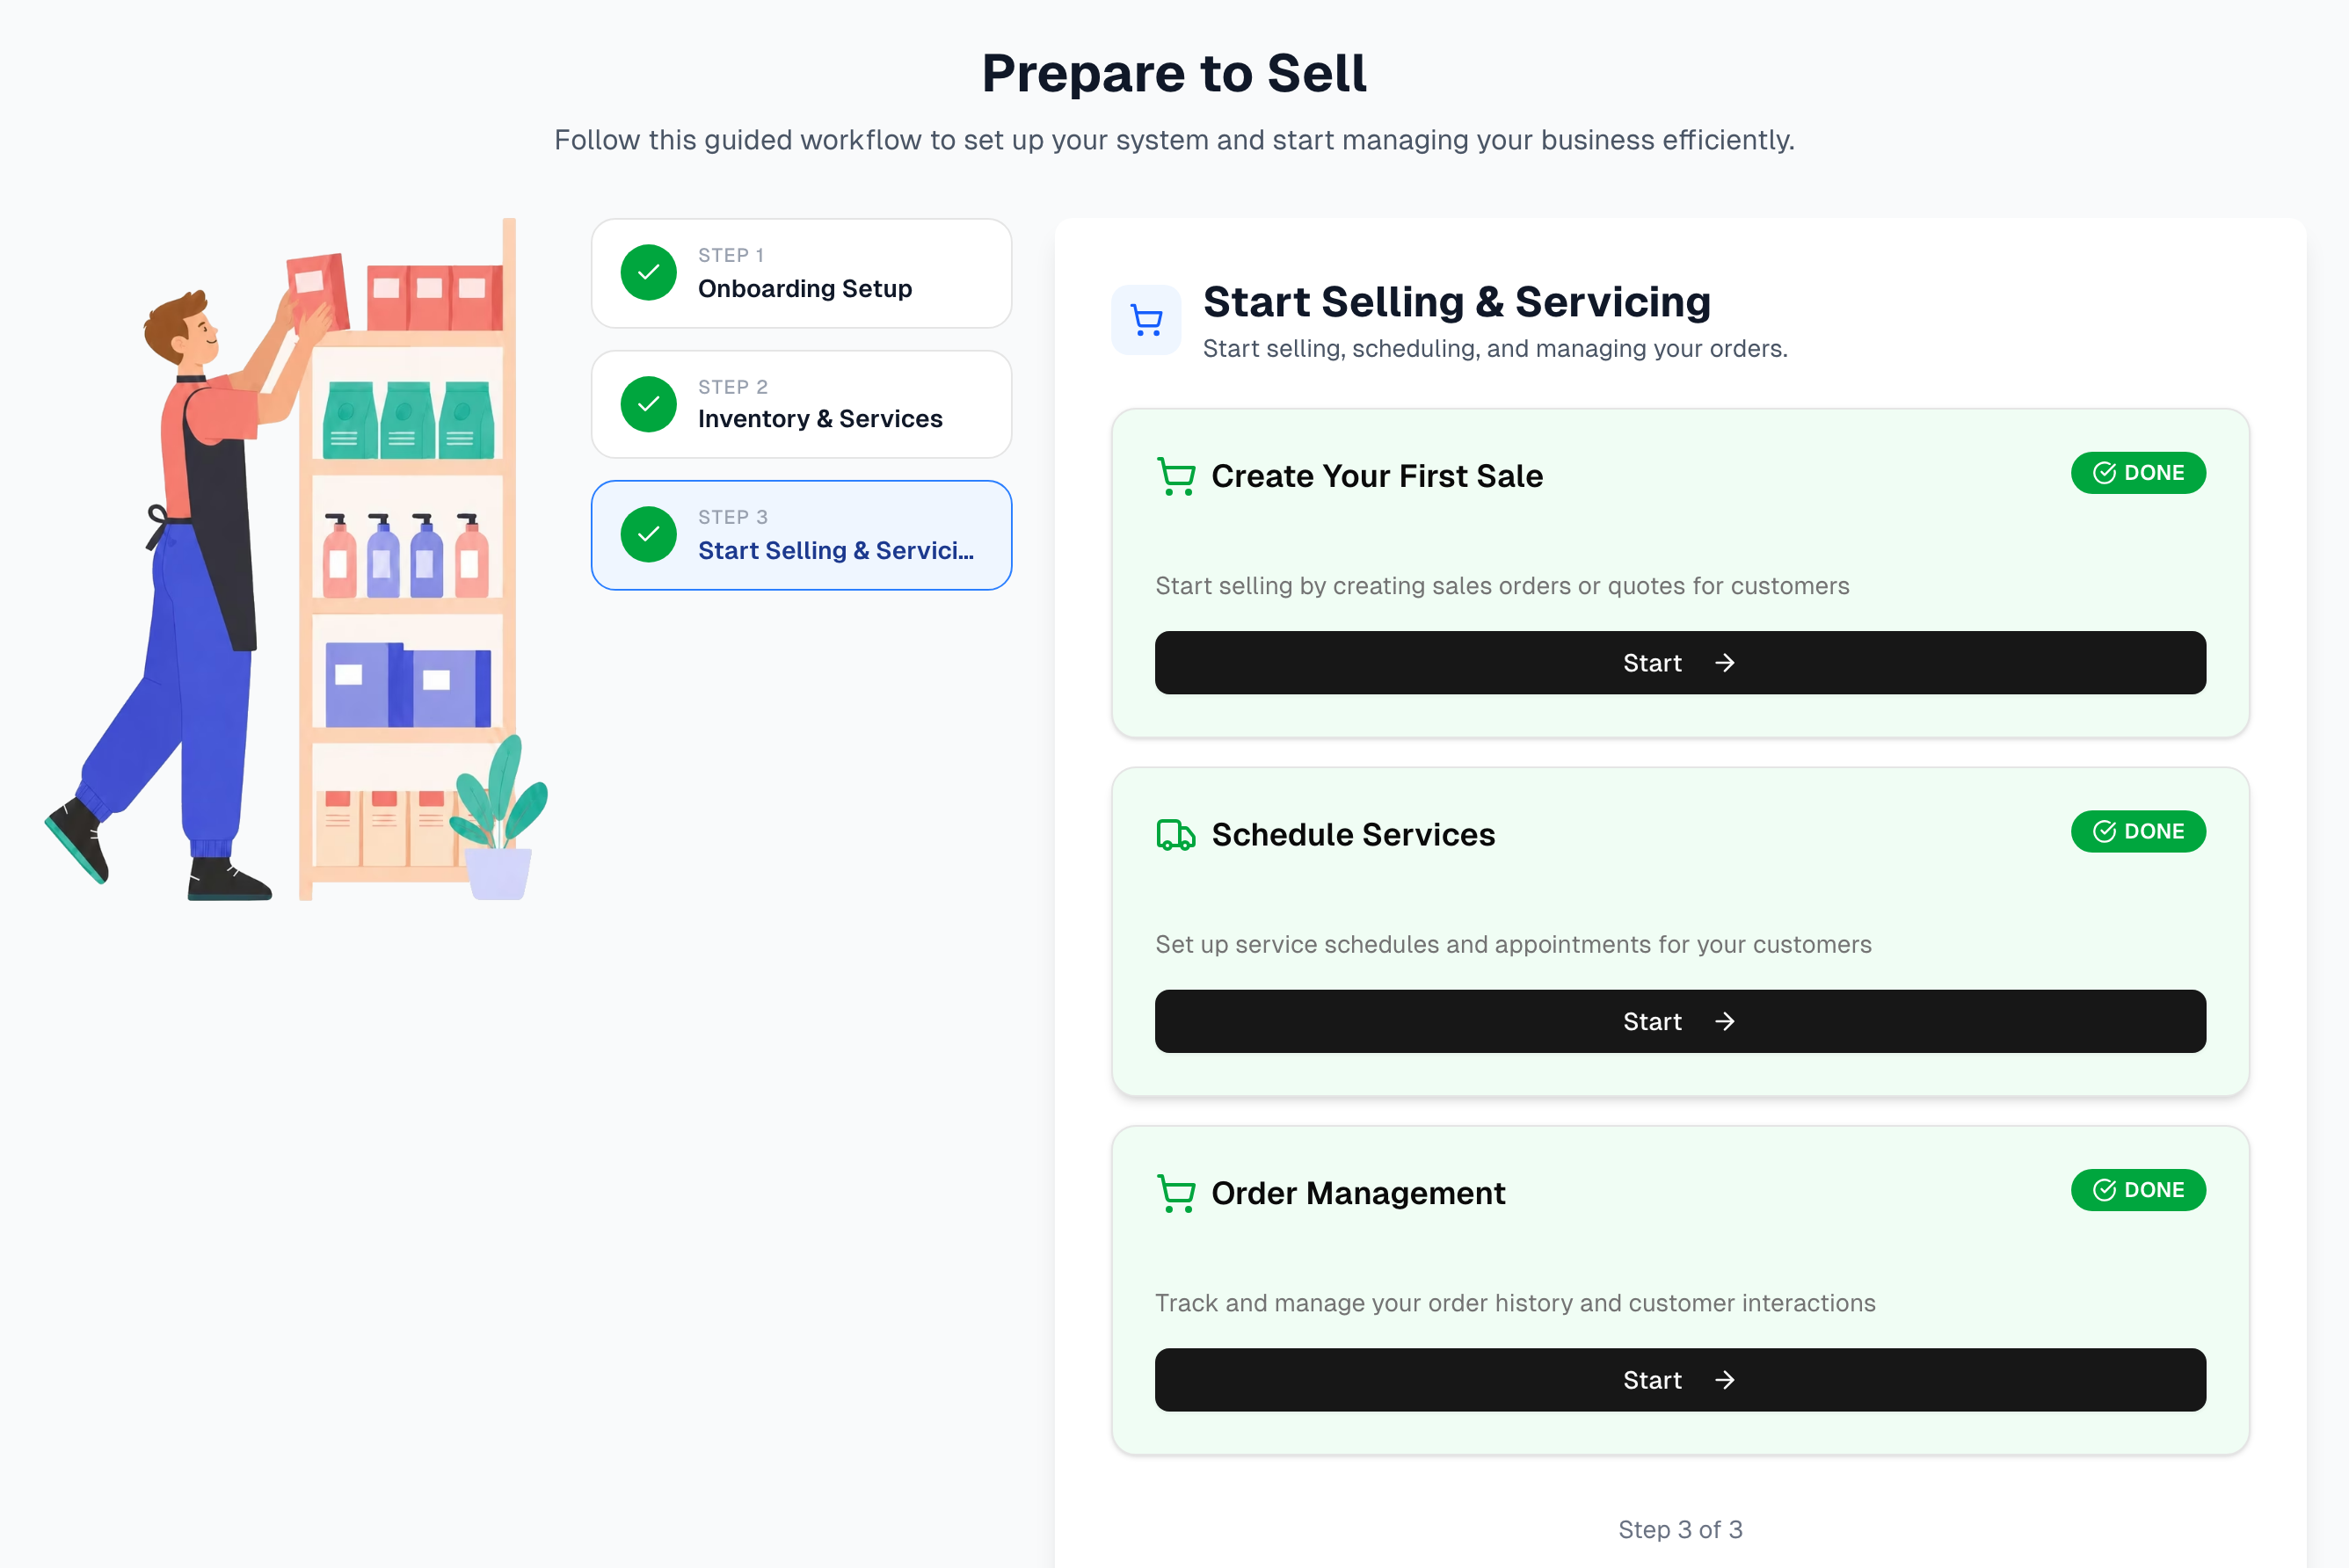
The screenshot also shows an Onboarding Setup step, which the checklist does not have: it has two steps, Inventory & Services, then Start Selling & Servicing.
Overview
- Where to find it: Get Started → Step 3. Prepare to Sell (also Shortcuts → Get Started, and the Step 3. Prepare to Sell button at the end of the onboarding wizard). The sidebar's Get Started item (in the Get Started group) opens the same checklist on a page of its own, without the Get Started header, tabs or Demo button.
- Layout: an illustration (wider screens only), a step navigator, and a card panel. On a phone the navigator becomes a row you can scroll sideways above the cards. A language switch (English / Español / 中文) at the top right translates this checklist only.
- The store profile is not a step here. The owner completes it on Step 2. Profile Setting. Until it is done, Create Your First Sale and Schedule Services show Locked.
- Statuses keep themselves up to date. Everything is checked again each time you open the checklist, so a task you have just finished elsewhere shows as Done the moment you come back. Switching back to the browser tab looks again too, reusing a reading from the last few seconds, and finishing the setup wizard re-checks everything. Refresh under the heading re-checks everything at once.
- When it opens, the page jumps to the first step that is not finished yet. Previous / Next under the panel (or a click on a step) move between steps.
Steps in detail
Step 1 — Inventory & Services
Always unlocked. The two cards are alternatives: either one Done gives Step 1 its green check and unlocks Step 2.
| Card | Start opens | Done when |
|---|---|---|
| Inventory Setup | Procurement Orders → Import tab | Your store has stock recorded, or an available serialized unit, at an active location |
| Services Setup | Services Catalog → Add Service tab | At least one service exists (active or not) |
Step 2 — Start Selling & Servicing
Unlocks as soon as Inventory Setup or Services Setup is Done.
| Card | Start opens | Enabled when (otherwise Locked) | Done when |
|---|---|---|---|
| Create Your First Sale | Sales → New | Store profile complete (an active location and an active tax profile with at least one active tax rate) and Inventory Setup or Services Setup Done | At least one sale, quote, return or scrap order exists. Inventory imports do not count |
| Schedule Services (optional) | Schedule | Store profile complete and at least one service exists | At least one service appointment exists. Never holds the step back |
| Order Management | The Orders list (Sales → List) | Always — the Orders list opens on any store and shows an empty state until there is something in it | Same rule as Create Your First Sale |
Step by step: go live
- Owner: on Get Started → Step 2. Profile Setting, finish the wizard so the store has a location and a tax rate. See Onboarding.
- Step 1 → Inventory Setup → Start. On the Import screen: check the location, vendor and invoice number, pick A - Trackable Items (one row per unit) or B - Bulk Items (one row, many units), download the template, replace the sample rows with your stock, upload it and click Import … Trackable Items or Import … Bulk Products. And/or Services Setup → Start to add a service.
- Come back to Prepare to Sell. The used card shows Done and Step 2 unlocks.
- Step 2 → Create Your First Sale → Start and ring up a sale or a quote.
- Optional: Schedule Services → Start to book your first service job.
Tips & best practices
- A product-only shop can skip Services Setup, and a services-only business can skip Inventory Setup. Either card on its own gives Step 1 its green check, so the page moves on to Step 2.
- Schedule Services is a bonus card for service businesses. It never blocks Step 2.
- Start your first import from the downloaded template and delete its sample rows. A template uploaded unchanged imports the sample products.
- The import lists your active locations only, so stock always lands somewhere the shop can sell it — and somewhere Inventory Setup can see it.
- The Demo button in the Get Started header opens a read-only guided overview of the three Get Started tabs. See Demo mode.
Troubleshooting
| Issue | Fix |
|---|---|
| Create Your First Sale shows Locked | The store profile is missing an active location or an active tax rate, or neither Step 1 card is Done yet. The owner finishes Step 2. Profile Setting, then comes back to the checklist |
| Step 2 is greyed out with a lock and Next does nothing | No card in Step 1 is Done yet. Import inventory or add a service, then come back |
| A card says Couldn't check | That check could not be answered, usually a dropped connection. It does not mean the task is unfinished, and it never locks a Start. Press Refresh |
| A card still says Pending after I did the task | Opening the checklist checks again by itself, so this usually means the task did not count as that card asks for it: check that the order is a sale or quote (not an inventory import). Refresh re-checks straight away. Imported stock always lands at an active location, but stock received or counted into a location that was switched off afterwards still does not count. The sidebar setup reminder reads the same rules, so the two never disagree |
| A team member sees Owner Access Required on Step 2. Profile Setting | Only an owner can edit the store profile: the Owner switch in Settings → Team, or the owner role. Being the store's only active person is enough to open Settings but not to edit the profile |
| "403 - Forbidden" when opening Get Started from the sidebar | The owner hid Get Started in this member's menu. Ask the owner to show it again (see Team), or try Shortcuts → Get Started, which opens the tabbed Get Started page instead |
What's next
- Learn the import screen in depth: Procurement
- Jump to any feature from Shortcuts
- Watch your numbers on the Dashboard
- Make your first sale in Sales → New
Detailed reference
Every button, icon, field and message on this page, for when you need the exact detail. Each panel starts closed — open the one you need.
Page header and toolbar
The Get Started header and tab bar appear only on the tabbed Get Started page: Shortcuts → Get Started, the Step 3. Prepare to Sell tab, or the wizard's Step 3. Prepare to Sell button when the wizard was opened inside Get Started. The sidebar's Get Started item, and the wizard's button when the wizard was opened from the sidebar's Profile Setup, show the checklist panel alone.
| Control | Where | What it does | Notes |
|---|---|---|---|
| Title Get Started, "Learn the basics, complete profile setup, and prepare your workspace to sell." | Page header | Page heading | Not shown on the standalone checklist page |
| Demo (Play icon, amber) | Header, right | Opens the Get Started demo: a guided overview of all three tabs | Everyone. Not on the standalone checklist page. See the Demo mode panel |
| Tab Step 1. Knowing Basics (graduation-cap icon, green) | Tab bar, 1st | Shows the two-minute crash course | Opens by default when the link names no tab |
| Tab Step 2. Profile Setting (person-and-gear icon, purple) | Tab bar, 2nd | Shows the onboarding wizard | Only owners see the wizard: the Owner switch, or the owner role. Everyone sees "Checking access…" for a moment; anyone else then sees "Owner Access Required", or "We couldn't check your access" with Try again if the check could not be made |
| Tab Step 3. Prepare to Sell (checklist icon, blue) | Tab bar, 3rd | Shows this checklist inside a blue frame | Everyone |
| Page address | Browser | The open tab is kept in the page address, so a bookmark or shared link reopens the same tab | Switching tabs does not scroll the page and does not add a browser history step, so Back leaves Get Started instead of returning to the previous tab |
| Globe icon | Checklist, top right | Marks the language switch | Decorative |
| English | Language switch | Shows the checklist in English | Default. Your choice is remembered in this browser. Changes this checklist only — not the rest of the app, and not the Knowing Basics or Profile Setting tabs, which have their own switches |
| Español | Language switch | Shows the checklist in Spanish (title "Prepárate para Vender") | Same as English |
| 中文 | Language switch | Shows the checklist in Chinese (title "准备销售") | Same as English |
| Heading Prepare to Sell, "Follow this guided workflow to set up your system and start managing your business efficiently." | Centred, under the switch | Checklist title and intro | — |
| Refresh (circular-arrow icon) | Under the intro | Checks every card again straight away | Reads Checking with a spinning icon, and is greyed out, while it is working. Everything is checked again each time the checklist opens; the browser tab regaining focus looks again too, reusing a reading from the last few seconds; and finishing the setup wizard re-checks everything |
| Amber note "We couldn't check everything just now, so some cards don't show where you are. Press Refresh to try again." | Under Refresh | Says at least one check could not be answered | Only when a check failed. The cards concerned show "Couldn't check" rather than Pending |
| Illustration | Left column | Decorative artwork that slides in on load | Hidden on phones and narrow windows |
| "403 - Forbidden" / "You do not have permission to view this page. Contact your organization owner." | Replaces the standalone checklist page | Blocks the page | Only for someone whose menu has Get Started hidden, in stores with more than one active member. See Team |
Section: Step navigator and panel footer
| Control | Where | What it does | Notes |
|---|---|---|---|
| Step row "STEP 1" over Inventory & Services | Navigator, 1st row | Shows Step 1's cards | Always unlocked. The circle shows a green check once either Step 1 card is Done, otherwise the number 1 |
| Step row "STEP 2" over Start Selling & Servicing | Navigator, 2nd row | Shows Step 2's cards | Locked (faded, lock icon in the circle, not clickable) until Inventory Setup or Services Setup is Done. Green check when Create Your First Sale and Order Management are both Done (Schedule Services is not needed) |
| Step circle colours | Each step row | Blue number: the step you are viewing, or the next step to work on. Grey number: another open step. Green check: complete. Grey lock: locked | — |
| Selected-step highlight | Navigator | The step you are viewing has a blue border and light-blue background | — |
| "Step" eyebrow | Each step row | Small label above the step name | "Paso" in Spanish, "步骤" in Chinese |
| Opening step | Navigator | Once the statuses have loaded, the page jumps to the first step that is not complete (Step 2 if both are complete) | Happens once per page load. A store that has done either Step 1 card opens on Step 2 |
| Step heading Inventory & Services, "Add what your business sells so you can start taking orders." (clipboard icon) | Top of the card panel, Step 1 | Heading | — |
| Step heading Start Selling & Servicing, "Start selling, scheduling, and managing your orders." (cart icon) | Top of the card panel, Step 2 | Heading | — |
| "Step 1 of 2" / "Step 2 of 2" | Bottom of the card panel | Shows which step you are viewing | — |
| Previous (left chevron) | Below the panel, left | Shows the previous step | Disabled on Step 1 |
| Next (right chevron, blue) | Below the panel, right | Shows the next step | Disabled on Step 2, and while Step 2 is locked |
Step 1: Inventory & Services
| Control | Where | What it does | Notes |
|---|---|---|---|
| Card Inventory Setup (clipboard icon), "Add your products by importing or creating procurement orders. Only sell services? You can skip this." | Step 1, 1st card | Explains the task | Card turns green (green border, background and icon) when Done. Skipping it is fine: Services Setup on its own completes Step 1 |
| "How it works: Download the template, fill it in with your store's inventory, then upload it." (info icon) | Inventory Setup card | Says what Start leads to | — |
| Badge Done / Pending / Checking / Couldn't check | Inventory Setup card, top right | Shows the card's status | Done when your store has any stock record, or any available serialized unit, at an active location. The quantity is not checked, so a stock record at 0 still counts. Stock at an inactive location does not count. Checking while the page is reading, and Couldn't check (amber, with a warning icon) when that check could not be answered — which is not the same as unfinished |
| Start (right arrow) | Inventory Setup card | Opens Procurement Orders on the Import tab | Always enabled, also when Done. Solid blue when this is the step to work on next and the card is not Done |
| Card Services Setup (truck icon), "Configure the services your business provides and their profiles. Only sell products? You can skip this." | Step 1, 2nd card | Explains the task | Skipping it is fine: Inventory Setup on its own completes Step 1, and this card stays Pending |
| "How it works: Add a service to your Services Catalog." (info icon) | Services Setup card | Says what Start leads to | — |
| Badge Done / Pending | Services Setup card | Shows the card's status | Done when at least one service exists, active or inactive |
| Start (right arrow) | Services Setup card | Opens the Services Catalog on its Add Service tab | Always enabled |
Step 2: Start Selling & Servicing
A Locked button is faded and cannot be clicked. The page does not say which part of the rule is missing — use the table below.
| Control | Where | What it does | Notes |
|---|---|---|---|
| Card Create Your First Sale (cart icon), "Start selling by creating sales orders or quotes for customers" | Step 2, 1st card | Explains the task | — |
| Badge Done / Pending | Create Your First Sale | Shows the card's status | Done when the store has at least one sale, quote, return or scrap order. Inventory imports and purchase orders do not count |
| Start / Locked (right arrow) | Create Your First Sale | Start opens Sales → New | Enabled only when the store has an active location, an active tax profile with at least one active tax rate, and Inventory Setup or Services Setup is Done |
| Card Schedule Services (truck icon), "Set up service schedules and appointments for your customers" | Step 2, 2nd card | Explains the task | Optional: never holds Step 2 back |
| Badge Done / Pending | Schedule Services | Shows the card's status | Done when at least one service appointment exists |
| Start / Locked | Schedule Services | Start opens Schedule | Enabled only when the store profile is complete (as above) and at least one service exists |
| Card Order Management (cart icon), "Track and manage your order history and customer interactions" | Step 2, 3rd card | Explains the task | — |
| Badge Done / Pending | Order Management | Shows the card's status | Same rule as Create Your First Sale |
| Start | Order Management | Start opens the Orders list | Always enabled, on any store. There is nothing to have first: the list opens and shows an empty state until the store's first order |
Section: How cards and steps update
| Rule | Detail |
|---|---|
| When statuses are worked out | Every time the checklist opens — including coming back to it straight after doing one of the tasks — whenever you press Refresh, when the setup wizard finishes, and when the browser tab regains focus. Opening the page, Refresh and the wizard finishing all read everything again; the tab regaining focus reuses a reading from the last few seconds, so flicking between windows costs nothing |
| While loading | Every card shows Checking, and the Refresh button spins, until the first reading comes back — and again while Refresh is working. A check that runs in the background leaves the badges showing what they already say. No card claims to be unfinished before it has been checked |
| A check that fails | That card shows Couldn't check in amber, and a note above the steps says some cards don't show where you are and to press Refresh. A failed check never locks a Start button |
| Step complete (green check) | Step 1 needs either Inventory Setup or Services Setup — they are alternatives, because a business sells products, services or both. Step 2 needs Create Your First Sale and Order Management. Schedule Services is optional |
| Step 2 unlocks | When any card in Step 1 is Done |
| A card's Locked label | Comes from that card's own rule (profile, inventory, services), not from the previous step |
| Blue Start buttons | In the step you should work on next, every card that is not Done has a solid blue button |
| Done cards | Still show Start, and it still opens the page |
| Owner vs team member | Everyone sees the same checklist. The store profile itself can only be edited by the owner |
| Which orders count | Any sale, quote, return or scrap order, whatever its status: a cancelled sale or an unconverted quote still counts as your first sale. Inventory imports and purchase orders never count |
Tab: Step 1. Knowing Basics and Step 2. Profile Setting (links into this checklist)
These tabs are documented on Onboarding. Only the parts that lead here are listed.
| Control | Where | What it does | Notes |
|---|---|---|---|
| Continue to Step 2. Profile Setting (right arrow) | "You know the basics!" banner at the end of Step 1. Knowing Basics | Switches to the Profile Setting tab | The banner appears once all five sections are marked Got it |
| "Checking access…" | Step 2. Profile Setting | Shown while the app checks whether you own the store | Brief |
| "Owner Access Required" / "Please switch to an owner account to edit the organization profile settings." (shield icon) | Step 2. Profile Setting | Replaces the wizard | Everyone except an owner (the Owner switch, or the owner role) |
| "We couldn't check your access" / "Something went wrong while checking whether you own this store.", with Try again (shield icon) | Step 2. Profile Setting | Replaces the wizard | Shown only when the check itself failed — not a refusal. It is tried three times first. Try again checks again without reloading the page |
| Step 3. Prepare to Sell (right chevron, blue) | Wizard completion screen, under "What's Next" | Opens this checklist and scrolls to the top | Inside Get Started it switches to the Step 3 tab; from the standalone wizard page it opens the standalone checklist |
| Edit Setup (left chevron) | Wizard completion screen | Reopens the wizard to change your answers | Shows "Loading..." and is disabled while your saved setup loads |
Dialog: Guided tour (both demos)
| Control | Where | What it does | Notes |
|---|---|---|---|
| Progress dots | Top of the tour bubble | The long blue dot is the current step | — |
| "… of …" (for example "2 of 4") | Tour bubble, bottom left | Step counter | — |
| Back | Tour bubble footer | Previous step | Hidden on the first step |
| Skip | Tour bubble footer | Closes the tour | — |
| Next (right chevron) / Got it! | Tour bubble footer | Next step; on the last step reads Got it! and closes the tour | — |
| Dark backdrop | Around the highlighted area | A click closes the tour | — |
| Keyboard | While the tour is open | Esc closes; Right arrow or Enter goes forward (closes on the last step); Left arrow goes back | — |
| Take a Tour (question-mark icon) | Demo banner | Restarts the tour from step 1 | — |
Dialog: Create New Vendor (Import screen)
Opened from New Vendor at the top of the Vendor list on the Import screen.
Fields:
| Field | Required | Default | Rules and error text |
|---|---|---|---|
| Vendor Name * | Yes | Empty | Red border while empty; Create stays disabled until filled. Spaces at the start and end are removed |
| Tags (e.g., electronics, supplier) | No | Empty | Free text. Left blank, the vendor is saved with the tag "import" |
Buttons:
| Control | Where | What it does | Notes |
|---|---|---|---|
| Cancel | Dialog footer | Closes the dialog; nothing is saved | What you typed is kept for the next time you open it |
| Create / "Creating..." | Dialog footer | Creates an active supplier vendor, adds it to the Vendor list, selects it, closes the dialog and clears the fields | Disabled while the name is empty or while saving. Unless you typed your own invoice number, it is refilled with the new vendor's letters |
| X (close), Esc, or a click outside | Dialog | Closes the dialog | Nothing saved |
| Browser pop-up with the error text, or "Failed to create vendor" | Pop-up | Reports a failed save | The dialog stays open so you can retry |
Dialog: Vendor list (Import screen)
| Control | Where | What it does | Notes |
|---|---|---|---|
| New Vendor (plus icon, blue) | First line of the open list | Closes the list and opens Create New Vendor | Always there |
| "Default Vendor" | List option | Placeholder vendor for a store with none | Only listed while it is selected, which happens when the store has no active vendors. The real "Default Vendor" is created only when an import actually runs |
| One line per vendor | List options | Selects that vendor | Only active vendors of this store are listed. Manage vendors in Vendors |
Dialog: Download Template A / Download Template B menu
| Control | Where | What it does | Notes |
|---|---|---|---|
| Download Template A / Download Template B (download icon, down chevron) | Inside the selected Trackable or Bulk card | Opens a two-item format menu | Only in the selected card. Glows until a file is uploaded. Shows a spinner while the Excel file is being built. Clicking it does not change the selected card |
| Excel (.xlsx), "Recommended. Dropdowns, a how-to sheet, and barcodes and serials kept exactly as typed." (spreadsheet icon) | Menu, 1st item | Builds and downloads the Excel template, named after your industry and format (for example appliance-retail-trackable-import-template.xlsx) | If it fails, a red pop-up says "Could not create the Excel template" / "Try again, or download the CSV version instead." The Excel template's sheet names and hints follow the language chosen on the import screen; its column names stay in English |
| CSV (.csv), "Plain text, for other software or your own exports." (document icon) | Menu, 2nd item | Downloads the CSV template with the same naming | — |
| "Fill in your file with the same column names — the order does not matter — then upload it in Step 3." | Under the download button | Reminder | Columns are matched by name, ignoring capitals, spaces, underscores and dashes. Extra columns are ignored |
Sub-page: Procurement Orders header and tabs (Inventory Setup → Start)
Inventory Setup → Start opens Procurement Orders on its Import tab. The full page is documented on Procurement.
| Control | Where | What it does | Notes |
|---|---|---|---|
| Title Procurement Orders, "Manage purchase orders, replenishment, and receiving for your inventory." | Page header | Page heading | — |
| Demo (Play icon, amber) | Header, right | From the Import tab, opens the import-only demo; from other tabs, the four-tab demo | See the Demo mode panel |
| Tab Orders (cart icon) | Tab bar, 1st | List of procurement orders | Locked (lock icon, not clickable) until the store has its first procurement order |
| Tab New Order (box-with-plus icon) | Tab bar, 2nd | Manual purchase order | Locked until the first procurement order |
| Tab Import (upload icon) | Tab bar, 3rd | The import screen | Never locked |
| Tab Receive (package icon) | Tab bar, 4th | Receiving | Locked until the first procurement order |
| "Orders, New Order and Receive unlock after your first import." (lock icon) | Under the tab bar | Explains the locked tabs | Only while the store has no procurement order. A link to a locked tab switches to Import. The tabs unlock as soon as an import creates its order (even one with failed rows), without a reload. If the check itself fails, nothing is locked |
| Spinner | Orders, New Order and Receive panels | Shown while the page checks for procurement orders | Brief |
| Heading Import Procurement Order (package icon), "Import inventory into your store by uploading an Excel or CSV file. Choose the format that matches your data." | Top of the Import tab | Heading | — |
| English / Español / 中文 (globe icon) | Import tab, top right | Translates this import screen only | Remembered in this browser, separately from the Prepare to Sell switch. Template column names (sku, costPrice …) always stay in English |
Sub-page: Import — Step 1 "Choose Store & Vendor"
Fields:
| Field | Required | Default | Rules and error text |
|---|---|---|---|
| Order date (calendar icon, date and time, pencil icon; tooltip Edit order date) | — | Today, 1:00 PM | Click to turn it into a date-and-time picker. Only the date is kept; the time is always 1:00 PM. The picker closes when you click away. Saved with the import as its load date |
| Location for Inventory * | Yes | Your home location when it is one of the ones listed, otherwise the first one | Lists your active locations as "Name (City, State)", so imported stock always lands somewhere it can be sold and counted. A home location that has been switched off is not offered, and the first active one is chosen instead. Red border when empty. "Loading locations..." with a spinner while loading; a store with no active location gets an amber box, "No active locations. Turn one on in Settings → Locations before importing stock."; on failure a red box "Error loading locations:" with "Failed to load locations. …" |
| Vendor * | Yes | Your first active vendor, or "Default Vendor" if the store has none | "Loading vendors..." while loading. Red border when empty. A load failure shows small red text. Under the field, while Default Vendor is selected: "No vendors yet, so "Default Vendor" is created when you import. Open the list to add your own." |
| Vendor Invoice # or PO # * | Yes | Filled in for you: the vendor's first three letters or digits plus the date and time (for example LG202607101211; Default Vendor gives "DEF…") | Clicking into it clears it so you can type your own. Left blank, a fresh automatic number comes back. It changes with the vendor until you type your own. Red border only if you emptied it, or if the vendor name has no Latin letters or digits. This number also blocks importing the same invoice twice |
| Already Received (checkbox, under Other Settings) | — | Ticked | Always ticked and greyed out: imported stock is received at once |
| Other Expenses & Fees (dollar icon, under Other Settings) | No | Empty | Number, 0 or more, cents allowed. Added to the order total (freight, handling). Shows as "Other Expenses:" in the Order Summary. Not part of the stock's cost: once the order is delivered it is an expense on the Profit & Loss, on Freight & Fees on Purchases |
| Notes (Vendor Name, Description, etc.) (under Other Settings) | No | Empty | Added to the order's internal notes. Cleared after a clean import |
Buttons and states:
| Control | Where | What it does | Notes |
|---|---|---|---|
| Arrow badge "STEP 1", then Choose Store & Vendor (package icon) | Card header, left | Step label | — |
| Other Settings (down chevron, dashed border) | End of the first row | Shows or hides Already Received, Other Expenses & Fees and Notes | Hidden by default |
| Greyed Steps 2 and 3 | Over the Step 2 and Step 3 cards | Steps 2 and 3 cannot be clicked | While the vendor or the invoice number is empty. Clicking into the filled-in invoice number empties it, so Steps 2 and 3 grey out until you type a number or click away |
Sub-page: Import — Step 2 "Choose Inventory Type"
| Control | Where | What it does | Notes |
|---|---|---|---|
| Arrow badge "STEP 2", then Choose Inventory Type (spreadsheet icon), "Choose the format that matches your data type." | Card header | Step label | Greyed out and not clickable while the vendor or invoice number is empty |
| A - Trackable Items (Non-Bulk Items), chip "One row = one physical unit" | Left card (click anywhere) | Chooses the Trackable format and shows Download Template A, the column preview and the help panels | "For serialized, high-value, or individually graded stock. Each row becomes its own inventory item carrying its own serialNumber, condition, and grade, so you can sell, return, or trace that exact unit. There is no quantity column — 5 laptops means 5 rows." Both cards pulse blue until you choose. Switching with a file loaded re-checks the file, and removes it if it does not match the new type |
| B - Bulk Items, chip "One row = many units" | Right card | Chooses the Bulk format | "For identical, interchangeable stock that shares one count: consumables, parts, accessories. Each row adds its quantity to the stock pool, with no per-unit serial or condition — 50 batteries is one row with quantity 50." |
| Download Template A / Download Template B | Inside the selected card | Opens the format menu | See the Download Template menu panel |
| "Template A (Trackable Items) columns" / "Template B (Bulk Items) columns" | Template preview box | Preview title | Only after a format is chosen |
| Chip "Sample data: …" (tooltip "The sample rows and the downloadable template use real products from your industry.") | Template preview box | Names the industry whose sample products are in the template | Set from your business type: General merchandise (default), Appliance retail, Appliance repair & service, Electronics retail, Furniture retail, Apparel retail, Liquidation & returns, HVAC contracting, Jewelry retail, Plumbing, Auto repair, Salon & barbering, Landscaping, Restaurant & food |
| Legend Required (red) / Recommended (amber) / Optional (grey) | Template preview box | Colour key for the columns | — |
| Column preview table | Template preview box | Column names (colour-coded), a sample row from the real template ("—" for blank) and a description row | Trackable: sku, name, category, costPrice, retailPrice (required); model, brand, msrp, serialNumber, condition (recommended); description, batchNumber, barcode, grade, note (optional). Bulk: sku, name, category, quantity, costPrice, retailPrice (required); model, brand, msrp (recommended); description, note (optional). Scrolls sideways |
| "If a product's SKU isn't in your catalog yet, include the recommended columns so it can be created." | Under the preview table | Footnote | — |
| Why fill in as many columns as you can? (info icon) | Help panel, left | Opens six tips: every column becomes a search key (name, sku, barcode, model, serialNumber, description); SKU is how rows match existing products; model is a good alternative key; only Trackable imports carry serial numbers and barcodes; richer data means fewer fixes; print barcode labels later, from Inventory → Labels (see Labels) | Closed by default |
| How is inventory computed for each row? (info icon) | Help panel, right | Opens seven steps: match by SKU; reuse the product or create it; update or create the stock level at the chosen location; Trackable creates an inventory item and an order line, Bulk an order line only | Closed by default |
| Update existing product name/description from your file, "Use when your file should overwrite catalog metadata." (checkbox, amber box) | Bottom right of Step 2 | When ticked, rows whose SKU already exists overwrite that product's name and/or description with non-blank values from the file | Unticked by default; only after a format is chosen. No other product field is ever overwritten |
Sub-page: Import — Step 3 "Upload Procurement File" and preview
| Control | Where | What it does | Notes |
|---|---|---|---|
| Arrow badge "STEP 3", then Upload Procurement File (upload icon), "Upload your Excel (.xlsx) or CSV (.csv) file. Required columns depend on the format selected above." | Card header | Step label | Greyed out and not clickable while the vendor or invoice number is empty |
| Drop zone "Upload your file" / "Drag and drop your Excel or CSV file here, or click to browse" (upload icon) | Step 3 | Drop a file to load it | You stay on the page. You can upload before choosing a format: a file with per-unit columns and no quantity column imports as Trackable, anything else as Bulk |
| Choose File | Drop zone | Opens the file picker | Takes .xlsx and .csv (.xls can be picked only to show the re-save message). Excel files over 10 MB are refused. CSV files saved by Excel on Windows are read correctly |
| Loaded-file card: file name, size, "Excel workbook" or "CSV file", and the sheet read | Replaces the drop zone | Confirms which file and sheet were read | For Excel, the first sheet whose header row (within its first 20 rows) names at least two known columns is used. A CSV may have title lines above its header row: the first line within the top 20 naming at least two known columns is the header |
| Red trash-can icon (tooltip "Remove this file") | Loaded-file card, right | Removes the file and its preview | — |
| Upload banner (warning icon) with Dismiss | Top of Step 3 | Red: the file was refused. Amber: accepted with a caveat | See Messages you may see |
| "Data Preview (… rows shown)" | Preview title | Shows every data row | Empty rows and the template's trailing reference row are dropped |
| Chip "Location: …" (pin icon) | Preview title, right | Names the chosen location | Only when the file will import as Trackable — chosen in Step 2, or guessed from its columns — and a location is selected |
| Chip "Individual Items" (box icon) / "Bulk Products" (chart icon) | Preview title, right | The format the rows will import as | Follows the automatic guess when no format was chosen, and then adds "(guessed from your file's columns)" so you can see where the answer came from |
| Box "Trackable Import Details:" (4 lines, including "Items will be assigned to: …" or "No location selected") | Preview body | Explains a Trackable import | Only when the file will import as Trackable, whether that was chosen in Step 2 or guessed from its columns |
| "Existing products: … • New products: …" | Preview body | Counts rows whose SKU is or is not already in your catalog | Counted as soon as the preview loads; picking a location is not needed for it |
| Red box "1 row cannot be imported yet. Fix these in your file and re-upload:" / "… of … rows cannot be imported yet. Fix these in your file and re-upload:" | Preview body | Lists blocking problems, one line per column | Keeps the Import button disabled |
| Amber box "These import as they are — filling them in just makes the catalog more complete:" | Preview body | Lists missing model, brand or msrp for new products | Does not block |
| Preview table with a blue Plan column | Preview body | Shows each row as uploaded | Problem cells are tinted red (blocking) or amber (warning); an empty problem cell shows "required" or "recommended"; hovering shows "… is required", "… is recommended" or "… is not a number". Scrolls |
| Plan column | Last column of each row | Says what will happen to the row | "Missing sku" (red), or "• Catalog: existing product" / "• Catalog: new product" (with "(a deleted product has this SKU; it stays deleted)" when only a product you deleted has the SKU); "• Location: update existing stock level" / "• Location: create new stock level" / "• Location: pending stock check"; "• Item: create InventoryItem + OrderItem" (importing as Trackable) or "• Item: create OrderItem (bulk qty)"; plus one line per problem. The item line follows the format the file will actually import as, chosen or guessed. The catalog line is filled in as soon as the preview loads, so a SKU already in your catalog reads "existing product" straight away. Only the location line waits for a location: until you pick one it reads "pending stock check" |
| "Location Required" / "Please select a location above before importing items." (warning) | Under the preview table | Asks for a location | While no location is selected |
Sub-page: Import — Order Summary, Import button and results
| Control | Where | What it does | Notes |
|---|---|---|---|
| "Upload and preview your file to see order summary" / "Detailed calculations will appear after file upload and processing" | Below Step 3 | Empty state | Before a file is loaded |
| Order Summary (dollar icon), "Complete breakdown of your procurement order" | Card header | Summary of the file | After a file is loaded |
| Tiles Total Items, Total Quantity, Cost Price, Retail Value | Summary grid | Rows; units (Trackable counts 1 per row, Bulk adds up the quantity column); cost × units; retail × units | Prices written like "$1,149.00" are read as numbers |
| Financial Breakdown: "Subtotal (Cost Price):", "Other Expenses:", "Total Purchase Price:" | Summary | Order cost | "Other Expenses:" only when above 0 |
| Profit Analysis: "Potential Profit:", "Margin:", "Markup:", and with Other Expenses & Fees above 0 "Profit after Other Expenses & Fees:" and "Margin after Other Expenses & Fees:"; "*Based on retail prices in your import file. Margin is profit ÷ retail; markup is profit ÷ cost. Potential Profit, Margin and Markup are on the goods cost, before Other Expenses & Fees, which is how each sale's profit is counted later…" | Summary | Retail value minus cost, and two percentages; then the same profit and margin with the fees taken off | Margin is profit divided by retail, the same way margin is worked out everywhere else in the app; Markup is profit divided by cost. $100 cost and $150 retail shows Margin 33.3% and Markup 50.0%. With $20 of freight the two lines after them read $30.00 and 20.0%: what the load earns after freight. The first three stay on the goods alone because that is how the product and sales screens and the Profit & Loss count each sale later. With fees entered, the footnote ends "…the two lines after them take the fees off. Once the order is delivered, the Profit & Loss books the fees as an expense, under Freight & Fees on Purchases." Any margin shows "—" when there is nothing to divide by (no retail prices, or no cost) |
| Import … Trackable Items / Import … Bulk Products | Bottom right | Runs the import (see the next panel) | Disabled while importing, with no file, with an empty invoice number, with no location, or while any row has a blocking problem. While running: spinner and "Creating Inventory Items..." (importing as Trackable) or "Creating Products..." |
| Progress message | Screen corner | "Import in progress" / "Preparing…" → "Importing…" with "… processed · … ok · … failed" → "Creating order…" / "Writing the procurement order atomically." → "Receiving stock…" / "Applying stock-in atomically." | — |
| Completion message "Import completed" / "Import completed with issues" — "…/… succeeded · … failed" (plus "· stock-in failed (order left Pending)", or "· the order could not be finished") | Screen corner | Final result | Red when anything failed |
| Go to Receive | Completion message | Opens Procurement Orders → Receive | — |
| Go to List | Completion message | Opens Procurement Orders → Orders | — |
| Green panel "Trackable Items Imported Successfully!" / "Bulk Products Imported Successfully!" with Order ID, Order Number, "Rows imported: … / …", "Imported value: $…", "Location: …" | Below the button | Confirms a clean import | When the file imported as Trackable, chosen or guessed, it adds "✓ Individual inventory items created with serial numbers ✓ Items assigned to selected location ✓ Full traceability from order to inventory". The file, preview and notes are cleared and a fresh invoice number is filled in. When the import created "Default Vendor" (the store had no vendors), a blue note under the order number says so and says to rename it in Inventory → Vendors; the amber panel of an import with issues shows it too |
| Amber panel "Import completed with issues — …/… rows imported" and "Failed rows (…) — fix these in your file and re-import:" (SKU, Error) | Below the button | Lists rows that failed | The file and form are kept. The rows that worked are already in the order, and the invoice number is now used, so re-import only the fixed rows under a new invoice number or the import is halted as a duplicate |
| Red box "Stock-in failed — no stock was applied and the order was left as Pending (not Delivered). You can receive it from the receiving tab. Reason: …" | Result panel | Explains a failed stock-in | Receive the order from the Receive tab |
| Red box "The purchase order was made and its rows went in, but it could not be finished: …", with the reason and a Finish the order button | Result panel | Says what was left: until it is finished the order shows a $0.00 total and stays Pending. The button runs what is left of the last step again (the order's total and the import's details, then its status) | Press Finish the order; do not import the file again, since its invoice number is now used. If it keeps failing, note the reason and contact support |
| Red panel "Error:" and a message | Below the button | Shows a halted or failed import | See Messages you may see |
Sub-page: What an import does, and template facts
| Behaviour | Detail |
|---|---|
| One order per import | Each import creates one procurement order, with your invoice number as the vendor's order number. It ends Delivered when every row and the stock-in succeed, stays Pending if some rows or the stock-in failed, and becomes Cancelled if no row imported |
| Duplicate invoice guard | An invoice number already used on any procurement order in your store blocks the import, including an import that only partly worked or was cancelled |
| Default Vendor | Created as a real vendor only when an import passes the duplicate check |
| Matching products | Rows match existing products by SKU, ignoring upper/lower case and spaces at the ends. Only live products match: a SKU only a deleted product has creates a new product, and the deleted one stays deleted. A new SKU creates a product from the row; new products store the SKU in lower case |
| Categories and brands | Created when new: category names in Title Case, brand names in UPPER CASE; existing ones match ignoring case |
| Catalog auto-fill | For appliance retail and appliance service stores, a new product whose model (or SKU, when the model is blank) exactly matches the UpChannels product catalog gets its blank fields filled in: name, description, MSRP, weight, dimensions, images, and category or brand if the row has none. Values from your file are never overwritten |
| Trackable rows | One available unit per row at the chosen location. A blank serial number gets a 13-digit one; a blank barcode gets one starting "UC-"; a blank condition becomes NEW; any quantity column is ignored |
| Duplicate serial or barcode | A Trackable row whose serial number (or barcode) already exists in your store is skipped with an error, so the unit is not counted twice |
| Bulk rows | The row's quantity is added to the product's stock at the location. Quantity is required on every Bulk row: a blank or non-number quantity blocks the import |
| Stock-in | Always immediate. All good rows are received together in one step that either fully succeeds or applies nothing |
| After the first import | Orders, New Order and Receive unlock; Prepare to Sell shows Inventory Setup: Done the next time it opens (if the location is active) |
| Template industries | General merchandise (default), Appliance retail, Appliance repair & service, Electronics retail, Furniture retail, Apparel retail, Liquidation & returns, HVAC contracting, Jewelry retail, Plumbing, Auto repair, Salon & barbering, Landscaping, Restaurant & food |
| Sample rows | The template comes with sample products. Its how-to sheet says: "The sample rows (…) are only examples. Replace or delete them before you upload." A template uploaded unchanged imports the sample products |
| Excel edition | Sheets "Items" and "How to fill" (in English; Spanish and Chinese screens name them in that language); red/amber/grey headers; dropdowns for condition (NEW, USED, REFURBISHED) and grade (A, B, C); cell checks with the messages "Use one of: ….", "Enter a number of 0 or more, without a currency sign or text. For example: 899.99" and "Enter a whole number of 1 or more. For example: 12" |
| Column names | Matched ignoring case, spaces, underscores and dashes ("Cost Price", "cost_price"). Also accepted: qty, quantityreceived, qtyreceived for quantity; notes for note |
| Required columns | sku, costPrice, retailPrice (and quantity for Bulk) on every row; name and category only for SKUs not yet in your catalog; model, brand and msrp only warn |
Sub-page: Services Setup, Create Your First Sale, Schedule and Orders
| Control | Where | What it does | Notes |
|---|---|---|---|
| Tab Add Service (plus icon, purple) | Services Catalog tab bar (Services Catalog, Add Service, Service Types) | Where Services Setup → Start lands | After you save a service, or click Cancel, the page switches to the Services Catalog tab. Form fields: see Services |
| Callout "Finish your store profile before creating an order" / "Orders need a store location and a tax rate to be priced and invoiced. It takes about two minutes." | Top of Sales → New | Explains why no order can be built yet | Adds " After that, add your first product or service." when the catalog is empty too. Owners only; hidden once the store has any sale, quote, return or scrap order (an inventory import does not count) |
| Finish store profile (store icon, right arrow) | Callout | Opens Get Started → Step 2. Profile Setting | When the profile is incomplete |
| Callout "Add a product or service before creating an order" / "Orders are built from your inventory and services. Add at least one and come straight back here." | Top of Sales → New | Explains why no order can be built yet | Profile done but no stock, unit or service |
| Add a product (box-with-plus icon) | Callout | Opens Procurement Orders → Import | — |
| Add a service (wrench icon) | Callout | Opens Services Catalog → Add Service | — |
| Schedule Services → Start | Step 2 card | Opens Schedule | See Schedule |
| Order Management → Start | Step 2 card | Opens the Orders list | See Sales → List |
Messages you may see
On the checklist and around the app
| Message | When it appears | What to do |
|---|---|---|
| "Done" / "Pending" / "Checking" / "Couldn't check" (card badge) | Worked out when the page opens and again whenever it re-checks | For Pending, do the task and come back. For "Couldn't check", press Refresh |
| "Locked" (card button) | Create Your First Sale or Schedule Services rule not met | First Sale: finish the store profile (active location and active tax rate) and add inventory or a service. Schedule: profile plus a service. Order Management is never locked |
| Lock icon on the Step 2 row; Next disabled | No Step 1 card is Done | Import inventory or add a service, then come back |
| "Step … of 2" | Always | — |
| "How it works: …" | Inventory Setup and Services Setup cards | — |
| "Checking access…" | Step 2. Profile Setting, for a moment while the app checks who you are | Wait |
| "We couldn't check everything just now, so some cards don't show where you are. Press Refresh to try again." | One or more checks could not be answered | Press Refresh. The cards that could not be checked show "Couldn't check" |
| "Owner Access Required" / "Please switch to an owner account to edit the organization profile settings." | Step 2. Profile Setting, anyone without the Owner switch or the owner role | Ask the owner to complete the profile |
| "We couldn't check your access" / "Something went wrong while checking whether you own this store." | The check failed — usually a dropped connection — rather than refusing you | Click Try again. If it keeps happening, reload the page or contact Support |
| "403 - Forbidden" / "You do not have permission to view this page. Contact your organization owner." | Standalone checklist page, for someone whose menu has Get Started hidden (stores with more than one active member) | Ask the owner to show the menu item, or try Shortcuts → Get Started (the tabbed Get Started page) |
| Sidebar row "Setup … of 3" with "Finish your store profile", "Add your first product or service" or "Create your first order" (rocket icon) | Owners, on every page, until the store has any sale, quote, return or scrap order — an inventory import does not count | Click it to go to the next step |
| Blue strip at the top of pages: "Setup … of 3 · Finish your store profile." ("Add a store location and a tax rate so orders can be priced and invoiced."), "Add your first product or service." ("Orders are built from your inventory and services, so add at least one to sell.") or "Create your first order." ("You are ready to sell. Ring up a sale or a quote to see the whole flow.") | Owners with a setup step left, until the store has any order. Never on the Get Started, onboarding or standalone checklist pages | Click its button: Finish store profile (opens Profile Setting), Add a product (opens the Import screen, with an "or add a service" link beside it) or Create an order (opens Sales → New). The X (tooltip Hide for now) hides the strip for that step until the browser tab is closed |
On the Import screen
| Message | When it appears | What to do |
|---|---|---|
| "No vendors yet, so "Default Vendor" is created when you import. Open the list to add your own." | Store has no active vendor | Keep it, or add one with New Vendor |
| "Loading locations..." / "Loading vendors..." | Step 1 loading | Wait |
| "Error loading locations:" with "Failed to load locations. …" or "No organization ID available. Please ensure you are properly authenticated." | The location list could not load | Refresh, or sign in again |
| "Failed to create vendor" (browser pop-up), or the server's message | Saving a new vendor failed | Retry; check the name |
| "Could not create the Excel template" / "Try again, or download the CSV version instead." | Building the Excel template failed | Retry, or choose CSV |
| "This file does not match the inventory type you selected" — "You selected Trackable Items, but this file has a … column and none of the per-unit columns (serialNumber, condition, grade) — that is the Bulk Items template." — "Check both sides before you retry: is this the wrong file, or is the wrong inventory type selected? Switch the type in Step 2, or download the matching template above and re-export your data." | A Bulk-shaped file (a quantity column and no serialNumber, condition, grade or batch column) under Trackable. For all three mismatch messages the file is not loaded (or is removed, if you switched the type after loading it) and a red pop-up repeats the message | Choose B - Bulk Items, or use Template A |
| "This file does not match the inventory type you selected" — "You selected Bulk Items, but this file has per-unit columns (…) and no quantity column — that is the Trackable Items template." plus the same "Check both sides…" line | A Trackable-shaped file under Bulk | Choose A - Trackable Items, or use Template B |
| "This file does not match the inventory type you selected" — "You selected Bulk Items, but this file has no quantity column, so every row would come in as a single unit." plus the same "Check both sides…" line | Bulk chosen, no quantity column and no per-unit columns | Add a quantity column |
| "The quantity column will be ignored" — "Trackable imports create one inventory item per row, so every row counts as 1 unit no matter what quantity says. If a row stands for several units, give each unit its own row — or switch to Bulk Items." (amber) | Trackable chosen and the file has a quantity column | The file is accepted; split multi-unit rows if needed |
| "This Excel file can’t be read" — "It is in the old .xls format or password-protected. In Excel, remove any password, choose File → Save As → Excel Workbook (.xlsx), and upload the new file." | .xls or password-protected file | Re-save as .xlsx |
| "This Excel file could not be opened" — "It may be damaged, or not really an Excel workbook. Open it in Excel, save a fresh copy as .xlsx, and try again." | Damaged workbook | Re-save |
| "This file is too large" — "Excel files can be up to 10 MB. Split the rows into smaller files, or save the sheet as CSV." | Excel file over 10 MB | Split it, or use CSV |
| "Only Excel or CSV files can be uploaded" — "Choose a file ending in .xlsx or .csv." | Any other file type | Use .xlsx or .csv |
| "This file could not be read" — "Reading the file failed: …" | Any other read error | Re-export the file |
| "… is empty in … — every row needs one: …", "… is empty in … — required to create a new product: …", "… is not a number in …: …", "… — your file has no such column, and every row needs one (…).", "… — your file has no such column, and it is required to create a product that is not in your catalog yet (…)." (with "and … more" after five) | Red box, blocking problems | Fix those cells in your file and upload it again |
| "… is empty in … — the product will be created without it:", "… — your file has no such column, so … will be imported without it.", "… is not a number in …, so it will be left blank:" | Amber box: model, brand or msrp | Optional |
| "Missing sku" | Plan column, row without a SKU | Add a SKU |
| "Location Required" / "Please select a location above before importing items." | No location selected | Pick a location |
| "Import halted" / "Location is required." with "Location selection is required for inventory tracking. Please select a location where inventory will be stored." | Import started without a location | Pick a location |
| "Import halted" / "Vendor invoice is required." with "Vendor invoice number is required." | Empty invoice number | Enter one |
| "Import halted" / "No rows to import." with "No data to import. Please upload and preview an Excel or CSV file." | No rows | Upload a file with data rows |
| "Import halted" / "Vendor is required." with "Vendor ID is required. Please enter a vendor ID for the procurement order." | No vendor | Choose a vendor |
| "Waiting for organization" with "Organization data is still loading. Please wait a moment and try again." or "Invalid organization context. Please re-authenticate or refresh." | Your session is not ready | Wait, refresh, or sign in again |
| "Import halted" / "This vendor invoice was already imported." with "Invoice "…" was already imported as …. Skipping to avoid duplicating the order and doubling stock. Use a different invoice number or open the existing order." | Invoice number already used | Use a different number, or open the existing order |
| "Import halted" / "Duplicate check failed." with "Could not verify whether this invoice was already imported: …" | The duplicate check failed | Retry |
| "No rows could be imported: every product failed to resolve." | No row could be matched or created | Check the file and the Failed rows list |
| "Failed to create order: …" / "No order data returned from server" | The order could not be created | Retry; contact support if it repeats |
| "A unit with serial … already exists (id=…). Skipped so the same unit is not counted twice." (or "… barcode …") | Failed rows table | Give the unit a unique serial or barcode, then re-import those rows with a new invoice number |
| "Inventory item already exists (id=…). Skipped stock update to avoid double counting." | Failed rows table | The unit is already in stock |
| "Failed to create InventoryItem: …" / "Failed to create product: …" / "Unable to resolve product for SKU …" / "Failed to finalize order item: …" / "No order item ID returned for SKU: …" | Failed rows table | Fix the row and re-import it with a new invoice number |
| "Stock-in failed — no stock was applied and the order was left as Pending (not Delivered). You can receive it from the receiving tab. Reason: …" | The stock-in step failed | Receive the order from the Receive tab |
| "The purchase order was made and its rows went in, but it could not be finished: …" (or "… could not be marked Delivered …", or "… could not be cancelled …") | The order was made, but saving its total and the import's details, or its final status, failed | Press Finish the order |
Who can use what
| Area | Owner | Team member | Notes |
|---|---|---|---|
| Prepare to Sell checklist | Yes | Yes, the same view | No plan or add-on is needed |
| Store profile (needed to unlock Create Your First Sale and Schedule Services) | Completes it on Step 2. Profile Setting | Sees "Owner Access Required"; Create Your First Sale stays Locked until the owner finishes | "Owner" here means the Owner switch in Settings → Team, or the owner role |
| Standalone checklist page (sidebar Get Started) | Yes | Yes | In stores with more than one active member, anyone whose menu has Get Started hidden sees "403 - Forbidden". A store whose only active member is that person skips this check, however many switched-off or removed people it has. Shortcuts → Get Started opens the tabbed Get Started page, a separate page |
| Sidebar setup row, setup strip, Create Order setup callout | Shown, with the Owner switch on | Never shown | These three follow the Owner switch alone, so an owner by role only doesn't see them. The row and strip disappear once the store has any sale, quote, return or scrap order (an inventory import does not count). The callout also disappears once the profile is done and a product, unit or service exists |
| Import screen | Yes | Yes, if the member can open Procurement Orders | No plan gate and no owner-only rule |
Demo mode (/initialize/demo)
- Open it: the Demo button (Play icon, amber) at the right of the Get Started header. It is not on the standalone checklist page.
- Header: "Get Started — Demo" / "A quick tour of the three steps that get your workspace ready to sell."
- Banner: "Demo mode — a guided overview of the Get Started steps. Nothing here changes your account." with Take a Tour, which restarts the tour.
- Content: "Get Started walks you through three steps — learn the basics, set up your business profile, then prepare everything you need to make your first sale." and three read-only cards. The Step 3 Prepare to Sell card says: "A guided checklist of everything you need before your first sale — it checks itself off as you go." with bullets "Inventory Setup — add your products by importing or creating procurement orders.", "Services Setup — configure the services your business provides.", "Create Your First Sale — ring up a sales order or quote for a customer.", "Schedule Services & Order Management — book service jobs and track your order history." and "Steps unlock as you go, and each one turns green automatically once it's done."
- Disabled: there is nothing to change — no checklist, step navigator, Start buttons, badges or language switch. Still works: Exit Demo Mode, Take a Tour and the tour buttons. The tour starts by itself the first time you open the demo.
- Leave: Exit Demo Mode (left arrow) returns to Get Started on the tab you opened the demo from, here Step 3. Prepare to Sell.
| # | Tab | Tour step | What it points at |
|---|---|---|---|
| 1 | Single screen | Get Started, in Three Steps | All three cards. "Get Started guides you from zero to your first sale: learn the basics, set up your business profile, then prepare everything you need to start selling. Here is a quick look at each step." |
| 2 | Single screen | Step 1 — Knowing Basics | The Step 1 card. "A two-minute crash course in five core concepts: the basic workflow, what a catalog is, how inventory is calculated, the recommended learning order, and the 7 levels of a well-managed store." |
| 3 | Single screen | Step 2 — Profile Setting | The Step 2 card. "The owner completes a short wizard: choose a business type, fill in the owner and organization details, and set up your first location and tax rate. This tailors the whole workspace to your business." |
| 4 | Single screen | Step 3 — Prepare to Sell | The Step 3 card. "A guided checklist for going live: add inventory and services, create your first sale, and schedule service work. Each task checks itself off automatically as you complete it." |
Differences from the live page: the demo describes the checklist but does not show it. On the live page, cards update when the page opens, not while you watch.
Import-only demo (for your first inventory import)
- Open it: Demo (Play icon, amber) in the Procurement Orders header while the Import tab is open.
- Header: "Import Inventory — Demo" / "The import screen with a sample file loaded. All actions are disabled."
- Banner: "Demo mode — this is the Import screen with sample data. All actions are disabled." with Take a Tour.
- Disabled: every field and button on the import screen. Still works: Exit Demo Mode, Take a Tour and the tour buttons. The tour starts by itself the first time you open the demo.
- Leave: Exit Demo Mode (left arrow) returns to Procurement Orders → Import.
- What is different: English only; Trackable is pre-selected; Other Settings is shown open; a sample industry file (12.4 KB, sheet "Items") is shown loaded with 5 preview rows; the help panels are closed; there is no tab bar.
| # | Tab | Tour step | What it points at |
|---|---|---|---|
| 1 | Import | Read it in your language | Language switch. "English, Español or 中文 — the switch translates this import screen only. Column names in the template (sku, costPrice, …) always stay in English." |
| 2 | Import | Step 1 — Store & Vendor | Step 1 card. "Pick the location the stock lands in and the vendor it came from. "New Vendor" sits at the top of the vendor list. The order date on the right defaults to today — click the pencil to change it." |
| 3 | Import | Invoice / PO number, filled in for you | Invoice field. "The vendor's initials plus the date and time. Click the field to type the vendor's real invoice number instead. This number is also the duplicate guard: the same invoice can't be imported twice." |
| 4 | Import | Other Settings | Other Settings row. "Imported stock counts as already received, so it is on hand as soon as the import finishes. Add other expenses and fees (freight, handling) and a note for the order here." |
| 5 | Import | Step 2 — Trackable or Bulk | Step 2 card. "A: one row = one physical unit, with its own serial number, condition and grade — 5 laptops means 5 rows. B: one row = many units, with a quantity column — 50 batteries is one row. Pick the one that matches your file." |
| 6 | Import | Download the template first | Download button. "Start from this file. Download Template A or B as Excel (recommended: dropdowns and a how-to sheet) or CSV. It comes filled with sample products from your industry — replace them with your own stock." |
| 7 | Import | Give your file the same column names | Template preview. "Your file needs the same column names as the template. Capitals, spaces, underscores and dashes don't matter, and neither does the order. Extra columns are ignored, and a few common names are understood too (Qty for Quantity, Notes for Note). Red columns are required, amber recommended, grey optional; the sample row shows what each cell should look like." |
| 8 | Import | Step 3 — Upload the file | Step 3 card. "Drag and drop your .xlsx or .csv (up to 10 MB), or click Choose File. The file is checked against the type you chose in Step 2, so a Bulk file under Trackable is caught before anything is imported." |
| 9 | Import | Check the preview | Data preview. "Every row is shown with its plan: an existing product gets stock added, a new SKU gets a product created. A row missing a required cell is flagged in red and blocks the import until you fix the file; warnings still import." |
| 10 | Import | Order summary | Order Summary. "Items, units, total cost and retail value, all from the prices in your file — what this procurement order will be worth." |
| 11 | Import | Import | Import button. "One click creates the procurement order, creates products for any new SKUs, and puts every unit into stock at the chosen location. Orders, New Order and Receive unlock once this first import is in." |
Common questions
Is there an "Onboarding Setup" / "Store Profile Setup" step on the checklist? No. The store profile is its own tab, Get Started → Step 2. Profile Setting, and only the owner can complete it. The checklist has two steps. You can tell the profile is missing when Create Your First Sale and Schedule Services show Locked.
Why is "Create Your First Sale" locked? It needs an active store location, an active tax profile with at least one active tax rate, and either Inventory Setup or Services Setup marked Done. The page does not say which one is missing. Check the profile on Step 2. Profile Setting (owner), make sure you imported stock or added a service, then reload.
I imported my inventory, but Inventory Setup still says Pending. Why? The checklist reads your data when it opens and when you press Refresh, so press Refresh first. If it is still Pending, check the import finished: if the stock-in step failed, the order was left Pending and no stock was added. Receive it from the Receive tab. Only stock at an active location counts, so it can also happen if the location holding it has been switched off since — the import itself only offers active locations.
I only sell products. Do I need Services Setup or Schedule Services? No. Inventory Setup alone completes Step 1 and unlocks Step 2, and Schedule Services is optional. Step 1 shows its green check with Services Setup still Pending, and the page opens on Step 2 from then on. Order Management opens whether or not you sell services; its Done badge is the part that waits for your first sale.
Can I open Order Management before my first sale? Yes. Start is always available there: the Orders list opens on any store and shows an empty state until you ring something up. Its Done badge is the one that waits for the first sale.
Can a team member use this checklist? Yes, everyone sees the same checklist. Only the owner can fill in the store profile on Step 2. Profile Setting.
Some rows failed on my first import. How do I bring them in? The rows that worked are already in stock on that procurement order, and its invoice number now counts as used. Fix the failed rows listed under "Failed rows", keep only those rows in your file, and import them again under a new invoice number. Re-using the same number is halted with "This vendor invoice was already imported."