Schedule
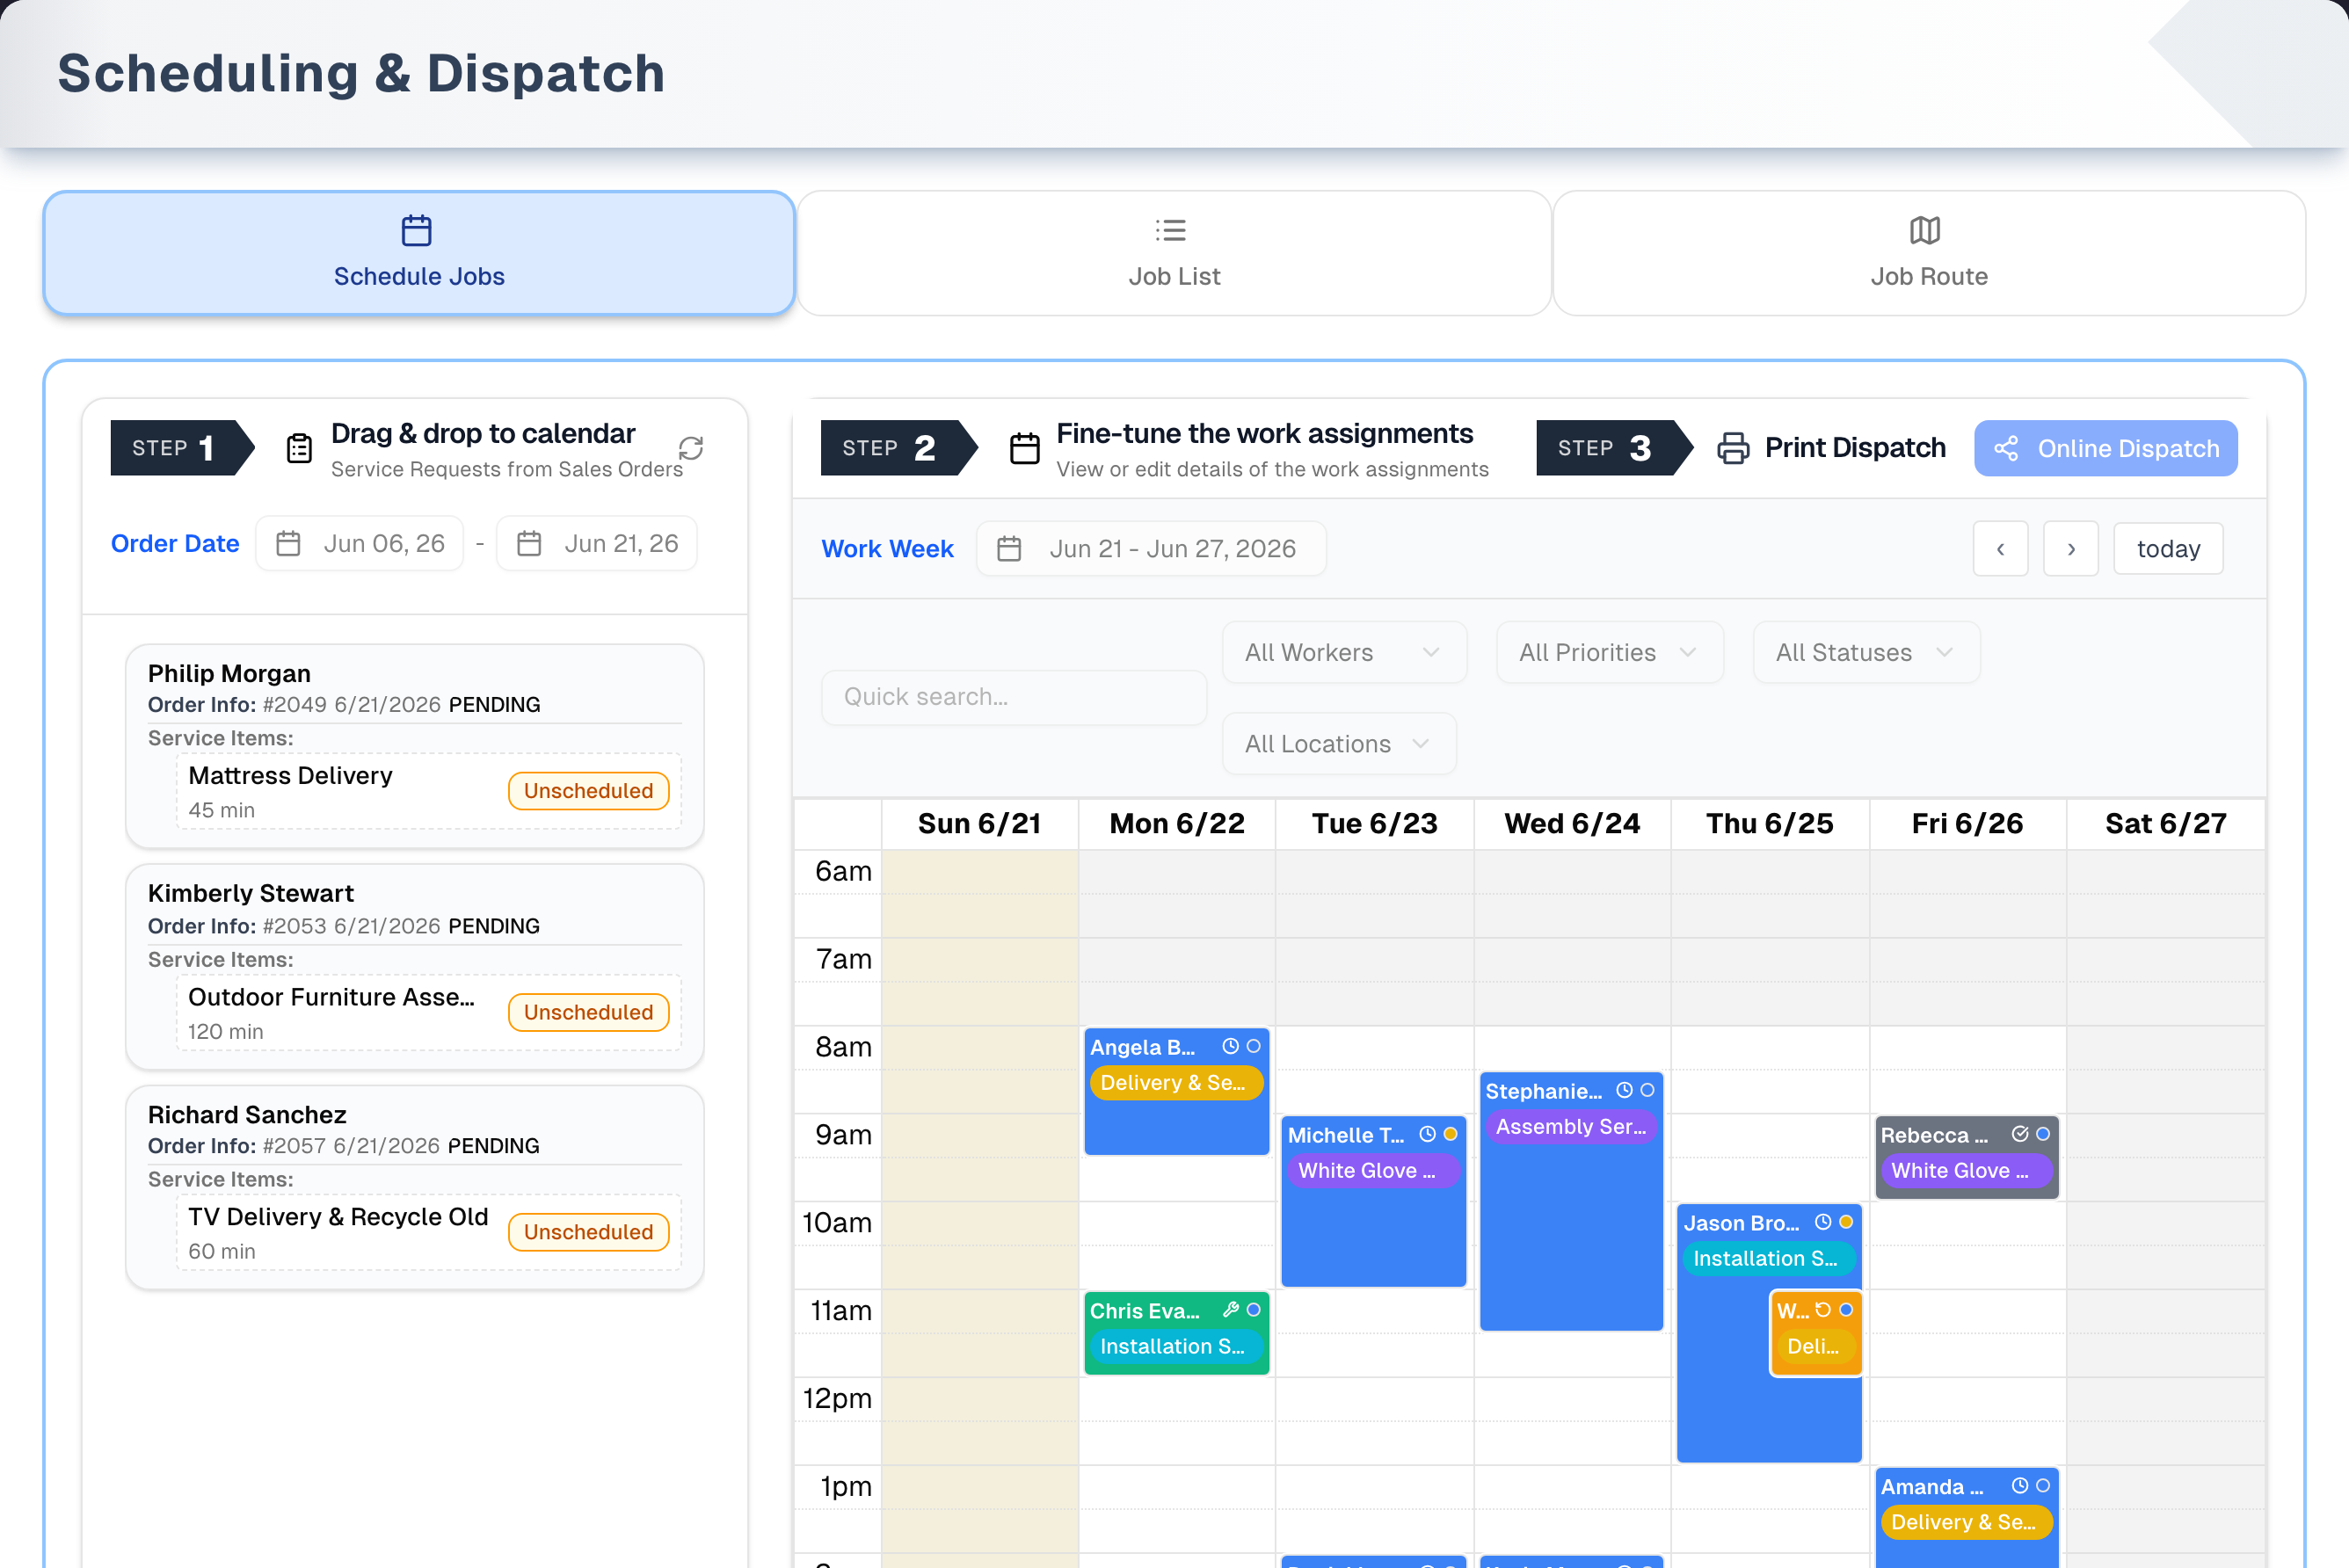
Scheduling & Dispatch (sidebar: Sales → Schedule) turns the service lines on your orders into jobs on a weekly calendar. You drag a service onto a day and time, open the job to assign a worker, then print the week or text your team a link. Three tabs — Schedule Jobs, Job List and Job Route — all work on the same week.
Overview
The Schedule Jobs tab is laid out in three numbered steps:
- Step 1 · Drag & drop to calendar — the Service Requests panel lists your orders that have service lines.
- Step 2 · Fine-tune the work assignments — the weekly calendar. Click a job to see or edit it, drag it to move it, drag its edge to change its length.
- Step 3 · Print Dispatch — prints every job in the week except cancelled and no-show ones. Online Dispatch next to it texts your team a link instead.
Worth knowing before you start:
- Dragging from Step 1 is the only way to create a job. There is no "new job" button.
- New jobs start Unassigned. Click the job → Edit → Worker → Save.
- One date range drives everything — the calendar, Job List, Job Route, the printout and the dispatch link. It starts as this week (Sunday to Saturday). Jobs outside it are not loaded. Every job inside it is, up to 5,000; past that the Job List says "Showing the first 5,000 jobs. Narrow the dates to see the rest." (The dispatch link lists up to 500, see below. Step 1 has its own Order Date range.)
- Print and Online Dispatch always cover the whole range. The Worker, Priority, Status and Location filters and Quick search only change what you see on screen. Both the printout and the online list leave out cancelled and no-show jobs, so nobody drives to a job you called off; the calendar and Job List still show them, so you can rebook.
- Header buttons: Demo opens the page with sample data and a guided tour, whether or not Schedule is in your menu. Team Management opens Settings → Users, where team members and their phone, Active and Field Worker settings live. The button is there for everyone, but Settings opens only for the owner and a one-person store's only member; anyone else lands on Shortcuts. Changing or adding a team member then needs the owner. See Team & Menu Visibility.
Tabs in detail
Schedule Jobs
Step 1 — Service Requests panel. One card per order that was created inside the Order Date range, has at least one service line, and isn't a quote, Cancelled or Refunded (completed orders are included). A quote appears here once it is accepted and becomes a sale. The range starts at the last 15 days and goes back to that every time you return to this tab. Each card shows the customer, "Order Info" (last 4 characters of the order number, order date, order status) and each service line with its length in minutes and an Unscheduled or Scheduled + date badge. Only Unscheduled lines can be dragged. Scheduled lines stay on the list, greyed out. Hovering a line highlights its job on the calendar, and hovering a job highlights its line.
Step 2 — the calendar. Always one Sunday–Saturday week, 6:00 AM to 10:00 PM, snapping to 15 minutes. There is no month or day view.
- Work Week picker, ‹ / › (a week back or forward) and today move the range. today goes to the week your store is in and shows today; the picker goes to the week of the day you click and shows that day. "Today" is your store's day, so the same week comes up wherever you sign in from.
- Quick search and the Worker, Priority, Status and Store Location filters narrow the jobs you see.
- Each job shows the customer and the service. Its colour is its status (Scheduled blue, In Progress green, Completed grey, Cancelled red, Rescheduled amber, No Show violet) and the small dot is its priority. Hover for the details.
- Drag a job to move it (its length stays the same). Drag its top or bottom edge to change its start or end time. When you move a job onto a time where its worker already has an overlapping job that day, you're asked to confirm (resizing doesn't check).
- A job whose Can Reschedule is off keeps its date and time. Nobody can move it — not on the calendar, not in the job's details, and not from a page left open since before it was switched off. To move it, open the job, turn Can Reschedule on and change the date in the same save. Anyone who can edit the job can do that.
- Delivery chips (🚚 + customer name) appear when Delivery & Routes is on. They are read-only: teal, or green once the driver has completed the delivery. Click one to open the Routes board on that delivery's day, with the stop highlighted. Deliveries are scheduled and moved there, never here, and the filters don't hide them.
Job List
The same jobs as a table: Date & Time, Customer, Service, Worker, Priority, Status, Phone, Address, Value. Rows are always in date-and-time order (the headers don't sort). The filters are shared with the calendar, and text left in Quick search on Schedule Jobs still filters this list even though the box isn't shown here. Work Date From/To, ‹ › and today change the shared range.
- Click a row to open the job.
- Delete on a row asks first — the same question as the job dialog's Delete, naming the job, the customer and the day — then removes the job and puts its service line back to Unscheduled in Step 1. The column is only there for the owner and managers.
Job Route
One Work Date at a time (today by default), on a Google Map. The day has to fall inside the range loaded on the other tabs — otherwise nothing shows. The Worker, Priority, Status and Location filters apply here too.
- Numbered pins are coloured by status. The amber S pin is your store. Click a pin for its details and View Full Details.
- Optimize Route (N) opens Google Maps in a new tab with driving directions from your store address through every job that day that has an address or a pin. Google works out the best order, unless you have given every job that day a Sequence Number, in which case your order is kept. A job with no address at all is left out, and the line under the toolbar says how many were.
- SMS Route texts that Google Maps link to a team member or any phone number.
- The list under the map (headed "Today's Schedule" for today, and "Schedule for" the date on any other day) has one row per job. Click a row to open the job.
- Jobs with no Service Address get no pin, and neither does one whose address Google can't find. Both are listed in an amber note under the map, by customer and address, so you can fix the Service Address.
The job details dialog
Opens when you click a job anywhere on the page. It shows the job's name, the work order number and four tabs — Overview, Timing, Customer, Completion. It opens read-only. Click Edit to change fields, then Save (or Cancel). Delete asks you to confirm, then removes the job and puts its service line back to Unscheduled; it only shows for the owner and managers. SMS next to the customer's phone texts the customer from your store's texting number, using the phone on the job (or, if the job has none, the number on their customer record). When a send can't go through, the message names the reason; read it before changing any setup.
Three things to know:
- Completing a job: set Status to Completed, fill in whatever else the job needs, and save once. Everything in that save is kept — the completion details (Actual Duration (min), Completion Notes, Customer Rating, Customer Feedback, follow-up, Completed By) and every other change (worker, dates, priority, address, warranty, quality, Total Cost, resolution notes and so on). Anything you leave alone keeps the value it already had, including details typed in an earlier save. The Actual Duration is logged as time on the job; leave it blank and the time already recorded is kept, or, if there is none, the job's Duration is logged instead. Completed By is a list of your team: it starts on the person already recorded, else the job's worker, else you, and completing the job records whoever it shows. If the save is refused, nothing in it is saved.
- Actual Start and Actual End are the clock times the work really began and ended, on the job's own day. Type them as times (for example 14:30) and save — they are read as your store's local time, so everyone sees the same figures whatever time zone they are working in. Clear a field and save to take the time off again, including in the save that sets Status to Completed. A job that runs past midnight is handled: an end time earlier than the start counts as the next morning.
- Everything you save is shown back the next time you open the job — Work Type, Sequence Number, the actual times, travel, costs, and the whole Customer and Completion tabs. A field only says "Not recorded" or "Not rated" when nothing has been recorded in it.
Dispatch: printout and online link
- Step 3 · Print Dispatch (Schedule Jobs) and Print Dispatch List (Job List, Job Route) open your browser's print dialog with a "Work Schedule Report" grouped by day.
- Online Dispatch creates a link that works for 7 days and opens Send Dispatch Link. Tick team members (each needs a phone with at least 10 digits), add other numbers if you like, then send. The texts go from your store's texting number (Pro or Premium plan). Write your own message if you want — the link is added to it, and the box under the message shows exactly what goes out.
- The link needs no sign-in. It shows the jobs in the range for every worker, with live data, apart from cancelled and no-show ones, and names the worker on each job. It lists up to 500 jobs and says so when the range holds more.
- The link is fixed to the dates you had chosen when you made it, and to your store. Change the dates and make a new one — editing the address of a link you already sent only stops it working. If nothing is booked in those dates, your team sees "No Jobs Scheduled".
- To send one worker just their own day, use Job Route: pick the day, choose that worker in the Worker filter, then SMS Route.
Step by step: schedule a service job
- Sell the service on an order (Sales → New).
- Open Sales → Schedule. Find the order in Step 1. If it's older than 15 days, move Order Date From back.
- Move the calendar to the right week with the Work Week picker or ‹ ›.
- Drag the service line onto the day and time. A yellow "Creating assignment..." placeholder appears, and the line's badge turns Scheduled.
- Click the new job → Edit → pick a Worker (and adjust priority, times or address) → Save.
If the drop fails, a red Job not created message says why, the placeholder disappears and the line goes back to Unscheduled. That covers a save the server refused and a dragged line the page could no longer match to an order. Put the reason right and drag it again, or click the Step 1 refresh icon.
Step by step: dispatch the week
- Set the week with Work Week (or Work Date From/To on Job List).
- To print: Step 3 · Print Dispatch, or Print Dispatch List on Job List / Job Route.
- To text a link: Online Dispatch → tick recipients → Send to N recipients.
- For one day's driving route: Job Route → pick the Work Date → Optimize Route or SMS Route.
Tips & best practices
- Assign a worker straight after dropping a job — new jobs are Unassigned.
- Filters don't change the printout or the dispatch link. To give each person only their jobs, filter by worker on Job Route and use SMS Route.
- Keep statuses current so the dashboard and Services Report stay accurate.
- Complete a job in one save, with its completion details and any other changes together.
Troubleshooting
| Issue | Fix |
|---|---|
| An order isn't in Step 1 | Step 1 only lists orders created in the Order Date range (last 15 days by default) — move From back. Cancelled and Refunded orders never appear, and the line has to be a service. Scheduled lines stay on the list, greyed out |
| A service line won't drag | It's already Scheduled. Delete its job to free the line |
| A person isn't in the Worker list | The list shows the store's active team members. The owner opens Team Management and turns the person's Active switch on; adding someone new is the owner's too |
| Job List or the calendar is empty | Jobs load only for the current range — change the week. Clear Quick search on Schedule Jobs and set the filters back to All |
| Job Route shows no jobs or an empty map | The Work Date has no jobs, or is outside the loaded week. Move the week on Schedule Jobs or Job List first, then pick the day. Jobs without a Service Address get no pin |
| A job has no pin, and is named in the amber note under the map | Google couldn't find the address, or the job has none. Fix the job's Service Address |
| Save fails naming a field, such as "Actual Start must be a time like 14:30" | The field holds something that isn't a time. Type it as a time (14:30), or clear it, and save again |
| "Nothing was saved" — "Fix …, then save again. Each box says what it takes." | A number box holds something it cannot keep: a decimal in Sequence Number, Duration, Actual Duration, the travel times, Buffer Time, Customer Rating or Warranty, a number below 0 in Duration, Actual Duration, the travel times, Buffer Time or Warranty, a Sequence Number of 0 or less, a rating outside 1 to 5, or a number past 2,147,483,647 in any of them; or a number below 0 in Distance, Labor Rate or Total Cost, or a Quality Rating outside 1 to 5. Nothing in that save was kept and the dialog stays open: fix each box that says so in red (another tab may have one too) and save again. Distance, Labor Rate, Total Cost and Quality Rating take decimals |
| "Actual Start needs the job's date. Reopen the job and try again." | The job on screen is out of date — someone else changed or removed it. Close the dialog, let the page reload, and open the job again |
| Changes are missing after completing a job | The save was refused, and a refused save keeps nothing. Read the message it showed, put that right, and save again |
| A field I saved shows "Not recorded" or "Not rated" when I reopen the job | The save it was in was refused, so nothing in it was kept. Check the message it showed, then enter the field again and save |
| SMS in a job says "This job has no customer phone number…" | The job has no phone and the linked customer record has none either. Add a phone on the job (Edit → Customer Phone), or add one to the customer in Customers |
| SMS in a job, or Send SMS on a route, names another reason | Read it: some reasons have nothing to do with texting setup. A number held by another conversation needs Start a new conversation, not a setup change — tick that box in the route text dialog, or turn on that switch in the job's Send SMS dialog, and send again. See Messages you may see |
| The printout ignores my filters | It always prints every job in the range, except cancelled and no-show jobs |
| "Upgrade required" when texting | Texting needs a Pro or Premium plan, an active subscription and texts left this month. See Billing |
| The dispatch link says "Dispatch List Error" | Links expire after 7 days, and a link whose address was edited or cut short stops working. Click Online Dispatch again for a new one |
| The dispatch link says "No Jobs Scheduled" | Nothing is booked in the dates that link was made for (cancelled and no-show jobs don't count). Set the dates on the Schedule and click Online Dispatch again |
What's next
- Create service orders: Sales → New
- Manage service offerings: Catalog → Services
- Plan deliveries alongside service jobs: Delivery & Routes
- Add team members and phones: Team & Menu Visibility
- See what the time on jobs cost: Team → Workforce
- Review completed work: Reports → Services Report
Detailed reference
Every button, icon, field and message on this page, for when you need the exact detail. Each panel starts closed — open the one you need.
Page header and toolbar
| Control | Where | What it does | Notes |
|---|---|---|---|
| Title Scheduling & Dispatch, subtitle "Plan, assign, and track jobs across your team in one place." | Header | Display only | Sidebar: Sales → Schedule |
| Demo (Play icon, amber) | Header, right | Opens this page with sample data and a guided tour | Everyone, and the demo copy opens even for someone whose menu doesn't include Schedule. Same tab. See Demo mode below and Demo mode |
| Team Management (people icon + small external-link icon) | Header, right | Opens Settings → Users (Menu Visibility), where team members are added and edited: phone, Active, Field Worker ("(Can receive jobs)" / "(Office)"), hourly rate | The button shows for everyone, but Settings only opens for the owner or the store's only active member (people switched off or removed in Team don't count); anyone else is sent to their Shortcuts page. Getting in is not the same as being able to change someone: editing another person — their name, phone, email or default location — takes owner level (the Owner switch or the owner role), and so do their Active switch (never your own) and the Role picker (never your own role or an owner's), while Create User, the Field Worker switch, the hourly and overtime rates, the employee code and a new password appear only for the person whose Owner switch is on. Your own details you can always edit. Opens in the same tab despite the icon. See Team & Menu Visibility |
| Tab Schedule Jobs (calendar icon) | Tab bar | Step 1 Service Requests panel + Step 2 calendar | Default tab. Blue border. The tab you pick isn't remembered on reload |
| Tab Job List (list icon) | Tab bar | Filter bar, Work Date bar and jobs table | Green border. Step 1 panel hidden |
| Tab Job Route (map icon) | Tab bar | Filter bar, route toolbar, map and day list | Grey border |
| Loading screen "Loading job scheduling with real data..." | Whole page | Shown while your store, team and jobs load | First load and after Retry |
| Error screen: "Couldn't open scheduling: …" + "Try again. If it keeps happening, sign in again.", or "Authentication required" + "Please log in to access job scheduling" | Whole page | Replaces the page only when your store could not be worked out at all | A job list that fails to load shows as a banner above a working board instead (see the next row). The first wording names the reason; the second means no session was found |
| Retry | Error screen | Loads the store and its jobs again | The first button, because a passing problem is the usual cause |
| Go to Login | Error screen | Opens the sign-in page, remembering this one. Signing in brings you back to the schedule | — |
| Banner "Couldn't load the jobs: …" with Try again | Above the tabs | Says the job list could not be read. The board, the filters, the Service Requests panel and everything else stay usable | Try again re-reads the jobs for the dates showing and the banner goes when it works. An empty week is not an error and shows no banner |
| Link from the dashboard's Recent Activity | — | Opens this page with that job's details dialog already open | Only if the job falls in the current week; otherwise the page opens normally |
| Shortcuts Job Scheduling & Dispatch, Service Team Management, Time Tracking Log | Shortcuts page, Sales group | All three open this page on Schedule Jobs | Shown when Schedule is in your menu. Team members are managed with Team Management; time is on My Hours and Workforce |
Tab: Schedule Jobs — Step 1 Service Requests panel
Lists every order in your store that was created in the Order Date range, isn't Cancelled or Refunded, and has at least one service line. Completed and paid orders are included. Each service line is one row.
| Control | Where | What it does | Notes |
|---|---|---|---|
| "STEP 1" + "Drag & drop to calendar" / "Service Requests from Sales Orders" | Panel header | Heading only | Left column on wide screens, below the calendar on narrow ones |
| Refresh icon (circular arrows, no label) | Panel header, right | Reloads the list | Spins and is disabled while loading |
| Order Date From (calendar icon, e.g. "Sep 03, 26", placeholder "From") | Panel header, second row | Shows orders created on or after the chosen day | Default: 15 days ago. Goes back to 15 days ago every time you return to this tab. Clicking the chosen day again clears it (no lower limit). Filters on the order's date, not the service date |
| Order Date To (placeholder "To") | Panel header, second row | Shows orders created on or before the chosen day | Default: today. Days before From are greyed out. Clicking the chosen day again clears it (no upper limit) |
| "Loading service requests..." | Panel body | Shown while loading | — |
| "No service requests" / "No service requests found for selected date range" | Panel body | Nothing matches the Order Date range | Move From back |
| Order card | Panel body | Customer name, then "Order Info:" with # + last 4 characters of the order number, the order date and the order's status, then "Service Items:" | Not clickable. "Unknown Customer" when the order has no customer; "Customer" + 6 characters when the customer record can't be found |
| Service line row | Inside a card | Service name, length ("60 min"), and a badge | Name comes from the service, else the line description, else "Service". Length is the service's estimated time, 60 minutes if none is set |
| Badge Unscheduled (amber) | Row, right | The line has no job yet | Row has a dashed border and a move cursor — drag it onto the calendar |
| Badge Scheduled + date (green), grey tick | Row, right | The line already has a job; the date is the job's date | Row greyed out and can't be dragged. Delete the job to free it |
| Hover a row | Row | Highlights the matching job on the calendar with a blue ring | Works the other way too |
| Drag a row onto the calendar | Row → calendar | Creates a job at that day and time (see next rows) | Only Unscheduled rows. A row being saved fades; a dropped row can't be dragged again |
| Drop result: yellow "Creating assignment..." placeholder | Calendar | Shown about 2 seconds while the job is created. The row's badge turns Scheduled + date | The new job: status Scheduled, worker Unassigned, name = the service line's name, work order = the order number, length = the service's estimated time (60 minutes if none), customer name, phone and main address copied from the customer, description "Service for" + customer, your store's main location, priority taken from the order: the Priority Level chosen on the order if it is anything but Normal, otherwise Urgent when the order is marked Rush or Emergency on the sales form, otherwise High if the order total is over $5,000 and Normal below that. A Priority Level is chosen on the Others tab when the order is created, or on the order window's Overview tab afterwards; the Sell tab has no priority box, so a counter sale is Normal unless somebody sets it on the order. A line that isn't linked to a catalog service is filed under a "General Service" service (created if needed), but the job is shown by its own name — the line's — everywhere, so "General Service" isn't what you read on the calendar, Job List or printout |
| Failed drop | Calendar | The placeholder disappears, the row returns to Unscheduled and a red Job not created message gives the reason | Try again, or refresh Step 1 if the panel is out of date. No double-booking check on this path |
Tab: Schedule Jobs — Step 2 calendar and Step 3
| Control | Where | What it does | Notes |
|---|---|---|---|
| "STEP 2" + "Fine-tune the work assignments" / "View or edit details of the work assignments" | Calendar card header, left | Heading only | — |
| Step 3 · Print Dispatch (dark "STEP 3" arrow + printer icon) | Calendar card header, right | Opens the browser print dialog with the "Work Schedule Report" | Prints every job in the range except cancelled and no-show jobs — ignores filters and Quick search. See Printout panel |
| Online Dispatch (share icon, blue) | Calendar card header, far right | Creates a 7-day dispatch link for the range and opens Send Dispatch Link | Shows a spinner and "Generating..." and is disabled while working. The link covers every worker's jobs in the range |
| Work Week picker (calendar icon, e.g. "Sep 13 - Sep 19, 2026", placeholder "Select week") | Work Week bar | Click any day to select its whole Sunday–Saturday week; jobs reload and the calendar moves there | Footer: "Click any day to select the entire week". Selected week shown in blue. Shared with Job List, Job Route, print and dispatch |
| ‹ | Work Week bar, right | Moves the range back 7 days | — |
| › | Work Week bar, right | Moves the range forward 7 days | — |
| today | Work Week bar, right | Sets the range to the Sunday–Saturday week your store is in, and moves the grid to today | "Today" is the day at your store, not on your own clock, so it is the same week for everyone. Also changes the Job List, print and dispatch range |
| Quick search... box | Filter row, left | Live filter on service name, customer name, service address and phone (digits match whatever the formatting) | Only shown on this tab, but the text keeps filtering Job List and Job Route after you switch. Doesn't affect delivery chips, print or dispatch |
| Worker filter ("All workers" / All Workers + each person) | Filter row | Shows only that person's jobs | List = the store's active team members (up to 100) plus field workers rostered today. Also applies on Job List and Job Route |
| Priority filter ("All priorities" / All Priorities, Emergency, High, Low, Normal, Urgent) | Filter row | Shows only that priority | Coloured dots: Emergency red, Urgent orange, High yellow, Normal blue, Low green. All five are reachable: a job takes the order's Priority Level, or Urgent when the order is marked Rush or Emergency |
| Status filter ("All statuses" / All Statuses, Cancelled, Completed, In Progress, No Show, Rescheduled, Scheduled) | Filter row | Shows only that status | Each has its status icon |
| Store Location filter ("All locations" / All Locations + each location) | Filter row | Shows only jobs recorded at that location | Only when the store has at least one location. Jobs created by dragging are recorded at your store's main location |
| Calendar grid | Card body | Sunday–Saturday week, 6:00 AM to 10:00 PM in 30-minute rows, hour labels. Times outside business hours (Monday–Friday 8 AM–8 PM) are shaded grey | No month or day view, no all-day row. Jobs outside 6 AM–10 PM don't show on the grid. Overlapping jobs are allowed |
| Job card | Grid | Customer name (bold) and a coloured service-name pill; status icon and priority dot at top right | Background = status: Scheduled blue, In Progress green, Completed grey, Cancelled red, Rescheduled amber, No Show violet. The worker isn't shown on the card |
| Status icon / priority dot on a card | Card, top right | Hover titles "Status: …" and "Priority: …" | — |
| Hover a job card | Grid | Dark box: 📋 Work Order (shows the service name), 👤 Customer, ⏰ Time, 📍 Location, 📊 Status, 🚩 Priority, ⚡ Duration, 💰 Value, 📞 Phone (or "N/A") with a small SMS link when there is a phone, 🔢 Qty | Lines without a value are left out. Also highlights the job's line in Step 1. The SMS link opens your device's texting app, but the box closes when the pointer leaves the card |
| Click a job card | Grid | Opens the job details dialog | — |
| Drag a job card | Grid | Moves the job to the new day and time, keeping its length, and saves. A job from an order also updates that line's date in Step 1 | If the same worker has an overlapping Scheduled, In Progress or Rescheduled job that day, a confirm appears (see Messages). Cancel puts the job back. A job whose Can Reschedule is off cannot be dragged at all, and if one is somehow dropped it springs back with "Job not moved — This job is marked as not reschedulable — turn Can Reschedule on in the job's details to move it." The same message appears when someone switched Can Reschedule off after your page loaded: the store's records refuse the move, the job springs back and the calendar reloads. Other failure: "Failed to update job: …" and the job snaps back |
| Drag a job card's top or bottom edge | Grid | Changes the start or end time; the length is recalculated and saved | No double-booking check. A job whose Can Reschedule is off cannot be resized: it springs back with "Job not changed — …", including when it was switched off after your page loaded. Other failure: "Failed to update job: …" and it snaps back |
| Delivery chip "🚚" + customer name (or "🚚 #" + order number) | Grid | Read-only delivery spanning its delivery window. Click opens the Routes board on the delivery's own day — read in your store's time zone, so an evening window lands on the right day — with the delivery highlighted | Only when Delivery & Routes is on. Teal; green once the driver has completed it. Can't be dragged or resized. Not affected by filters or Quick search. No hover box. Covers deliveries from 60 days ago to 90 days ahead, cancelled ones excluded. With no store time zone set, your own is used at both ends. Where the chip sits on the grid is the store's clock too, so a late evening delivery is drawn on the same day it opens however far away you are reading from |
Tab: Job List
| Control | Where | What it does | Notes |
|---|---|---|---|
| Worker, Priority, Status, Store Location filters | Grey filter bar | Same filters as on Schedule Jobs — a choice made on one tab carries to the others | Quick search isn't shown here, but text typed on Schedule Jobs still filters this list |
| Print Dispatch List (printer icon, green) | Filter bar, right | Opens the browser print dialog with the "Work Schedule Report" | Prints every job in the range except cancelled and no-show jobs — ignores filters |
| Online Dispatch (share icon, blue) | Filter bar, right | Creates the 7-day dispatch link and opens Send Dispatch Link | "Generating..." with a spinner and disabled while working |
| Work Date From (placeholder "From date") | Work Date bar | Sets the start of the shared range; jobs reload | Clicking the chosen day again does nothing. Shared with the calendar, route, print and dispatch |
| "to" | Work Date bar | Text | — |
| Work Date To (placeholder "To date") | Work Date bar | Sets the end of the shared range | Days before From are greyed out |
| ‹ / › | Work Date bar, right | Move the range back or forward 7 days | Need both From and To |
| today | Work Date bar, right | Sets the range to the Sunday–Saturday week your store is in | The same week as the calendar's today |
| Amber line "Showing the first 5,000 jobs. Narrow the dates to see the rest." | Above the table | The range holds more than 5,000 jobs; the Job List, the calendar, Job Route and the printout hold the first 5,000 in date-and-time order | Pick a shorter Work Date From/To. Only a range of months on a busy store gets here |
| "No jobs scheduled for the selected filters" | Table area | No jobs in the range after filters | Clear filters and Quick search, or change the range |
| Date & Time column | Table | Date in your store's format + 24-hour time | Rows always earliest first. Headers don't sort |
| Customer column | Table | Customer name on the job | — |
| Service column | Table | Service name | — |
| Worker column | Table | Assigned person | "Unassigned" when nobody is. A person who is no longer active is still named, as on the printout and the dispatch link |
| Priority column | Table | Badge: Emergency red, Urgent grey, High outlined, Normal and Low solid dark | — |
| Status column | Table | Icon + "Scheduled", "In Progress", "Completed", "Cancelled", "Rescheduled" or "No Show" | — |
| Phone column | Table | Customer phone on the job | — |
| Address column | Table | Service address | Cut short; hover for the full text |
| Value column | Table | Price of the service line, e.g. "$150.00" | Blank when none |
| Click a row | Table | Opens the job details dialog | — |
| Delete (outline button) | Actions column, each row | Opens Delete <service>? → Delete job removes the job and returns its service line to Unscheduled | The same question as the dialog's Delete. Keep the job backs out and changes nothing. The whole Actions column is only shown to the owner and managers. Can't be undone — drag the line onto the calendar again to recreate it. Refused or failed: a red "Job not deleted" message naming the reason, and the row stays |
Tab: Job Route
| Control | Where | What it does | Notes |
|---|---|---|---|
| Worker, Priority, Status, Store Location filters | Grey filter bar | Narrow the jobs on the map, the list, Optimize Route and SMS Route | Quick search from Schedule Jobs also applies |
| Print Dispatch List, Online Dispatch | Filter bar, right | Same as on Job List | Cover the whole range, not just the route day |
| Work Date picker (placeholder "Select date") | Route toolbar, left | Picks one day for the map and route | Default: your store's today, and back to it whenever you return to this tab. Must be inside the range loaded on Schedule Jobs / Job List, or no jobs appear. Clicking the chosen day again clears it: the map then shows the whole range and the route buttons are disabled |
| ‹ / › | Route toolbar | Previous / next day | Do nothing when no day is chosen |
| today | Route toolbar | Sets the route day to today | Your store's today, not your own clock's |
| Optimize Route (N) (route icon; N = jobs that day) | Route toolbar, right | Opens Google Maps in a new tab: driving directions starting at your store address, through each job's address. Google picks the order; when every job that day has a Sequence Number, your order is sent instead and Google keeps it | Disabled with no day or no jobs. Hover titles: "Select a date first to get directions", "No jobs found on selected date", "Open in Google Maps - you can enter your starting location and get directions to this job" (1 job), "Open in Google Maps - you can enter your starting location and get optimized routing to all job locations" (2 or more). Also disabled, with "No job on this date has an address to route to", when no job that day has an address or a pin. Starts from your current location when the store has no address. A job with no Service Address and no pin is left out of the route; "… left out of the directions" beside the job count says how many |
| SMS Route | Route toolbar, right | Opens Send Route via SMS | Disabled with no day or no jobs. Hover titles: "Select a date first", "No jobs found on selected date", "Send route link via SMS" |
| Badge "N locations" (navigation icon) | Route toolbar, far right | Number of pins on the map; "(geocoding...)" while addresses are looked up | Counts only jobs with a position: one without an address, or with an address Google can't find, is not counted. "0 locations" when the day has no jobs |
| "Tip: Map all job locations on Google Maps and open a shareable, optimized route. Start is the store address by default." | Under the toolbar | Info | Ends "…your current location by default." when the store has no address |
| "Showing N job(s) for …" | Under the tip | Number of jobs on the chosen day | Adds " - No jobs scheduled for this date" when there are none |
| "Loading map..." | Map area | Shown until Google Maps loads | Reload the page if it never finishes |
| Map | Map area | Numbered pins, zoom +/− and full screen | Centres and zooms on the pins it has; with no pins at all it centres on the store, and when the store's address can't be found either it opens zoomed out over the whole country, with an amber line above it: "We could not find your store's address on the map, so it opens zoomed out. Check it in Settings → Locations." (or "Your store has no address, so the map can't open on it. Add it in Settings → Locations."). Jobs it can't place are left out of that |
| Store pin S (amber) | Map | Click: popup "Store Location" + the store address; × closes | Only when the store address can be found |
| Job pin (numbered, status colour) | Map | Click: popup with 📋 job title, 🚩 priority, 📊 status (for example "In Progress" or "No Show"), 👤 Customer, 📞 Phone, ⏰ Time (date "at" time), ⚡ Duration, 📍 Location (or "No address"), 💰 Value, 🔢 Qty and View Full Details; × closes | Pin colours: Scheduled blue, In Progress green, Completed grey, Cancelled red, Rescheduled amber, No Show violet. A job whose address Google can't find gets no pin — it is named under the map instead |
| Amber note "N jobs could not be placed on the map" | Under the map | Lists each job it couldn't place, as customer + address (or "no service address"), and says to correct the job's Service Address. It also says they have no pin and no number here, that one that still has an address is passed to Optimize Route and SMS Route as it is written, and that one with no address is left out of them | Only when there is one. The first 5 are named and the rest counted ("…and N more.") |
| View Full Details | Job pin popup | Opens the job details dialog | — |
| "Today's Schedule" / "Schedule for …" list | Under the map | One row per job that day: number (matches the pin), status icon, service, customer, time, phone, address, priority badge and dot. Click a row to open the job | Only when the day has jobs. A job with no pin shows "–" instead of a number, with the hover "Not on the map — check this job's Service Address". The heading is "Today's Schedule" for the store's today and "Schedule for" the Work Date (e.g. "Schedule for Sep 26, 2026") on any other day. The order follows each job's Sequence Number, lowest first; jobs with no number come after them by their scheduled time |
Dialog: Job details — buttons and Overview tab
Opens from a calendar job, a Job List row, a map pin's View Full Details, a "Today's Schedule" row, or a dashboard Recent Activity link. The title is the job's status icon and service name, with "Work Order: …" under it. It opens read-only; Edit makes every tab editable. Any team member who can open the page can edit and complete jobs; Delete is the owner's and managers'.
Every field you save is shown back the next time you open the job, on all four tabs, and edit mode starts from those values. A field shows its empty text ("Not specified", "Not recorded", "Not rated" …) only when nothing has been recorded in it. The two clock fields — Actual Start and Actual End — and Completed At are shown in your store's local time.
Buttons:
| Control | Where | What it does | Notes |
|---|---|---|---|
| Edit (pencil icon) | Header, right | Switches to edit mode | Read mode only |
| Cancel (X icon) | Header, right | Throws away your edits and returns to read mode | Edit mode only. Nothing is saved |
| Save (disk icon; "Saving..." while working) | Header, right | Saves only the fields you changed, refreshes the calendar and closes the dialog. Closes without saving if nothing changed | Changing Worker, Date, Start/End Time or Duration runs the double-booking check (confirm; Cancel keeps you editing with "Failed to save changes: Scheduling conflict not confirmed"). Setting Status to Completed turns the save into a completion — see the Status row. Failure: "Failed to update job: …" then "Failed to save changes: …", and the dialog stays open |
| Tabs Overview, Timing, Customer, Completion | Under the header | Switch sections | Opens on Overview each time |
| Delete (red) | Footer, left | Opens Delete <service>? → Delete job removes the job, returns its service line to Unscheduled, refreshes the calendar and Step 1, and closes the dialog | Read and edit mode. Only shown to the owner and managers. Keep the job backs out. Refused or failed: "Failed to delete job: …" naming the reason, and the dialog stays open on the job, which is still there |
| "Saving changes..." (spinner) | Footer, right | Progress while saving | — |
| SMS (outline button) | Overview, next to Customer Phone | Opens Send SMS to the customer | Read mode only. Disabled only when the job has neither a phone of its own nor a linked customer — a job with no phone but a linked customer can still be texted on that customer's number |
| × (close), clicking outside, Esc | Dialog | Closes; unsaved edits are lost | — |
Overview tab — "Work Assignment Information":
| Field | Required | Default | Rules and error text |
|---|---|---|---|
| Service Name | No | The service name (jobs from an order) | Text, placeholder "Enter service name". Empty shows "Not specified". This is the job's own name, and it is what every screen shows: the dialog title, the calendar, the hover box, the Job List, the map popup, the printout, the dispatch link and the dashboard's Recent Activity. Clear it and the catalog service's name is shown instead. Renaming a job changes that job only, never the service in your catalog |
| Work Type | No | Empty | Free text, placeholder "e.g., REPAIR, MAINTENANCE, INSTALLATION". Shows "Not specified" when empty |
| Worker | No | Unassigned | Choose Unassigned or an active team member (placeholder "Select worker"). Inactive people aren't listed. Read mode shows the name or "Unassigned" |
| Priority | No | The order's Priority Level; Urgent when the order is marked Rush or Emergency; otherwise High over $5,000 and Normal below. The order's own Priority Level is set on the Others tab when it is created, or on the order window's Overview tab later | Emergency, Urgent, High, Normal, Low. Read mode shows a badge |
| Status | No | Scheduled | Scheduled, In Progress, Completed, Cancelled, Rescheduled, No Show. The read-mode badge uses the same words. Choosing Completed and saving completes the job: it records the completion time, who completed it and the Actual Duration (logged as time on the job), plus Completion Notes, Customer Rating, Customer Feedback and follow-up. A detail you don't touch keeps the value it already had, and every other change in the same save — worker, dates, priority, address, warranty, quality, Total Cost, resolution notes — is saved with it. A job that is already Completed can't be completed again: "Service assignment is already completed" |
| Sequence Number | No | Empty | Number, placeholder "Job order in schedule". Shows "Not set" when empty. Takes a whole number, 1 or more; anything else (2.5, 0, -1) shows "Use a whole number, 1 or more, or leave it blank" under the box and saves nothing, and a number past 2,147,483,647 shows "Use a whole number up to 2,147,483,647". Clearing the box saves it blank, leaving the job unnumbered again. It sets the stop order on Job Route: the pins, the numbered "Today's Schedule" list and the Optimize Route / SMS Route link all follow it, lowest number first, with unnumbered jobs after them by time. Only when every job that day is numbered is Google asked to keep your order instead of working out its own — one blank job anywhere in the day and Google picks the order. It does not reorder the calendar or the Job List |
| Customer Name | No | From the customer record | Placeholder "Enter customer name". Changes this job only, not the customer. Empty shows "Not specified" |
| Customer Phone | No | From the customer record | Placeholder "Enter phone number". Empty shows "Not specified" |
| Service Address | No | The customer's main address | Placeholder "Enter service address". Used for the map pin and route. Empty shows "Not specified" |
| Mark as Urgent | No | Off | Switch, edit mode only. Adds a red "Urgent" badge next to Status; doesn't change Priority |
| Can Reschedule | No | On | Switch, edit mode only. Off locks the job's Date, Start Time, End Time and Duration: no save changes them — not a drag, not this dialog, not a page opened before the switch went off — and the Timing tab says "Can Reschedule is off, on the Overview tab. Turn Can Reschedule on to change the date." To move the job, turn the switch on and change the date in the same save. There is no manager step: anyone who can edit the job can lift it. Everything else on the job, completing it included, saves as normal while it is off |
| Job Description | No | "Service for" + customer | Text box, placeholder "Enter job description". Empty shows "No description" |
Dialog: Job details — Timing, Customer and Completion tabs
Everything on these three tabs is shown back when you reopen a job, and edit mode starts from those values. Actual Start, Actual End and Completed At are stored as moments in time and shown in your store's local time; the rest are shown exactly as they were typed.
Timing tab — "Timing Information":
| Field | Required | Default | Rules and error text |
|---|---|---|---|
| Scheduled Times → Date | No | The day you dropped it on | Date. Changing it moves the job (double-booking check). While Can Reschedule is off, this and the three fields below cannot change unless the same save turns it on. Empty shows "Not set" |
| Start Time | No | The time you dropped it on | Time, shown 24-hour. Empty shows "Not set" |
| End Time | No | Start + length | Time. Not recalculated when you change Start Time or Duration here |
| Duration (minutes) | No | The service's estimated time | Number, steps of 15, placeholder "60". Shown as "N minutes". A whole number, 0 or more: a decimal or a number below 0 shows "Use a whole number, 0 or more" under the box and saves nothing, and a number past 2,147,483,647 shows "Use a whole number up to 2,147,483,647" |
| Actual Times → Actual Start | No | Empty | Time, shown 24-hour. Read as that time on the job's Date, in your store's time zone. Moving the job to another day carries the recorded times to the new day, whether or not you touch them in that save. Clear it and save to take it off, in any save — including one that also sets Status to Completed. A field you do not touch is left exactly as it was. Empty shows "Not recorded". A value that isn't a time is refused with "Actual Start must be a time like 14:30, not …" and nothing in the save is kept |
| Actual End | No | Empty | Same as Actual Start. An end earlier than the start is taken as the next morning, so an overnight job gets a positive length |
| Actual Duration (min) | No | Empty | Number. The time logged when the job is completed. Left empty, a duration recorded by an earlier save is kept; with none, the job's Duration is logged instead — including the Duration you change in the same save. Empty shows "Not recorded". A whole number, like Duration |
| Labour cost | — | — | Read-only: "$…" and "… h at the technician's hourly rate. The duration is the one entered when the job was completed." Only shown when Workforce is on for the store (Premium plan), you are the owner or a manager with See pay rates and dollar amounts, the job's worker has an hourly rate and time was logged. Otherwise the line is absent (never $0) |
| Travel & Buffer → Est. Travel (min) | No | Empty | Number. Shows "N min" or "N/A min". A whole number, like Duration |
| Actual Travel (min) | No | Empty | Number. Shows "N min" or "N/A min". A whole number, like Duration |
| Distance (km) | No | Empty | Number, one decimal. Shows "N km" or "N/A km". 0 or more: a number below 0 shows "Use a number, 0 or more" under the box and saves nothing |
| Buffer Time (min) | No | Empty | Number. Shows "N min" or "N/A min". A whole number, like Duration |
| Cost Information → Labor Rate ($/hour) | No | Empty | Typed by hand; separate from the worker's pay rate. Shows "$N/hour" or "Not set". 0 or more, like Distance |
| Total Cost | No | Empty | Typed by hand; not calculated. Shows "$N" or "Not calculated". 0 or more, like Distance. Kept by a completing save, so the Services Report shows it for a job completed in one go |
Customer tab — "Customer Information":
| Field | Required | Default | Rules and error text |
|---|---|---|---|
| Customer Present | No | Off | Switch. Read mode shows "Yes" or "No" |
| Customer Rating (1-5) | No | Empty | Number 1 to 5. Shows "N/5 ⭐" or "Not rated". A decimal such as 4.5, or a number outside 1 to 5, shows "Use a whole number from 1 to 5" under the box and saves nothing. Kept whether it was entered in the completing save or an earlier one, and cleared by emptying it and saving — in any save, including the one that completes the job |
| Customer Feedback | No | Empty | Text box, placeholder "Customer comments and feedback". Shows "No feedback provided" when empty. Kept the same way |
Completion tab — "Completion Information":
| Field | Required | Default | Rules and error text |
|---|---|---|---|
| Quality & Inspection → Quality Rating (1-5) | No | Empty | Number 1 to 5, decimals allowed (4.5). Shows "N/5 ⭐" or "Not rated". A number outside 1 to 5, such as 7.5 or -1, shows "Use a number from 1 to 5" under the box and saves nothing; emptying the box clears the rating. Saved in a completing save too |
| Inspection Required | No | Off | Switch. Shows "Yes" or "No". Saved in a completing save too |
| Inspected By | No | Empty | Text. Shows "Not inspected" when empty. Saved in a completing save too |
| Follow-up & Warranty → Follow-up Required | No | Off | Switch. Shows "Yes" or "No". Saved with a completion |
| Follow-up Date | No | Empty | Date. Shows the day, or "Not set" when empty. Saved with a completion |
| Warranty (days) | No | Empty | Number. Shows "N days" or "No warranty". Saved in a completing save too. A whole number, like Duration |
| Completion Details → Completion Notes | No | Empty | Text box, placeholder "Notes about work completion". Shows "No completion notes". Saved with a completion |
| Resolution Notes | No | Empty | Text box, placeholder "How problems were resolved". Shows "No resolution notes". Saved in a completing save too |
| Completed By | No | The person already recorded; otherwise the job's Worker; otherwise you | A list of the store's active team members, like Worker (placeholder "Select person"). The save that completes the job records the person the list shows; any other save changes Completed By only when you pick someone. Read mode shows the person's name, "Former user" for someone who is no longer an active team member, and "Not completed" when nothing is recorded. A name that was typed in rather than picked from the list still shows as typed, greyed out in the list: it is kept until someone picks a person or the job is completed, and it can't be picked again |
| Completed At | No | Empty | Date and time, in your store's time zone. Shows "Not completed" when empty. Completing a job sets it to the moment of completion, whatever you type here; on a job that is already completed, what you type is saved |
Dialog: Send SMS (text the customer from a job)
| Control | Where | What it does | Notes |
|---|---|---|---|
| Title "Send SMS", "To:" + the customer's phone | Header | Display | Opened by SMS in the job details dialog. When the job has no phone but is linked to a customer it reads "the number on <name>'s record"; "No phone available" when there is neither |
| Message box (placeholder "Type your message...") | Body | Your text. Helper: "Plain text only. Carrier rates may apply." | — |
| Start a new conversation (switch) | Body, under the message | On: closes the customer's current text conversation and sends this text in a new one. The closed conversation keeps its messages in Messages | Off every time the dialog opens. Turn it on when a send is refused because the customer's number is held by another conversation |
| Cancel | Footer | Closes without sending | Your text stays if you reopen it |
| Send | Footer | Texts the customer from your store's texting number, in their existing Messages conversation if there is one. Success: the "Message sent" toast, and the dialog closes and clears | Disabled until you type something. The number used is the job's own Customer Phone; when the job has none, the linked customer's mobile, then main, then business number. Needs Pro or Premium and a connected texting number, and a customer not opted in to texts brings up Confirm SMS consent. Every refusal is shown as a "Message not sent" toast naming the reason — no phone anywhere, no texting number, texting not set up, the monthly allowance used up, or a number held by another conversation. See Messages you may see |
| × / clicking outside | Dialog | Closes | — |
Dialog: Confirm SMS consent
| Control | Where | What it does | Notes |
|---|---|---|---|
| Title "Confirm SMS consent"; "This customer isn’t marked as opted in to SMS."; note "Only continue if this customer has agreed to receive text messages from you. Confirming sends this message and, once it has gone out, records their SMS opt-in. If they previously texted STOP, the carrier will still block delivery until they text START." | Dialog | Display | Appears when you text a customer who isn't opted in |
| Cancel | Footer | Closes; nothing is sent | Disabled while sending |
| Confirm opt-in & send ("Sending…" while working) | Footer | Sends the message, then marks the customer as opted in to texts | Only confirm if the customer agreed to texts. The opt-in is only recorded once the text has actually gone out; a refused send leaves it as it was |
Dialog: Send Dispatch Link
Opens after Online Dispatch has created the link. The texts go out from your store's texting number, one per recipient.
| Control | Where | What it does | Notes |
|---|---|---|---|
| Title "Send Dispatch Link" (send icon), "Send the dispatch list link to your team members via SMS" | Header | Display | — |
| Message box | Body | Optional custom text. The placeholder shows the default: store name + "Dispatch List for" + the date range + ". View your assignments here:" + the link | "Leave empty for the default message. Whatever you write, the dispatch link is added at the end if it isn't already in your text." Paste the link in yourself and it stays where you put it; a link kept from an earlier Online Dispatch is replaced by the current one |
| "This is what each person receives:" box | Under the Message box | The finished text, link included | Updates as you type, so you can see the link is in it before sending |
| "Recipients (N selected)" | Body | Counts ticked recipients whose phone has at least 10 digits | — |
| Team member row: tick box, name, phone box (placeholder "Enter phone number") | Recipients list | Tick to include. The phone is filled from the person's mobile or business phone; you can change it here for this send only | The tick box is disabled until the phone has at least 10 digits. Lists every active team member. Nobody is ticked at first |
| Trash icon (red) | Rows you added by hand | Removes that recipient | Not on team member rows |
| "Name (optional)" (placeholder "Team member name") | Add row | Name for a one-off recipient | Blank → "Phone" + last 4 digits |
| "Phone Number" (placeholder "+1 (555) 123-4567") | Add row | Phone for a one-off recipient. Enter adds it | — |
| Plus icon | Add row, right | Adds the one-off recipient, already ticked | Disabled while the phone box is empty. Fewer than 10 digits → "Please enter a valid phone number" |
| "Add team members above to send the dispatch link" | Recipients area | Shown when there are no recipients | — |
| "Dispatch Link:" box | Body | The full link | Works for 7 days |
| Preview (external-link icon) | Footer, left | Opens the link in a new tab | — |
| Cancel | Footer | Closes | A message you typed and your ticks are kept for next time. Each Online Dispatch makes a new link, and a typed message carrying the old one has it swapped for the new one |
| Send to N recipient(s) (send icon; "Sending..." with spinner) | Footer, right | Texts the message to every ticked recipient and shows the result | Disabled while sending or with no valid recipient. Needs Pro or Premium; each text counts against your monthly allowance. Needs texting set up for your store (Settings → SMS) |
| Result: green tick "Messages Sent!", amber "Some texts did not go out", or red X "Nothing was sent"; "N sent, N failed"; red error lines | Body | Outcome | The heading and the counts follow what the send produced. Failures are named underneath ("Failed to send to …: …"). "Nothing was sent" adds "Nobody received the dispatch link. Check the reasons below, fix the numbers or your texting setup, then send again." |
| Close | Result footer | Closes; next time the dialog opens on the form again | Your message and ticks are kept |
| × / clicking outside | Dialog | Closes | Same as Cancel |
Dialog: Send Route via SMS
Opened by SMS Route on Job Route. Sends the Google Maps route for the chosen day.
| Control | Where | What it does | Notes |
|---|---|---|---|
| Title "Send Route via SMS" | Header | Display | — |
| Send to staff (placeholder "Choose a staff member") | Body, left | Pick a team member; their phone digits fill the phone box | Options read "Name - phone" or "Name (no phone)". People with fewer than 10 phone digits can't be picked |
| Or enter phone (placeholder "e.g., +1 555 123 4567") | Body, right | Type any number | Typing clears the staff choice |
| 'We will send a message like: "This is the service route for … ..."' | Body | Preview. The full text is "This is the service route for" + date + ". Open the directions here:" + the Google Maps link | — |
| "To: … (…) | Start a new conversation: On/Off" | Body | Exactly where the text will go | A 10-digit number gets +1 (US) |
| Cancel | Footer | Closes | Disabled while sending |
| Send SMS ("Sending…") | Footer | Sends the route link through Messages. Success toast "Route sent" / "SMS sent successfully.", the dialog closes and resets | Disabled while sending, or with no staff member or phone. Needs Pro or Premium. Failure toast "Send failed" + the reason, e.g. "This customer isn’t opted in to SMS." (no consent prompt here), "Business phone not configured", "Messaging is not configured for your organization" or "No phone number or message was given." |
| Start a new conversation tick box | Under the footer | Closes the current text conversation with that number and starts a new one with this text. The closed conversation keeps its messages in Messages | Off every time the dialog opens, including after a send that failed. If the old conversation can't be closed, nothing is sent |
| × / clicking outside | Dialog | Closes without sending | Your staff choice and phone stay until a send succeeds |
Printout: Work Schedule Report
Printed by Step 3 · Print Dispatch or Print Dispatch List. Only the report prints; the rest of the app is hidden.
| Part | What it shows | Notes |
|---|---|---|
| Header | "Work Schedule Report", store name, "Location:" + your main location, "Generated on:" date "at" time, "Showing assignments for" the range (or "from" / "up to" a date when only one end is set) + total | — |
| Day sections | Weekday and date + "(N jobs)", jobs in time order | Cancelled and no-show jobs are left off, and are not counted here or in the header total |
| Each job | Customer, service, time "(N min) • Order #" work order, priority ("🚨 EMERGENCY", "⚡ URGENT", "🔴 HIGH", "🟡 NORMAL", "🟢 LOW"), status, Phone, Address, Work (description), Value, "Assigned Worker:" name or Unassigned (a person no longer active is still named) | Every job in the range except cancelled and no-show jobs — filters and Quick search are ignored |
| Empty text | "No work assignments scheduled for 9/20/2026 to 9/27/2026." — the range you picked | When the range has no jobs. "No upcoming work assignments scheduled for the next 7 days." only when no range is set |
Sub-page: Dispatch list link (what your team sees)
| Part | What it shows | Notes |
|---|---|---|
| Opening it | The link from Send Dispatch Link (or Preview) | No sign-in needed. Works for 7 days. Shows live data each time it's opened, not a snapshot. Each link is tied to one store and one date range: an address that was edited or cut short shows the error page instead |
| Header | Store name and logo, main location, "Dispatch List" and the date range | The dates shown are the ones the list actually covers |
| Counters | "Total Jobs", "Scheduled", "In Progress", "Completed" | — |
| Jobs, grouped by day | Customer, service, priority and status badges, time (or "TBD") and length, "Assigned To", phone (tap to call), address (tap to open Google Maps), "Work Order" (#…), "Value", "Notes" | Every worker's jobs in the range, not one person's — scheduled, in progress, rescheduled and completed. Cancelled and no-show jobs are left out, as on the printout. "Assigned To" shows the person's name ("Technician" + 4 characters for someone no longer in your team list). Stops at 500 jobs, with a line saying so |
| Footer | Store phone (tap to call), email, address (tap for Google Maps) and when the page was generated | Lines without a value are left out |
| "No Jobs Scheduled" / "There are no jobs scheduled for the selected date range." | Nothing is booked in the days the link covers | Choose different dates on the Schedule and make a new link |
| "Dispatch List Error" / "Unable to load dispatch list. The link may be invalid or expired. Ask your dispatcher for a new one." | Expired (over 7 days), cut short, or an address that was edited after it was sent | Nothing technical is shown with the message. Create a new link with Online Dispatch. If a brand-new link shows this, contact support |
Messages you may see
| Message | When it appears | What to do |
|---|---|---|
| "Loading job scheduling with real data..." | Page loading | Wait |
| "Couldn't open scheduling: …" (with Retry and Go to Login) | Your store could not be worked out — usually a passing connection problem | Click Retry. The red line gives the reason. If it keeps happening, sign out and in |
| "Authentication required" / "Please log in to access job scheduling" | No session was found | Sign in again with Go to Login |
| "Couldn't load the jobs: …" (banner, with Try again) | The job list failed to read. Everything else on the page still works | Click Try again. The jobs on screen may be from an earlier read until it succeeds |
| "User has no organization assigned. Ask the store owner to add you to the store." | Your account isn't attached to a store | The owner adds you to the store |
| "Loading service requests..." | Step 1 loading | Wait |
| "No service requests" / "No service requests found for selected date range" | No orders with service lines in the Order Date range | Move Order Date From back (default is only 15 days). Check the order isn't a quote, Cancelled or Refunded, and has a service line |
| "Creating assignment..." (yellow placeholder) | Right after dropping a service line | Wait about 2 seconds |
| "Job created, but the order item could not be flagged as scheduled — it may still appear in Service Requests. Please refresh." | The job was made but its service line wasn't marked as scheduled (rare) | Click the Step 1 refresh icon. Don't drag the line again, or you'll get a second job |
| "Job not created" with the reason | A drop failed | Read the reason and drag it again |
| "Job not created — That service line could not be read — refresh the panel and try again." | The dragged line could not be matched to an order, usually because Step 1 is out of date | Click the Step 1 refresh icon and drag it again |
| "Click any day to select the entire week" | Work Week picker footer | — |
| "… already has "…" …–… that day. Schedule anyway?" ("This worker" when the name is unknown) | Moving a job, or saving a changed worker, date, time or duration, onto a time that overlaps another Scheduled, In Progress or Rescheduled job of the same worker that day | OK saves anyway. Cancel puts the job back (or keeps the dialog open). Only jobs loaded for the current range are checked |
| "No jobs scheduled for the selected filters" | Job List empty | Clear filters and Quick search, or change the range |
| "Failed to update job: …" | Moving, resizing or saving a job failed | Read the reason. When it names a field — "Actual Start must be a time like 14:30, not …" — put that field right and save again. "Actual Start needs the job's date. Reopen the job and try again." means the job on screen is out of date |
| "Failed to save changes: …" | Follows the message above when saving the dialog | Same |
| "Failed to save changes: Scheduling conflict not confirmed" | You clicked Cancel on the double-booking question while saving | Pick another time or worker, or save again and click OK |
| "This job is set not to be rescheduled" — "Turn Can Reschedule on to change the date." (red message) | Saving the job details dialog changed the date, time or duration of a job whose Can Reschedule is off — including when it was switched off after you opened the page. Nothing in that save is kept | The dialog stays in edit mode, and Can Reschedule now shows off even if it read on when you opened the job. Turn it on (Overview tab) and save again, or put the date back |
| "Delete <service>?" with the customer and the day, then "The job comes off the calendar, with everything recorded on it." / "Its service line goes back to Unscheduled in Step 1…" / "This cannot be undone." | Delete, in the job details dialog or on a Job List row | Delete job removes it; Keep the job changes nothing |
| "Failed to delete job: …" | A delete from the job details dialog was refused or failed | Read the reason. The dialog stays open and the job is still there |
| "Job not deleted" (red message) | A delete from a Job List row was refused or failed | Same reason text, and the row stays |
| "This job was not deleted. Deleting is limited to managers and the store owner, and it may also have been removed by someone else already. Reload the page to see what is there now." | The store's records refused the delete, or the job had already gone | Ask a manager or the owner to remove it — or reload, in case it is already gone |
| "Dispatch link not created" — "Organization not found. Please try again." (red message) | Online Dispatch clicked before the page finished loading | Wait a moment and click again |
| "Dispatch link not created" — "Unauthorized" / "No organization for this user" (red message) | Creating the dispatch link failed — your session or store wasn't recognised | Sign in again |
| "Dispatch link not created" — "Mint failed" / "Failed to create link" / "Failed to generate dispatch link" (or a server set-up message) (red message) | Creating the dispatch link failed on our side | Contact support |
| "Generating..." | Online Dispatch creating the link | Wait |
| "Please enter a valid phone number" | Adding a one-off recipient with fewer than 10 digits | Enter the full number |
| "Please select at least one recipient with a valid phone number" | Sending with no ticked recipient that has a 10-digit phone (normally the send button is disabled instead) | Tick someone with a full phone number |
| "Messages Sent!" / "Some texts did not go out" / "Nothing was sent", "N sent, N failed", "Failed to send to …: …" | Dispatch send result | "Messages Sent!" only when every text went out; otherwise read the named lines |
| "Failed to send SMS" | Red line on the dispatch result when the send failed without a reason | Try again; contact support if it repeats |
| "Messaging is not configured for your organization. Contact UpChannels support to set up texting." / "From number … is not owned by this account." | Dispatch send: texting isn't fully set up | Ask UpChannels to connect your texting number (the Contact Sales form on SMS Campaigns Setup) |
| "Failed to send dispatch SMS" | Dispatch send failed unexpectedly | Try again; contact support if it repeats |
| "Upgrade required" — "Your plan does not include SMS. Upgrade to Pro or Premium to send messages." + Upgrade | Any text from this page on the Basic plan | Upgrade opens Billing |
| "Upgrade required" — "Your subscription is inactive or your trial has expired. Update billing to send SMS." + Upgrade | Texting with an inactive subscription or expired trial | Update billing (Upgrade opens Billing) |
| "Upgrade required" — "No active subscription. Subscribe to Pro or Premium to send SMS." + Upgrade | Texting with no subscription | Subscribe (Upgrade opens Billing) |
| "Upgrade required" — "Monthly SMS limit reached (…/…). Upgrade your plan or wait for the next billing cycle to send more." + Upgrade | This month's texts are used up (Pro 500, Premium 2,000, plus any credits bought) | Upgrade, buy more credits, or wait for the next billing cycle |
| "Message sent" | Customer text from a job sent | — |
| "Message not sent" + "This job has no customer phone number. Add one on the job, or text the customer from Customers." | Job text where neither the job nor the linked customer record holds a number | Add a phone on the job, or to the customer in Customers |
| "Message not sent" + "Business phone not configured" / "Messaging is not configured for your organization" | Job text before the store's texting number is connected | See SMS Campaigns Setup |
| "Failed to send message" | Only when the browser could not reach the app at all — every refusal from the app itself names its own reason | Check your connection and try again |
| "Couldn't add this customer to this conversation, so nothing was sent. Their number is still held by another conversation. Use 'Start a new conversation' on the customer to move them over." | A job or route text where the customer's number is tied to a different conversation. Nothing was sent | Tick Start a new conversation (route text) or turn on its switch (job text) and send again. Their earlier messages stay in Messages. This is not a texting-setup problem |
| "This conversation can't reach the customer, so nothing was sent. Open their newest conversation, or use 'Start a new conversation' on the customer." | The conversation no longer holds the customer, and the app could not tell why. Nothing was sent | Try once more first — a brief problem at the texting service shows the same thing. If it repeats, tick Start a new conversation (route text) or turn on its switch (job text) and send again |
| "Couldn't close the current conversation with this customer, so nothing was sent. Try again." or "Couldn't start a new conversation with this customer, so nothing was sent. Try again." | A job or route text with Start a new conversation on, where the texting service couldn't close the old conversation or open the new one. Nothing was sent and the old conversation is unchanged | Try again, or turn the switch off |
| "Couldn't add this customer to the new conversation, so nothing was sent. The earlier conversation is closed and its messages stay in Messages. Try again." | A job or route text with Start a new conversation on. The old conversation was closed, but the customer couldn't be added to the new one. Nothing was sent | Try again with the switch on. The earlier messages stay in Messages |
| "Confirm SMS consent" | Texting a customer who isn't opted in | Confirm only if they agreed to texts |
| "Route sent" / "SMS sent successfully." | Route text sent | — |
| "Send failed" + reason (e.g. "This customer isn’t opted in to SMS.") or "Please try again." | Route text failed | For an opted-out number, use another number; otherwise check texting setup |
| "Select a date first to get directions" / "Select a date first" / "No jobs found on selected date" / "Send route link via SMS" / "Open in Google Maps - …" | Hover titles on Optimize Route and SMS Route | Pick a day with jobs, inside the loaded week |
| "Showing N job(s) for … - No jobs scheduled for this date" | Route day with no jobs | Pick another day, or move the week on Schedule Jobs / Job List first |
| "N locations (geocoding...)" | Map looking up addresses | Wait |
| "Loading map..." | Google Maps loading | Wait, or reload |
| "Store Location" | Store pin popup | — |
| "No address" | Map popup for a job with no address | Add a Service Address in the job |
| "Dispatch List Error" / "Unable to load dispatch list. The link may be invalid or expired." | Opening an expired or broken dispatch link | Create a new link with Online Dispatch |
| "No Jobs Scheduled" / "There are no jobs scheduled for the selected date range." | Dispatch link page with no jobs at all | — |
Who can use what
| Capability | Who |
|---|---|
| Open Scheduling & Dispatch; create jobs by dragging; move, resize, edit, complete jobs; print; create dispatch links | Any signed-in team member of the store who has Schedule in their sidebar menu. There's no owner, manager or staff check on these, and no plan tier or add-on for the page itself. The demo copy opens either way |
| Delete a job (in the job details dialog and on a Job List row) | The owner, and anyone with the Manager role. Everyone else doesn't see the button, and the store's records are protected even if they reach it another way: the attempt is refused and says so. Staff can still edit and complete jobs |
| Team Management (Settings → Users) | The button shows for everyone; the page it opens is for the owner or the store's only active member (people switched off or removed in Team don't count). Anyone else is sent to their Shortcuts page. Changing someone else there — their details, their Active switch or their Role — takes owner level (the Owner switch or the owner role); Create User, the Field Worker switch, pay rates, the employee code and a new password are for the Owner switch alone. Your own details you can always edit |
| Labour cost line in the job details dialog | Stores with Workforce on (Premium plan), for the owner and managers with See pay rates and dollar amounts. Hidden for everyone else |
| Customer SMS, Send Dispatch Link, SMS Route | Stores on Pro or Premium (a free trial counts) with an active subscription, texts left this month, and a connected texting number. Customer SMS also needs a phone on the job or on the linked customer record |
| Delivery chips on the calendar | Stores with Delivery & Routes switched on (it's on unless the owner turns it off) |
| Being picked as a Worker | Active team members of the store (up to 100), plus field workers rostered today. Inactive people are hidden in the job's Worker list |
Demo mode (/schedule/demo)
- Open it: Demo (Play icon, amber) at the top right of Scheduling & Dispatch.
- Header: "Scheduling & Dispatch — Demo" / "Sample schedule populated with demo data. All actions are disabled."
- Banner: "Demo mode — schedule is populated with sample data. All actions are disabled." with Take a Tour, which restarts the tour from step 1.
- Tour: starts by itself the first time you open the demo. Each step switches to its tab first; a step whose target isn't on screen is skipped.
- Tour controls: dots and "N of 8"; Back (not on step 1); Skip ends the tour; Next / Got it! on the last step; clicking the dark backdrop ends it. Keys: → or Enter next, ← back, Esc ends.
- Still works: the three tabs, Exit Demo Mode, Take a Tour and the tour controls.
- Disabled: everything inside the tabs — Step 1 refresh, Order Date pickers and dragging, Print Dispatch, Online Dispatch, Work Week and Work Date pickers, ‹ › today, Quick search, all filters, clicking, dragging or resizing jobs, hover boxes, Job List rows and Delete, the route buttons and the map. No dialogs open.
- Sample data: jobs for this Sunday–Saturday week matched to your industry, 4 sample workers (Marco Rivera, Sarah Chen, James Wilson, Ana Morales), 2 locations (Main Store, Warehouse), 3 sample service requests, addresses around Dallas–Fort Worth.
- Leave: Exit Demo Mode (top right) returns to the live page.
| # | Tab | Tour step | What it points at |
|---|---|---|---|
| 1 | Schedule Jobs | View Tabs — "Switch between three views: Schedule Jobs shows the calendar with drag-and-drop scheduling, Job List lays every job out as a table, and Job Route plots locations on a map. This tour walks through each one." | The tab bar |
| 2 | Schedule Jobs | Service Requests Panel — "Pending service orders from sales appear here. Drag an item onto the calendar to schedule it — that is how a job is booked from this panel." | Step 1 panel |
| 3 | Schedule Jobs | Calendar Filters — "Filter the calendar by worker, priority level, job status, or store location to focus on specific technicians or urgent jobs." | Worker, Priority, Status and Location filters |
| 4 | Schedule Jobs | Calendar View — "The main scheduling calendar. Drag a job to move it, click one to open its details, and drop a service request here to book a new job. A job whose Can Reschedule switch is off stays where it is." | Step 2 calendar |
| 5 | Job List | Dispatch Actions — "Print a dispatch list, or generate a shareable online dispatch link your technicians can open in the field. Both cover the dates showing, not just one day." | Print Dispatch List and Online Dispatch |
| 6 | Job List | Job List — "Every assignment in one table — customer, service, technician, schedule, and status — in date and time order. The headings do not sort; the filters above narrow what it shows." | The jobs table |
| 7 | Job Route | Route Toolbar — "Pick a work date, open the day’s route in Google Maps, and text that same map link straight to a chosen technician. Number the jobs with Sequence Number and the route follows your order." | Work Date, Optimize Route, SMS Route |
| 8 | Job Route | Job Route Map — "All of the day’s jobs plotted on a Google Map, color-coded by status with the store as the starting point — followed by the ordered route schedule below." | The map area |
Differences from the live page:
- Header has only Exit Demo Mode (no Demo or Team Management).
- Step 1 shows 3 sample orders regardless of Order Date. No delivery chips, no hover boxes, no job details dialog.
- Job Route shows all of the week's sample jobs at once ("Showing N job(s) for the current week"), the Work Date is fixed to today, there's an extra "Send route to staff" picker beside SMS Route, the list below the map is headed "Route Schedule" (with dates, not clickable) and pins have no popups.
Common questions
How do I create a new job? Drag a service line from Step 1 (Service Requests) onto a day and time on the calendar. That's the only way — there's no "new job" button, and a job can't be made without an order that has a service line.
I dropped a job but nobody is assigned. How do I assign a worker? New jobs always start Unassigned. Click the job → Edit → Worker → pick the person → Save. The list shows the store's active team members; the owner turns a person active in Team Management, and adding someone new is the owner's too.
I renamed a job. Where does the new name show? Everywhere. Service Name in the job details dialog is the job's own name, and every screen shows it: the dialog, the calendar and its hover box, the Job List, the map popup, the printout, the dispatch link and the dashboard's Recent Activity. Clear the field and the catalog service's name comes back. Renaming a job never touches the service in your catalog, so other jobs of that service keep their own names.
Why isn't my order in the Service Requests panel? The panel only shows orders created in the Order Date range, which starts at the last 15 days and resets whenever you come back to the tab. Move From back. Quotes, Cancelled and Refunded orders never show, and only service lines appear. A quote's services arrive here as soon as you accept the quote and it becomes a sale.
Can I print or send just one worker's jobs? The printout and the dispatch link always include every job in the range (except cancelled and no-show jobs), whatever the filters say. To send one worker their day, go to Job Route, pick the day, choose the worker in the Worker filter, then SMS Route (or Optimize Route to open it yourself).
Does completing a job keep my other changes? Yes. One save is one change: the completion details and everything else you edited — worker, dates, priority, address, warranty, quality, Total Cost, resolution notes — are saved together, or, if the save is refused, none of them is. Details you didn't touch keep the values they already had, so notes, ratings and follow-up typed earlier stay. Reopen the job and every one of them is there.
How do I record when the work actually started and finished? Open the job, click Edit, and fill in Actual Start and Actual End on the Timing tab as clock times (for example 14:30 and 16:45). They belong to the job's own Date and are read in your store's time zone, so a job at 2 pm is 2 pm where the work happens. An end earlier than the start is taken as the next morning, and moving the job to another day carries the times with it. The Services Report's on-time figure is worked out from completed jobs that have an Actual Start; with none recorded it reads 0.0%. Clear a field and save to take the time off again — the save that completes the job can do it too, and a time you do not touch is left exactly as it was.
Why is the Job Route map empty, or a job missing from it? Job Route only shows jobs on the chosen Work Date, and only if that day is inside the week loaded on Schedule Jobs or Job List — move the week there first, then pick the day. A job with no Service Address, or with one Google can't find, gets no pin at all: look for it in the amber note under the map and fix its Service Address in its details dialog.
Why does the dispatch link show "Technician" and some letters instead of a name? The shared dispatch page names the person each job is assigned to. It falls back to "Technician" plus the last 4 characters of their account only when that person is no longer in your team list. Reassign the job and send a new link.