Get Started Overview
Get Started takes a new store from zero to its first sale. It has three tabs:
- Step 1. Knowing Basics: a two-minute lesson on how the app fits together.
- Step 2. Profile Setting: the owner's setup wizard.
- Step 3. Prepare to Sell: a checklist that ticks itself off as you go.
To get there, use Shortcuts → Get Started, which opens Step 3, or the owner's setup reminder Finish store profile, which opens Step 2.
An unfinished setup never locks you out of the app. Until the store rings up its first sale, quote, return or scrap order, the owner sees a one-line setup reminder that names the next step. It appears on other pages, not on Get Started itself. On this page, only an owner can use Step 2. Two Step 3 cards also show Locked until the store has a location, a tax rate, and stock or a service to sell — Order Management is not one of them, and opens on any store.
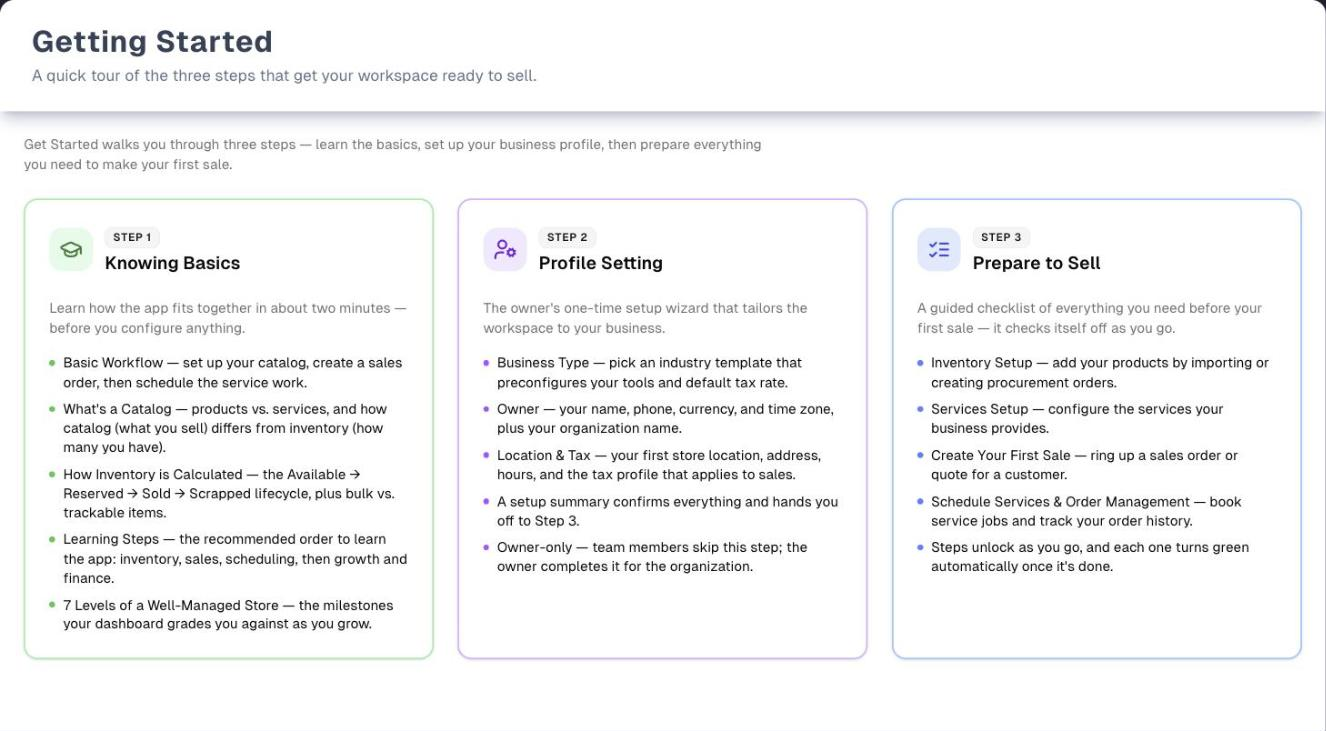
The picture comes from the Get Started demo, which sums up each tab on one card. The real page shows the three tabs.
Onboarding
The owner’s 3-step setup wizard
- Business Type
- Owner & organization
- Location & sales tax
Prepare to Sell
Guided go-live checklist
- Two steps, auto-tracked
- Second step unlocks as you progress
- Inventory & services → first sale
Shortcuts
One-click feature launchpad
- Where you land after signing in
- Grouped much like your sidebar
- Search every card
Dashboard
Your business at a glance
- Store score across 7 levels
- Each key figure links to its page
- 30-day KPIs & recent activity
The three tabs
| Tab | What it's for | Who can use it |
|---|---|---|
| Step 1. Knowing Basics (opens first) | Five short concept cards: the basic workflow, what the catalog is, how inventory is counted, the order to learn the app, and the 7 levels your dashboard grades | Everyone |
| Step 2. Profile Setting | The setup wizard: Business Type → Owner → Location & Tax. See Onboarding | Owner only. Everyone else sees "Owner Access Required" |
| Step 3. Prepare to Sell | A two-step checklist, Inventory & Services then Start Selling & Servicing, that ticks itself off from your store's data. See Prepare to Sell | Everyone |
Each tab has its own web address, so a link can open straight on it. Switching tabs saves nothing to your store. The wizard in Step 2 saves to your store only when you press Complete Setup, but while you are still finishing setup it keeps what you have typed in this browser tab, so switching to another Get Started tab — or reloading — brings it back on the step you left it on. Closing the browser tab clears it. Once setup is complete that no longer applies: Edit Setup always opens on the values your store has saved, so a change made there survives a tab switch but not a reload.
Step 1. Knowing Basics
Each of the five cards ends with OK, I got it. Press it to mark that concept as understood. The progress bar moves on ("… of 5 concepts") and the page scrolls to the next card. Once all five are done, "You know the basics!" appears with Continue to Step 2. Profile Setting.
| Concept | What it teaches |
|---|---|
| 1. Basic Workflow | Set up Inventory & Catalog → Create Sales Order → Schedule Services |
| 2. What's Catalog | The catalog is what you can sell: products and services. Inventory is how many products you have. Services have no stock. You book them on the calendar instead |
| 3. How Inventory is Calculated | Items move Available → Reserved → Sold, and Scrapped means written off. Bulk items are counted as one quantity, and each trackable item has its own serial number. Available = Tracked Items + Bulk Items Quantity |
| 4. Learning Steps | The order to learn the app: inventory and catalog, then sales orders, schedules and Growth, with Finance last (optional) |
| 5. 7 Levels of a Well-Managed Store | Operational, Organized, Dependable, Informed, Sustainable, Connected and Intelligent: the levels the Dashboard grades |
- Your ticks are saved on your account, for you alone: they follow you to every browser and device, and someone else signing in on the same computer has their own. Ticks this browser kept from before are moved to your account the first time you open Step 1. Nothing else in the app depends on them.
- Review again appears once all five are done and clears every tick.
- English / Español / 中文 at the top right changes this tab's text only.
Quick start path
1. Step 1. Knowing Basics (about two minutes, anyone)
   → 2. Step 2. Profile Setting (owner: business type, owner details, location & sales tax)
   → 3. Step 3. Prepare to Sell: add products (Procurement → Import) or a service
   → 4. Ring up your first sale or quote
   → 5. Schedule service work, then explore Growth and Finance
Pages in this section
- OnboardingThe owner sets up the business profile in three guided steps.
- Prepare to SellTwo-step go-live checklist: inventory & services, then your first sale.
- ShortcutsThe page you land on after signing in: cards for every feature, grouped much like your sidebar, with search.
- Quick FactsHow this week is going and what needs doing today, at the top of Shortcuts and on a page of its own.
- DashboardYour store’s score across seven levels, key figures, 30-day KPIs and recent activity.
- Demo modeTry a page with a guided tour before you use it for real.
Demo tours
The amber Demo button (Play icon) at the right of the Get Started header opens a read-only overview. It shows one card for each tab, and a four-step guided tour starts by itself the first time. There's no sample data, and nothing you do there changes your account. Press Take a Tour in the amber banner to replay the tour. Exit Demo Mode takes you back to Get Started, on the tab you opened the demo from.
Many other pages have a Demo button too, usually with sample data and a tour. Messages, Profit & Loss and the Assets & Liabilities report are a few examples. See Demo mode.
Tips
- To send a teammate to a particular tab, open that tab and share the page address.
- Team members can skip Step 2. The owner completes it once for the whole store.
- Owners: nothing reaches your store until Complete Setup, but a half-filled wizard is held in this browser tab, so you can look at another tab and come back to it.
- Concept 3's formula explains most stock counts that look wrong: Available is always the tracked units plus the bulk quantity.
Troubleshooting
| Problem | Why | What to do |
|---|---|---|
| Step 2 shows "Owner Access Required" | Only owners can use the wizard: the Owner switch on, or the owner role. A manager role isn't enough | Ask the owner to complete it, or to turn on your Owner switch in Team |
| Step 2 shows "We couldn't check your access" | The check couldn't reach your account details. It tries twice more on its own before saying so | Click Try again. If it keeps happening, reload the page and contact Support |
| My Knowing Basics ticks are gone, or show 0 of 5 on another device | You pressed Review again, or they could not be read: a red message says "Couldn't load your progress from your account. Refresh the page to try again." | Refresh the page. If they're still gone, press OK, I got it again. Nothing else depends on these ticks |
| "Your progress wasn't saved to your account. Check your connection and try again." | A tick (or Review again) couldn't be saved. The tick stays on screen but won't be there next time | Check your connection and press it again |
| I can't untick a concept | There's no undo on a single card | Finish all five, then press Review again to clear them all |
| What I typed in the wizard disappeared | A half-filled wizard is held in the browser tab you typed it in. Closing that tab, using a different browser or another device, or a private window all start it empty | Fill it in and press Complete Setup to save it to your store |
| Back in the browser leaves Get Started | Switching tabs doesn't add a step to your browser history | Use the tab bar to move between tabs |
| Create Your First Sale shows Locked on Step 3 | It needs a finished store profile (a location and a tax rate) and stock on hand or a service | Have an owner finish Step 2, then add stock or a service. See Prepare to Sell |
| The language buttons only changed one tab | Each tab has its own language switch | Pick the language again on the other tab |
| The demo tour closed | Clicking the dark area, Skip, Got it! or Esc closes it | Press Take a Tour in the amber banner |
What's next
- Configure your business in Onboarding
- Follow the go-live workflow in Prepare to Sell
- Jump to any feature from Shortcuts
- Watch your numbers on the Dashboard
- Try other pages safely in Demo mode
Detailed reference
Every button, icon, field and message on this page, for when you need the exact detail. Each panel starts closed. Open the one you need.
Page header and toolbar
| Control | Where | What it does | Notes |
|---|---|---|---|
| Title Get Started, subtitle "Learn the basics, complete profile setup, and prepare your workspace to sell." | Header, left | Static heading | Always shown |
| Demo (Play icon, amber) | Header, right | Opens the Get Started demo in the same browser tab: a read-only overview of the three tabs with a guided tour | Everyone. Changes nothing. See the Demo mode panel |
| Step 1. Knowing Basics (graduation-cap icon, green) | Tab bar, 1st | Shows the Knowing Basics lesson | Selected by default. The address ends in ?tab=basics. Everyone |
| Step 2. Profile Setting (person-with-gear icon, purple) | Tab bar, 2nd | Shows the owner's setup wizard | The address ends in ?tab=onboarding. Owner only. Everyone else sees "Owner Access Required" |
| Step 3. Prepare to Sell (checklist icon, blue) | Tab bar, 3rd | Shows the go-live checklist | The address ends in ?tab=getstarted. Everyone |
| Selected-tab pill | Tab bar | A white pill with a colored border slides under the selected tab | All three tabs always show, and none is ever disabled |
| Left and Right arrow keys, Home and End | Tab bar, when a tab has keyboard focus | Arrows move to the previous or next tab and open it. Home and End jump to the first or last tab | The arrows wrap around from the last tab to the first |
| Page address | Browser | Follows the selected tab, so a copied link opens on that tab | Switching tabs replaces the address instead of adding a history step. The browser Back button leaves Get Started instead of returning to the previous tab |
| A tab name in the address that doesn't exist | Browser | Opens on Step 1, as an address with no tab name does | The address keeps the unknown name until you pick a tab |
| Switching tabs | Tab bar | Hides the tab you leave. Step 2 stays exactly as you left it — same step, same entries — whether you come back from another tab or reload the page. Step 3 checks your store's data again each time it opens. Step 1 reloads your ticks from your account | What Step 2 holds is kept in this browser tab only, and only until Complete Setup saves it to your store or the browser tab is closed |
| Setup reminder strip | Top of other pages | Never shown on Get Started or its demo | See the Ways into Get Started panel |
Tab: Step 1. Knowing Basics
Header area:
| Control | Where | What it does | Notes |
|---|---|---|---|
| Globe icon | Top right of the tab | Marks the language switch | Not clickable |
| English / Español / 中文 | Top right of the tab | Rewrites this tab's text in that language. The selected button is solid blue | Only this tab changes. Steps 2 and 3 have their own switches, and the rest of the app stays in English. This browser remembers the choice. If the saved choice can't be read (for example with site data blocked or cleared), the tab opens in English. In Español and 中文, names of real features keep the English word with the translation in brackets, such as "Products(Productos)" or "Available(可用)", so you can still find them in the app |
| UpChannels logo | Centered, above the greeting | Decoration | — |
| "Welcome onboard, …!" | Centered heading | Greets you by name | The name is your profile first name, else the first word of your full name, else your username, else your sign-in email before the @. If none loads: "Welcome onboard!" Español: "¡Bienvenido a bordo, …!" 中文: "欢迎加入,…!" |
| "Five quick concepts that explain how the software fits together — two minutes now saves hours later." | Under the greeting | Static text | — |
| "… of 5 concepts" | Left, above the progress bar | Counts the concepts you have confirmed | Español: "… de 5 conceptos". 中文: "已掌握 … / 5 个概念" |
| Green progress bar | Under the count | Fills a fifth for each confirmed concept | Not clickable |
| Review again (circular-arrow icon) | Right, above the progress bar | Clears all five ticks at once. The completion banner disappears and every card shows OK, I got it again | Only appears once all five are done. No confirmation. It's the only way to untick. Español "Revisar de nuevo", 中文 "重新学习" |
Every concept card:
| Control | Where | What it does | Notes |
|---|---|---|---|
| "Concept … of 5" | Top of each card | Label | Español "Concepto … de 5", 中文 "概念 … / 5" |
| Icon tile | Top left of each card | Shows the concept's icon | Turns into a green check, and the card border turns green, once confirmed |
| OK, I got it (check icon) | Bottom right of each card | Marks the concept as understood and saves the tick on your account. After a moment the page scrolls to the next card | Shown until the concept is confirmed. Cards can be done in any order. Card 5 doesn't scroll anywhere. The completion banner appears below it when all five are done. Español "De acuerdo, entendido", 中文 "好的,我明白了" |
| "Got it" chip (green, check icon) | Bottom right of a confirmed card | Status only | Replaces the button. Español "Entendido", 中文 "已了解" |
| Cards fading in | Whole tab | Each card slides in as it scrolls into view | — |
Completion banner:
| Control | Where | What it does | Notes |
|---|---|---|---|
| "You know the basics!" / "Next, set up your organization profile so the rest of the workspace can come to life." | Below card 5 | Appears when all five concepts are confirmed | Disappears after Review again. Español "¡Ya conoces lo básico!", 中文 "你已掌握基础!" |
| Continue to Step 2. Profile Setting (right arrow) | Inside the banner | Switches the page to Step 2 | People who aren't owners land on "Owner Access Required". Español "Continuar al Paso 2. Configuración de perfil", 中文 "继续第 2 步:资料设置" |
Where the ticks live: on your account, for you alone. They follow you to every browser and device, a private window included. Anyone else signing in on the same computer has their own ticks. Ticks a browser kept before they moved to the account are handed to the first person to open Step 1 there, once, and then removed from the browser. Step 1 doesn't affect setup progress, the setup reminder or any other page.
Tab: Step 1. Knowing Basics — what each concept says
| Concept | Content | Notes |
|---|---|---|
| 1. Basic Workflow (flow icon) | "Everything in the app follows one simple loop — set up what you sell, sell it, then deliver the work:" then three stages: Set up Inventory & Catalog ("Tell the system what you sell and load your starting stock.") → Create Sales Order ("Sell products and services to a customer in one order.") → Schedule Services ("Book the service work from the order onto your calendar.") | The stages aren't clickable. On narrow screens the stages stack and the arrows point down |
| 2. What's Catalog (open-book icon) | "Your catalog is the menu of everything you offer. It holds two kinds of entries:" Products: "Physical goods you sell — each catalog entry defines the what: name, SKU, price, and photos. Inventory is the how many: the stock you actually have on hand right now. A product stays in your catalog even at zero stock; only its inventory count changes as you buy and sell." Services: "Work you sell — repairs, installations, deliveries. Services live in the catalog with pricing just like products, but there is no stock to count. Instead of shipping units, you schedule time on the calendar." Summary: "Catalog = what you can sell · Inventory = how many you have" | Nothing clickable except the button |
| 3. How Inventory is Calculated (calculator icon) | Status: Available "in stock" → Reserved "held for an order, or off sale after a damaged return" → Sold "fulfilled" · Scrapped "written off (final)". "Every item moves through this lifecycle as orders are placed, fulfilled, or written off." Bulk items: "Counted in aggregate — one quantity per product and location, with no per-unit identity. The bulk quantity is the calculated remainder: whatever is Available beyond the individually tracked units." Trackable (Non-bulk) items: "Each unit gets its own record with a serial number, so it can be reserved, sold, or scrapped individually — moving through the statuses above one unit at a time." Formula: Available = Tracked Items + Bulk Items Quantity, "Your Available count is the single source of truth — trackable units and bulk quantity always add up to it." | The colored status badges are labels, not filters |
| 4. Learning Steps (numbered-list icon) | "Learn the app in this order — each step builds on the one before it:" 1 Inventory & Catalog setup: "Add the products and services you sell, then load your starting stock." 2 Create and manage sales orders: "Ring up products and services together — quotes, invoices, and payments in one place." 3 Create and manage schedules: "Turn service orders into booked jobs on your team calendar." 4 More advanced features in Growth management: "Customers, Messages, Reviews and more — build lasting relationships once daily operations feel natural." 5 More in Finance management: "Expenses, bank integration, and payment integration — see the profit you actually keep." | Only step 5 has the grey Optional badge. The steps aren't links |
| 5. 7 Levels of a Well-Managed Store (rising-chart icon) | "A well-managed store is built in layers. Climb the levels from left to right — start by running the daily counter smoothly, then work upward until every part of the business takes care of itself. Your dashboard grades each level as you adopt more of the toolkit, so you always know what to improve next." Then a staircase of seven bars, one per level (see below) | The bars aren't clickable here, and this card shows no score. Your grades are on the Dashboard. On narrow screens the staircase scrolls sideways |
The seven levels on card 5:
| Level | Name | Tagline | The five measures shown |
|---|---|---|---|
| Level 1 | Operational | Run the daily counter | Products, Services, Orders, Revenue, Sold today |
| Level 2 | Organized | Master your stock & supply | Stock tracked, Stock valued, Vendors, Procurement, Reorder points |
| Level 3 | Dependable | Schedule and serve reliably | Services, Jobs booked, Jobs done, Upcoming, Quotes |
| Level 4 | Informed | See the business clearly | Journaling, Logged today, Calls tracked, Foot traffic, Daily habit |
| Level 5 | Sustainable | Know what you actually keep | Expenses, Revenue, Profitable, Assets, Healthy margin |
| Level 6 | Connected | Bring customers back | Customers, Reviews, Messaging, Campaigns, Loyalty |
| Level 7 | Intelligent | Outgrow the local market | Google Ads, Competitors, Partners, Partnerships, Network 5+ |
Tab: Step 2. Profile Setting
| Control | Where | What it does | Notes |
|---|---|---|---|
| Shield icon and "Checking access…" | Tab body | Shows while the app checks whether you are an owner | Shows briefly each time Step 2 opens |
| Shield icon, Owner Access Required, "Please switch to an owner account to edit the organization profile settings." | Tab body | Blocks the wizard. There are no buttons in this panel | Shown to anyone who isn't an owner (no Owner switch and no owner role), managers and staff included, and on the wizard's own page too. The wizard isn't on the page underneath, so it can't be reached with the keyboard either |
| Shield icon, We couldn't check your access, "Something went wrong while checking whether you own this store.", Try again | Tab body | Blocks the wizard, and offers the button | Shown when the check itself failed, not when you are refused. It retries twice on its own first. Try again runs the check again without reloading the page |
| Setup wizard: Business Type → Owner → Location & Tax, ending in "Profile Setup Complete" | Tab body | The store profile form | Owner only. If the profile was finished before, the tab opens on the Profile Setup Complete summary instead. Every field and message is on Onboarding |
| Next (wizard) | Wizard | Moves to the next wizard step without saving | Greyed out until the current step is filled in. Only Complete Setup saves. Until then, what you typed stays in this browser tab, so switching to another Get Started tab or reloading keeps it |
| Step 3. Prepare to Sell (right chevron) | Completion screen, under "What's Next", right | Switches this page to Step 3 and scrolls to the top | Only on the completion screen |
| Edit Setup (left chevron) | Completion screen, under "What's Next", left | Reopens the wizard with your saved values | A second Edit Setup (circular-arrow icon) sits beside the "3 of 3 steps" bar at the top of the summary and does the same. See Onboarding |
| English / Español / 中文 (globe icon) | Top right of the wizard | Changes the wizard's language only | Separate from the Step 1 and Step 3 switches |
Tab: Step 3. Prepare to Sell
| Control | Where | What it does | Notes |
|---|---|---|---|
| Go-live checklist, "Step … of 2" | Tab body | Two guided steps, Inventory & Services and Start Selling & Servicing. The cards turn done from your store's data | Everyone. Opens on the first step that still needs work. Every card is on Prepare to Sell |
| Locked card buttons | Checklist cards | Stay locked until what they need exists | Create Your First Sale needs a store location, a tax rate, and stock on hand or a service. Schedule Services needs the location, the tax rate and a service. Order Management is never locked: the orders list opens on any store. The store profile itself isn't a card here, because it's the Step 2 tab |
| Start Selling & Servicing step | Checklist, step list | Greyed out and locked until at least one card in Inventory & Services is done | See Prepare to Sell |
| Automatic re-check | Whole tab | Inventory, services, orders and bookings are checked again each time you open the tab | — |
| English / Español / 中文 (globe icon) | Top right of the checklist | Changes the checklist's language only | Separate from the Step 1 and Step 2 switches |
Ways into Get Started
The real Get Started page has no dialogs, drawers or menus. These are the links elsewhere in the app that open it, and the buttons that move you between its tabs.
| Control | Where | What it does | Notes |
|---|---|---|---|
| Get Started card | Shortcuts, Get Started group | Opens Get Started on Step 3. Prepare to Sell | Everyone. It opens Step 3, not Step 1 |
| Onboarding Setup card | Shortcuts, Get Started group | Opens Get Started on Step 2. Profile Setting | Needs the Owner switch or the owner role — the same people the form itself lets in. The rare backup layout Shortcuts uses when the menu has no groups follows the same rule |
| Finish store profile (right arrow), in the strip "Setup … of 3 · Finish your store profile. Add a store location and a tax rate so orders can be priced and invoiced." | Blue strip at the top of other pages | Opens Get Started on Step 2 | Only for people whose Owner switch is on. Shows while the profile is the next setup step, until the store has any order. Hidden on Get Started itself. The X (tooltip Hide for now) hides it for this step until you close and reopen the browser tab |
| Add a product / or add a service, in the strip "Add your first product or service." | Same strip, once the profile is done | Opens Procurement on the Import tab, or Services on the Add Service tab | Only for people whose Owner switch is on. These don't open Get Started. On a phone only Add a product shows |
| Sidebar setup row (rocket icon): "Setup … of 3" and the next step's name | Top of the sidebar menu | Opens the next setup step. For the profile step, that's Get Started on Step 2 | Only for people whose Owner switch is on, until the store's first order. It still shows while you are on Get Started |
| Finish store profile (store icon), under "Finish your store profile before creating an order" | Top of the Create Order page | Opens Get Started on Step 2 | Only for people whose Owner switch is on, while the store profile (a location and a tax rate) isn't finished, and never after the first order |
| Set up organization | Services page, "Unable to load services" error card | Opens Get Started on Step 1 | Only when services can't load because of a problem with your organization |
| Continue to Step 2. Profile Setting | Step 1 completion banner | Switches to Step 2 | See Tab: Step 1 |
| Step 3. Prepare to Sell | Wizard completion screen | Switches to Step 3 | See Tab: Step 2 |
| Sidebar Get Started (Get Started group) | Sidebar | Opens the Prepare to Sell checklist on a page of its own, without the Get Started title, tabs or Demo button | Standard menu. Not the tabbed Get Started page |
| Sidebar Profile Setup (Get Started group) | Sidebar | Opens the setup wizard on a page of its own, without the Get Started title or tabs | Standard menu. There, the wizard's Step 3. Prepare to Sell button opens the stand-alone checklist instead of switching tabs. See Onboarding |
Messages you may see
| Message | When it appears | What to do |
|---|---|---|
| "Checking access…" | Step 2, while the app checks whether you are the owner | Wait a moment |
| "Owner Access Required" / "Please switch to an owner account to edit the organization profile settings." | Step 2, when you aren't an owner (no Owner switch and no owner role) | Ask the owner to finish Step 2, or to turn on your Owner switch in Team. Steps 1 and 3 still work |
| "We couldn't check your access" / "Something went wrong while checking whether you own this store." | Step 2, when the check couldn't finish | Click Try again. Steps 1 and 3 still work meanwhile |
| "Welcome onboard, …!" / "Welcome onboard!" | Top of Step 1. The version without a name shows when no name could be loaded | Add a first name to your profile for a personal greeting |
| "Five quick concepts that explain how the software fits together — two minutes now saves hours later." | Top of Step 1 | — |
| "… of 5 concepts" | Above the Step 1 progress bar | Press OK, I got it on each card |
| "Concept … of 5" | Top of each concept card | — |
| "Got it" | A concept card after OK, I got it | To clear it, finish all five and press Review again |
| Available "in stock", Reserved "held for an order, or off sale after a damaged return", Sold "fulfilled", Scrapped "written off (final)" | Concept 3 | Labels that explain the stock lifecycle |
| Optional | Concept 4, step 5 "More in Finance management" | Finance features are optional to learn |
| "You know the basics!" / "Next, set up your organization profile so the rest of the workspace can come to life." | Step 1, after all five concepts are confirmed | Press Continue to Step 2. Profile Setting |
The Get Started page frame, Step 1 and the demo have no pop-up notices, field errors or confirmation prompts. Wizard messages are on Onboarding and checklist messages are on Prepare to Sell. The demo's banner and tour text are in the Demo mode panel below.
Who can use what
| Area | Owner (Owner switch on, or the owner role) | Everyone else (managers, staff) | Notes |
|---|---|---|---|
| Open Get Started, header and tabs | Yes | Yes | No plan, add-on or store switch limits this page |
| Demo and the demo page | Yes | Yes | — |
| Step 1. Knowing Basics | Yes | Yes | Ticks are kept on each person's account |
| Step 2. Profile Setting | Yes | No: "Owner Access Required" | "Owner" means the Owner switch in Settings → Team, or the owner role. The same check guards the wizard's own page (sidebar Profile Setup) and runs again on the server for every save. See Team |
| Step 3. Prepare to Sell | Yes | Yes | Card locks depend on the store's data |
| Onboarding Setup card on Shortcuts | Yes | Hidden | The card follows the same rule as Step 2 itself: the Owner switch, or the owner role. The rare backup layout follows the same rule |
| Setup reminders that link here (top strip, sidebar row, Create Order callout) | Yes, with the Owner switch on | Never shown | These follow the Owner switch alone, so an owner by role only doesn't see them. Also never shown once the store has any order |
Demo mode (/initialize/demo)
- Open it: Demo (Play icon, amber) at the right of the Get Started header. It opens in the same browser tab.
- Title: "Get Started — Demo", with "A quick tour of the three steps that get your workspace ready to sell."
- Banner: "Demo mode — a guided overview of the Get Started steps. Nothing here changes your account." At its right end, Take a Tour (question-mark icon) starts the tour again from step 1.
- Tour: starts by itself the first time the page opens. Its controls are in the table after the tour steps.
- Content: the line "Get Started walks you through three steps — learn the basics, set up your business profile, then prepare everything you need to make your first sale." and three cards that can't be clicked, one for each tab.
- Disabled: nothing, because there is nothing to change. The demo has no tabs, concept cards, OK, I got it buttons, language switch, wizard or checklist, and it saves nothing, not even Step 1 ticks. Still works: Exit Demo Mode, Take a Tour, the tour controls, and the sidebar and top bar.
- Leave: Exit Demo Mode (left arrow, header right) returns to Get Started on the tab you opened the demo from (Step 1 if the demo was opened some other way).
| # | Tab | Tour step | What it points at |
|---|---|---|---|
| 1 | Single screen | Get Started, in Three Steps | All three cards. "Get Started guides you from zero to your first sale: learn the basics, set up your business profile, then prepare everything you need to start selling. Here is a quick look at each step." |
| 2 | Single screen | Step 1 — Knowing Basics | The Step 1 card. "A two-minute crash course in five core concepts: the basic workflow, what a catalog is, how inventory is calculated, the recommended learning order, and the 7 levels of a well-managed store." |
| 3 | Single screen | Step 2 — Profile Setting | The Step 2 card. "The owner completes a short wizard: choose a business type, fill in the owner and organization details, and set up your first location and tax rate. This tailors the whole workspace to your business." |
| 4 | Single screen | Step 3 — Prepare to Sell | The Step 3 card, with the tooltip above it. "A guided checklist for going live: add inventory and services, create your first sale, and schedule service work. Each task checks itself off automatically as you complete it." |
Tour controls (demo only):
| Control | Where | What it does | Notes |
|---|---|---|---|
| Dark backdrop | Whole screen around the highlight | Clicking it closes the tour | — |
| Spotlight | Around the highlighted card or cards | Highlights the current step and follows it when you scroll or resize | Not clickable |
| Progress dots | Top of the tooltip | One dot per step (4). The current step is a wide blue bar | Not clickable |
| "… of 4" | Tooltip footer, left | Shows which step you are on | — |
| Back | Tooltip footer | Goes to the previous step | Hidden on step 1 |
| Skip | Tooltip footer | Closes the tour | Always shown |
| Next (right chevron) | Tooltip footer, right | Goes to the next step | Steps 1 to 3 |
| Got it! | Tooltip footer, right | Closes the tour | Replaces Next on step 4 |
| Esc | Keyboard | Closes the tour | — |
| Right arrow or Enter | Keyboard | Next step. On the last step it closes the tour | — |
| Left arrow | Keyboard | Previous step | Not on step 1 |
| Skipping a missing step | — | If a step's target can't be found within about 3 seconds, the tour moves on to the next step | — |
| Take a Tour (question-mark icon) | Right end of the amber banner | Starts the tour again from step 1 after it has closed | — |
The three cards:
| Card | Purpose line | Bullets |
|---|---|---|
| Step 1, Knowing Basics (green) | "Learn how the app fits together in about two minutes — before you configure anything." | "Basic Workflow — set up your catalog, create a sales order, then schedule the service work." · "What's a Catalog — products vs. services, and how catalog (what you sell) differs from inventory (how many you have)." · "How Inventory is Calculated — the Available → Reserved → Sold → Scrapped lifecycle, plus bulk vs. trackable items." · "Learning Steps — the recommended order to learn the app: inventory, sales, scheduling, then growth and finance." · "7 Levels of a Well-Managed Store — the milestones your dashboard grades you against as you grow." |
| Step 2, Profile Setting (purple) | "The owner's one-time setup wizard that tailors the workspace to your business." | "Business Type — pick an industry template that preconfigures your tools and default tax rate." · "Owner — your name, phone and time zone, plus your organization name. Prices and payments are in US dollars." · "Location & Tax — your first store location, its address, and the tax profile that applies to sales." · "Opening hours are not asked for: a new location starts on Monday to Saturday, 9:00 to 17:00, closed Sunday." · "A setup summary confirms everything and hands you off to Step 3." · "Owner-only — team members skip this step; the owner completes it for the organization." |
| Step 3, Prepare to Sell (blue) | "A guided checklist of everything you need before your first sale — it checks itself off as you go." | "Inventory Setup — add your products by importing or creating procurement orders." · "Services Setup — configure the services your business provides." · "Create Your First Sale — ring up a sales order or quote for a customer." · "Schedule Services & Order Management — book service jobs and track your order history." · "Steps unlock as you go, and each one turns green automatically once it's done." |
Differences from the live page:
- The demo is one page of three summary cards. The real page has three working tabs.
- The demo has no sample data. It is an overview, unlike most other page demos.
- The Step 2 card says opening hours are not asked for, which matches the wizard: a new location is saved with Monday–Saturday 9:00–17:00 and Sunday closed.
- The card says team members "skip" Step 2. On the real page, they see "Owner Access Required" if they open it.
- The Step 3 card lists four tasks. The real checklist has two steps with five cards, and Schedule Services doesn't hold up finishing the second step.
Common questions
Why does Step 2 say "Owner Access Required"? The profile wizard is only for owners: people whose Owner switch is on in Settings → Team, or who have the owner role. A manager role isn't enough. Team members can skip this step, because the owner completes it once for the whole store. Steps 1 and 3 still work for everyone. If it says "We couldn't check your access" instead, that is a different thing — the check couldn't finish, so click Try again.
Do I have to finish Knowing Basics before I can use the app? No. Step 1 is a lesson. It saves only your own ticks and doesn't unlock anything. Nothing on Get Started locks the rest of the app.
I finished Knowing Basics on my laptop. Why does my phone say 0 of 5? It shouldn't: the ticks are saved on your account, so every device shows the same ones. Check that the phone is signed in as you, then refresh the page. If a red message says your progress couldn't be loaded, refresh again when your connection is back.
How do I start Knowing Basics over? Confirm all five concepts, and Review again appears above the progress bar. It clears every tick at once. There's no way to untick a single card.
What does "Available = Tracked Items + Bulk Items Quantity" mean? Your Available count is the one number that matters. Trackable items each have a serial number and are counted one by one. The bulk quantity is whatever is Available beyond those tracked units. Together they always add up to Available.
Does the Get Started demo use sample data or change my store? No to both. It is a read-only overview with one card per tab and a four-step tour that starts by itself the first time you open it. Press Take a Tour to replay it, or Exit Demo Mode to go back.
Which tab does Shortcuts → Get Started open? Step 3. Prepare to Sell. Onboarding Setup, which only owners see, opens Step 2. To see Step 1, click its tab.
Why don't I see the blue setup reminder on Get Started? It is deliberately hidden on Get Started, because this page already shows the setup steps. It shows on other pages only to people whose Owner switch is on, until the store's first order. The sidebar's pinned Setup … of 3 row still shows here.