Onboarding
Onboarding is a three-step wizard — Business Type, Owner, and Location & Tax — that an owner of the organization uses to set up (or later edit) the business profile. It finishes with a Profile Setup Complete summary.
It lives inside the Get Started page, which has three tabs of its own:
| Tab | What it is |
|---|---|
| Step 1. Knowing Basics | Five short concept cards on how UpChannels fits together |
| Step 2. Profile Setting | This onboarding wizard. Owner only — everyone else sees "Owner Access Required", here and on the wizard's own page |
| Step 3. Prepare to Sell | The go-live checklist |
The page header also carries a Demo button — a guided walkthrough of the three steps you can watch before doing it for real. Other ways in: the Finish store profile button on the setup strip, Onboarding Setup on the Shortcuts page (owners), and Profile Setup in the sidebar's Get Started group, which opens the same wizard on a page of its own (no Get Started header or tabs) — owner only there too. The group's own Get Started item is different: it opens only the Prepare to Sell checklist.
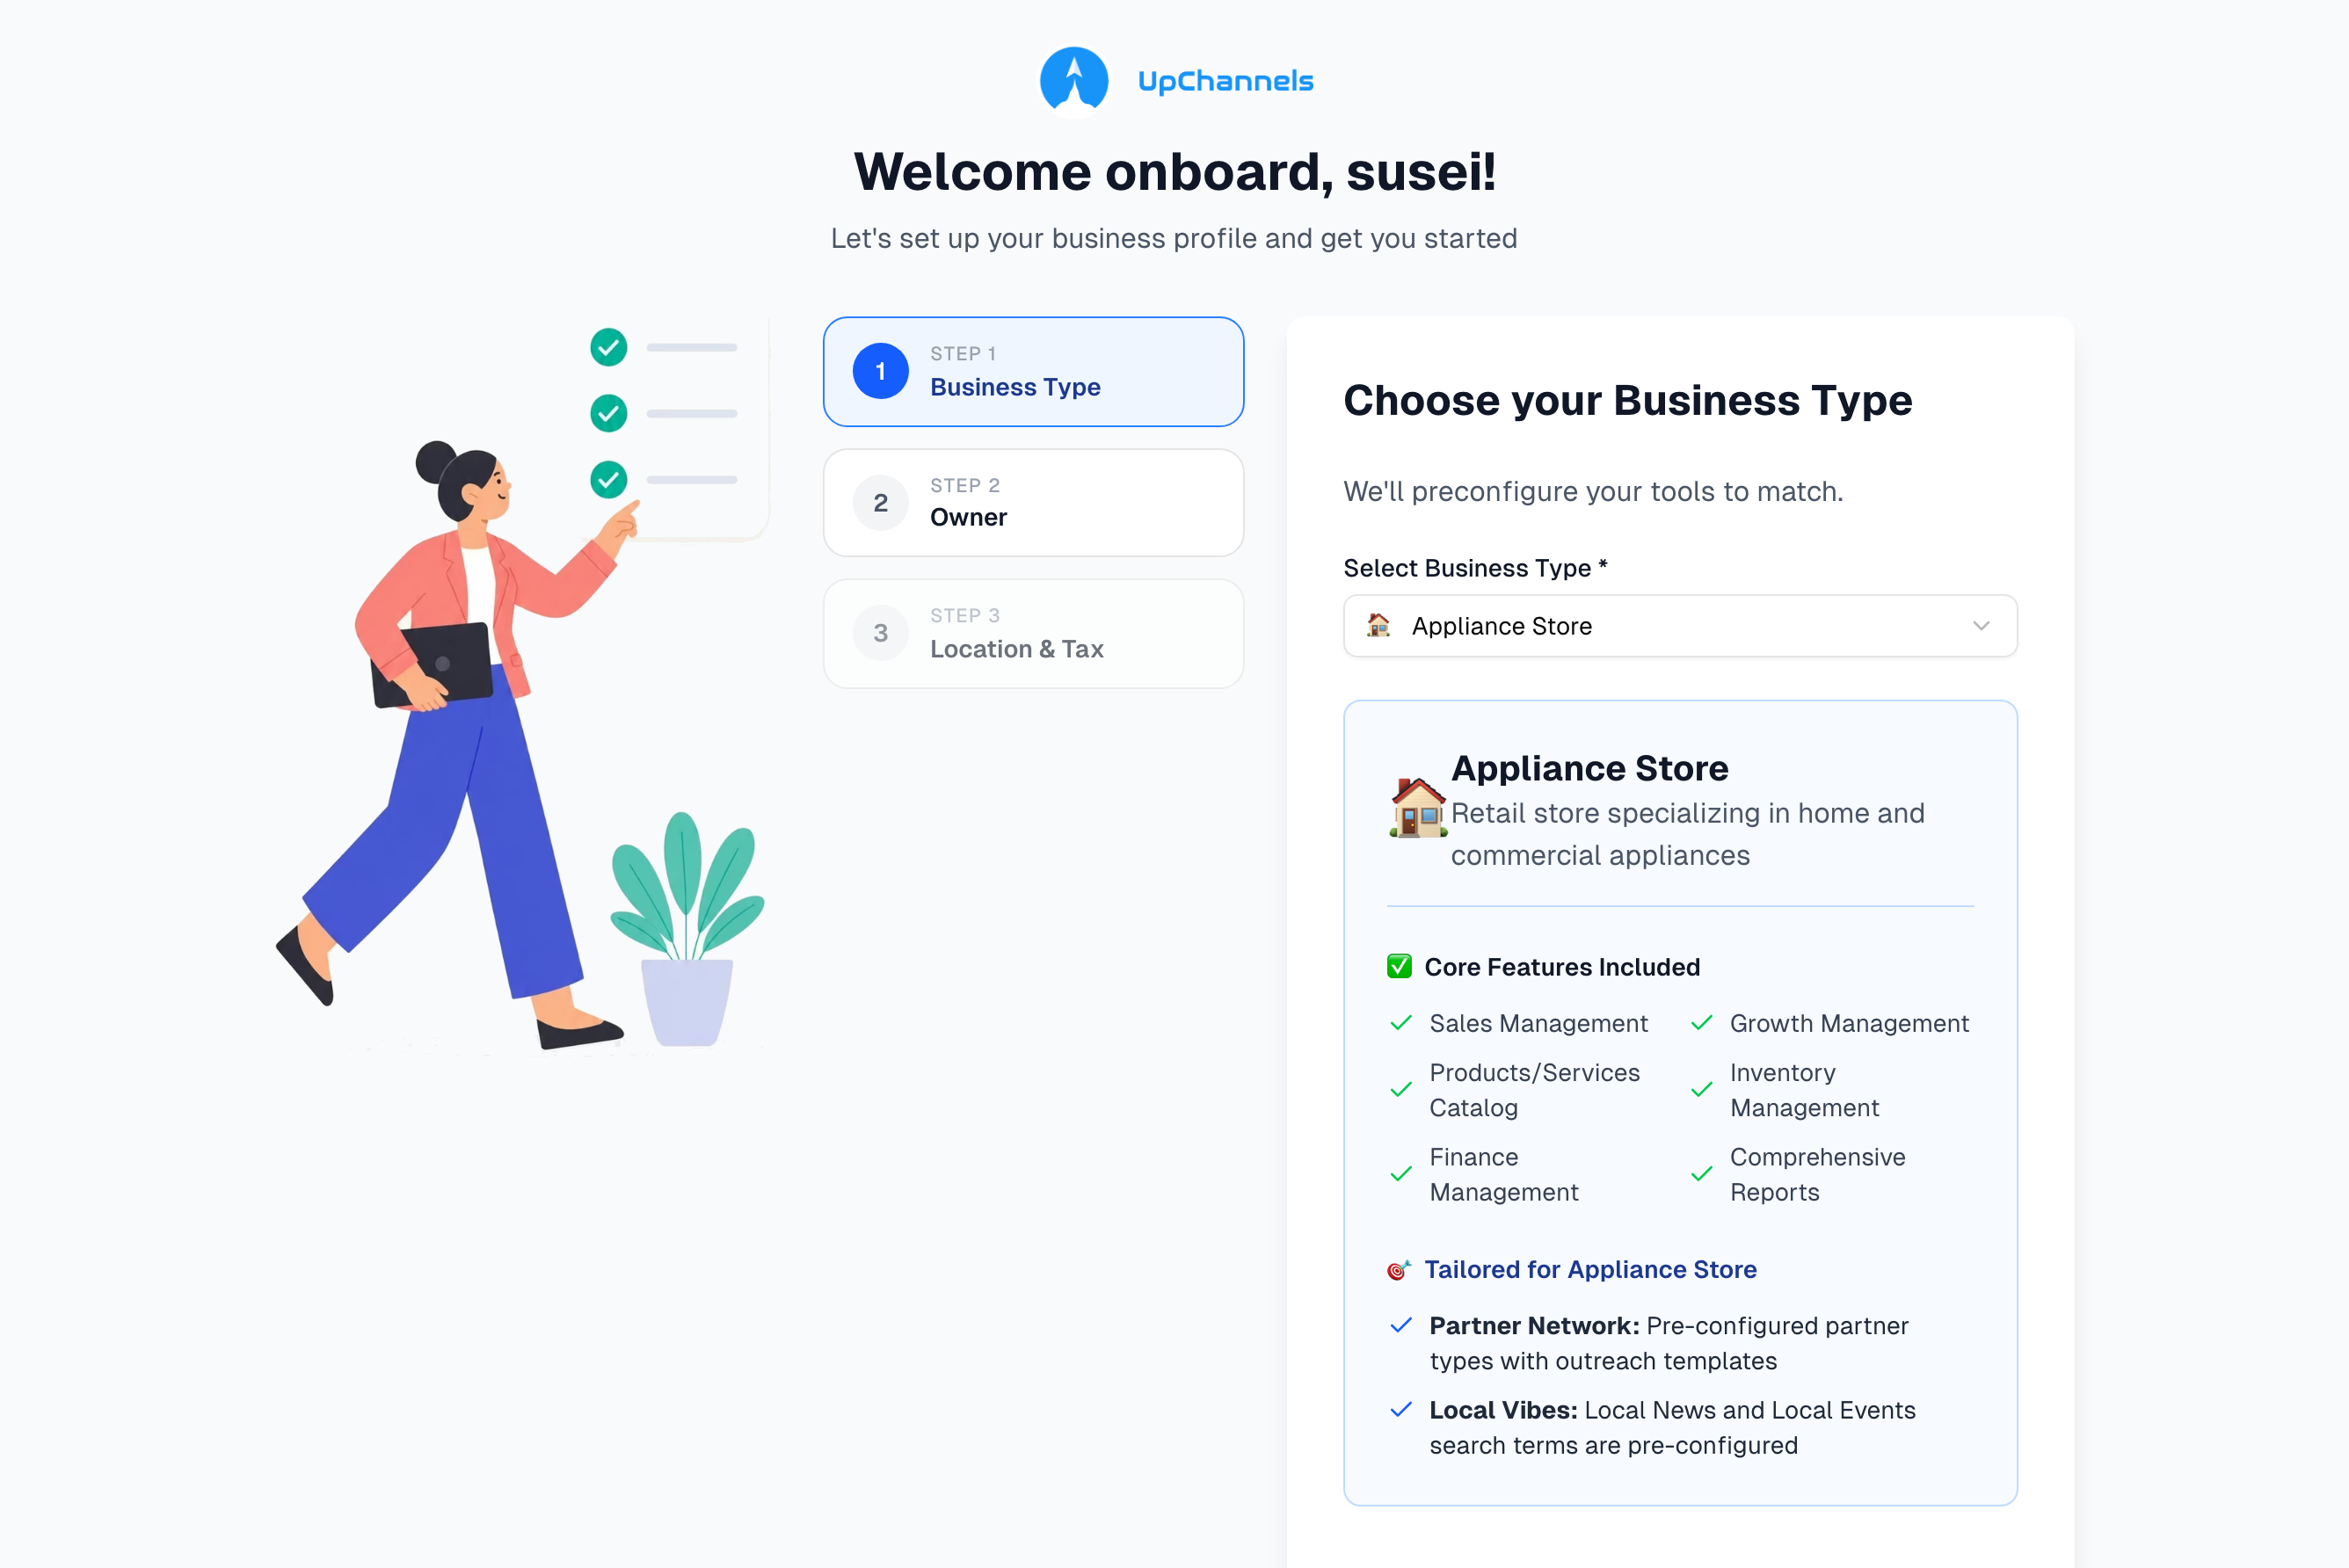
Overview
An illustration sits on the left, the three step buttons in the middle, and the form on the right (on a phone the illustration is hidden and the steps become a row across the top). On a first-time setup, picking a Business Type pre-fills that type's default tax rate for Step 3; once your store has a saved rate, or you have typed one, changing the type leaves the rate alone. Nothing is saved until you press Complete Setup on Step 3.
Once setup has been completed, coming back opens the Profile Setup Complete summary instead of the wizard. Press Edit Setup to reopen the wizard with your saved values filled in. Edit Setup always opens on those saved values, never on an earlier unfinished attempt.
Steps in detail
Step 1 — Business Type
- Choose your industry from the list. It is alphabetical — for example Appliance Store, Auto Repair Shop, Beauty Salon & Spa, Landscaping & Lawn Care, Restaurant & Cafe — with Other / General Business at the bottom for anything that doesn't fit.
- A preview shows the six Core Features every type gets and what's Tailored for that industry: Partner Network partner types with outreach templates, and Local Vibes news and events search terms.
- The type also carries a default sales tax rate. It isn't shown in the preview. On a first-time setup — before your store has a saved rate, and until you type one — picking a type fills Step 3's Tax rate with it. When you edit an existing setup, changing the type keeps your saved rate.
Step 2 — Owner
- Owner Information: First Name, Last Name, Mobile Phone (10-digit US or Canada number), Store Time Zone (Eastern, Central, Mountain, Arizona, Pacific, Alaska, Hawaii, or UTC). There is no currency to choose: prices and payments are in US dollars.
- Organization Information: Business Name (pre-filled with your organization's current name).
- The Store Time Zone you pick becomes your organization's time zone — the one date filters and reports use for "today". Every store holds one. The box opens on the time zone your store is already set to, including one set in Settings → Organization, so finishing the wizard does not change it unless you change it here. A store that finished setup before but has no time zone sees "Your store has no time zone yet. Completing setup sets it to …" under the box, naming the zone it shows; pick another before you complete setup if that one is wrong.
Step 3 — Location & Tax
- Location: Location name, Location phone (printed on invoices), and Street address. Start typing and pick the Google suggestion that includes your street number (suggestions cover the US and Canada), or press Verify Address. City, State and ZIP fill in and lock green.
- There are no fields for location type, country, or opening hours. A new location is saved as a Store, the country comes from the Google match, and hours are saved as Monday–Saturday 9:00–17:00, Sunday closed (a location that already has hours keeps them). Change the location type later in Settings → Locations.
- Tax: Tax profile name (default "Default Sales Tax") and Tax rate in % (your saved rate when editing; otherwise 8.25 until you pick a Business Type, then that type's default rate unless you have already typed one).
- Complete Setup saves everything and shows the Profile Setup Complete summary, with Edit Setup and Step 3. Prepare to Sell buttons.
Why Next or Complete Setup is greyed out
The button tells you what is missing rather than just refusing: an amber box under the form headed "To continue, please:" (or "To complete setup, please:" on Step 3) lists everything still blocking the step, and updates as you type. The most common one is the address — a street-only address is rejected, because an order cannot be delivered or taxed from half an address. Pick a suggestion that includes your building number, or type the full address and press Verify Address. When you are editing and leave the saved street address unchanged, it doesn't need verifying again.
Step by step: complete onboarding
- Open the wizard: press Finish store profile on the setup strip, or open Shortcuts → Onboarding Setup. Both land on Get Started → Step 2. Profile Setting.
- Step 1 — choose your Business Type; Next.
- Step 2 — enter your name, mobile phone, store time zone, and business name; Next.
- Step 3 — enter the location name and phone, verify the street address, then check the tax profile name and Tax rate.
- Press Complete Setup, review the summary, then press Step 3. Prepare to Sell to carry on to the go-live checklist.
What Complete Setup saves
- Organization: business name, business type, currency (always US dollars), time zone, contact email and phone, and business address (the location's address). A description is added automatically if you had none. The first completion date is kept on later edits.
- Your user profile: first and last name, mobile phone, currency (always US dollars), and time zone.
- First location: your store's first active location is updated, or a new Store location is created.
- Sales tax: your default tax profile and its rate are updated to the name and percentage you entered, or a new default profile is created with one rate named "Sales Tax".
You are never locked out
An unfinished setup never redirects you here or greys out the sidebar. The whole app is open from the first minute, and unfinished setup shows up as nudges — to owners only — instead:
- A one-line setup strip at the top of the page, reading, for example, "Setup 0 of 3 · Finish your store profile." (the number counts finished steps; later steps are Add your first product or service and Create your first order), with a button straight to that step. It isn't shown on the Get Started pages. The X (tooltip Hide for now) hides it for the current step in this browser tab only — it comes back in a new tab or session, and when the next step becomes current.
- A pinned row in the sidebar with the same next step. It can't be hidden.
- A callout on Create Order (Sales → New) when an order cannot be built yet. If the profile is unfinished: "Finish your store profile before creating an order" with a Finish store profile button. If the catalog is empty: "Add a product or service before creating an order" with Add a product and Add a service buttons.
The profile step also counts as done if your store already has an active location and an active tax rate (for example, set up in Settings). All nudges stop for good once your organization has its first order.
Tips & best practices
- On a first-time setup the tax rate auto-fills from the business type — change it to your jurisdiction's rate. After that the wizard always keeps the rate you saved or typed, even when you change the Business Type.
- Opening hours can't be set in the wizard, and the Location step says so; it saves Monday–Saturday 9:00–17:00 with Sunday closed for a new location.
- A half-filled wizard is held in the browser tab you are using, so moving to another Get Started tab or reloading the page brings it back on the step you left. Nothing reaches your store until Complete Setup, and closing the browser tab clears what was held. This covers a setup you have not finished yet; once setup is complete, Edit Setup always opens on your saved values, so a change you make there survives a tab switch but is gone if you reload before pressing Complete Setup.
- Pick the closest Business Type even if not exact — use Other / General Business when nothing fits. You can change it later in Settings → Business Type.
- You can press Edit Setup and Complete Setup as often as you like. Each save updates the same location, tax profile and rate; it never adds a second one.
Troubleshooting
| Issue | Fix |
|---|---|
| "Owner Access Required" on the Profile Setting tab or on the wizard's own page | Only owners can use the wizard. Ask an owner to do it, or to turn on your Owner switch in Settings → Team |
| "We couldn't check your access" on either of those | The check couldn't finish. Click Try again — it already retried twice on its own |
| "Verify the street address — pick it from the Google suggestions, or click "Verify Address"" | Re-type the Street address and pick the match from the Google dropdown, or press Verify Address |
| "The selected address is a street or area with no building number…" | You picked a whole street or area. Type the full address with the house number and pick that suggestion |
| Address unverified after an edit | Typing in Street address clears the verification. Re-pick the suggestion or press Verify Address |
| "Enter the city" even though the address is verified | Google's match had no city. Edit the Street address text to unlock City, type the city, then pick the suggestion again |
| "Enter a tax rate greater than 0" | The Tax rate box is empty or 0. Type your local rate, for example 8.25 |
| "Enter a tax rate of 50% or less" | The rate is over 50, usually a typo such as 825 for 8.25. Type the percentage with its decimal point |
| Tax rate didn't change when I changed the Business Type | By design: a type's default rate only fills in a first-time setup, before a rate is saved or typed. Type the rate you want in Tax rate |
| "Store profile save failed: …" or another red message after Complete Setup | Nothing was saved — the organization, your profile, the location and the tax are saved together or not at all. Press Complete Setup again; it can't create a second location. Contact support with the message if it repeats |
| "Only the store owner can change the store profile." | Nothing was saved. Your owner access was removed after you opened the wizard. Ask an owner to finish it |
| "Your saved setup couldn't be loaded, so saving is turned off…" | Your saved details didn't load, so the wizard is showing placeholders (such as the 8.25 tax rate) instead of your real setup. Complete Setup stays greyed out so they can't overwrite it. Reload the page |
| "Choose your time zone from the list." | The time zone sent with the save isn't one the app recognises. Go back to Step 2, pick a time zone, and press Complete Setup again |
What's next
- Work the go-live checklist in Prepare to Sell
- Add your offerings in Catalog → Products and Services
- Make your first sale in Sales → New
- Fine-tune your business type, locations and tax profiles in Settings
Detailed reference
Every button, icon, field and message on this page, for when you need the exact detail. Each panel starts closed — open the one you need.
Page header and toolbar
| Control | Where | What it does | Notes |
|---|---|---|---|
| Title Get Started and the line "Learn the basics, complete profile setup, and prepare your workspace to sell." | Header, left | Static heading | Not shown when the wizard is opened on its own page |
| Demo (Play icon, amber outline) | Header, right | Opens a guided overview of the three Get Started steps, and the tour starts by itself the first time | Every user, on every tab. Nothing is saved. See the Demo mode panel and Demo mode |
| Tab Step 1. Knowing Basics (graduation-cap icon, green) | Tab bar | Shows the five concept cards | The default tab when the link names no tab |
| Tab Step 2. Profile Setting (person-and-gear icon, purple) | Tab bar | Shows the onboarding wizard to owners, or "Owner Access Required" to everyone else | The setup strip, sidebar row and Create Order callout all link straight to this tab |
| Tab Step 3. Prepare to Sell (checklist icon, blue) | Tab bar | Shows the go-live checklist | |
| The page address | Browser address bar | Each tab has its own link (the address ends in ?tab=basics, ?tab=onboarding or ?tab=getstarted), so a bookmark or shared link opens that tab. Switching tabs updates the address without scrolling | A link with an unrecognised tab name opens on Step 1 |
| Onboarding Setup | Shortcuts page, Get Started group | Opens Get Started on the Step 2. Profile Setting tab | The card follows the same rule as the tab itself: the Owner switch, or the owner role. If the check can't finish, the card stays hidden and the tab explains why. Hiding Profile Setup in someone's menu doesn't take the card away, because the card opens the tabbed page, which is never blocked |
| Profile Setup | Sidebar, Get Started group | Opens the same wizard on a page of its own — no Get Started header, no tabs, no Demo button | Owners only, the same as the tab: everyone else sees "Owner Access Required". On that page the Summary's Step 3. Prepare to Sell button opens the Prepare to Sell checklist page instead of switching tabs. The sidebar's Get Started item opens only that checklist, not this tabbed page |
| "403 - Forbidden" panel | Replaces the wizard's own page | Shown when Profile Setup is hidden in your menu, whether you open it from a link, a bookmark or the address bar | Only for team members who aren't owners, in stores with more than one active user (people switched off or removed in Team don't count). The owner can show it again in Settings → Team. The tabbed Get Started page is not blocked this way |
Tab: Step 1. Knowing Basics
A self-paced orientation. Your ticks are saved on your account, so they follow you to every device; nothing else is saved to your account (the language you pick is remembered in this browser).
| Control | Where | What it does | Notes |
|---|---|---|---|
| Globe icon with pills English, Español, 中文 | Top-right of the tab | Switches this tab's text to that language | Remembered in this browser. Separate from the wizard's and Prepare to Sell's own language switches. Feature words such as Products, Catalog and Inventory stay in English with the translation in brackets |
| UpChannels logo and "Welcome onboard, …!" (or "Welcome onboard!") | Top | Greeting, with the line "Five quick concepts that explain how the software fits together — two minutes now saves hours later." | The name is your first name; without one, your username or the start of your email address |
| "… of 5 concepts" and a green progress bar | Under the greeting | Shows how many cards you have marked | |
| Review again (circular-arrow icon) | Right of the progress text | Marks all five cards as not done again | Only appears once all five are done |
| "Concept … of 5" | Top of each card | Card number. The card's icon turns into a green check when done | |
| OK, I got it (check icon) | Bottom-right of each card | Marks the card done: its border turns green, the button becomes a green Got it chip, and the page scrolls to the next card | You can't un-mark one card; use Review again |
| Card 1 Basic Workflow | Card | Three stages: "Set up Inventory & Catalog" → "Create Sales Order" → "Schedule Services" | Read-only |
| Card 2 What's Catalog | Card | Products vs Services, and "Catalog = what you can sell · Inventory = how many you have" | Read-only |
| Card 3 How Inventory is Calculated | Card | Status chips Available (in stock), Reserved (held for an order, or off sale after a damaged return), Sold (fulfilled), Scrapped (written off (final)); Bulk items vs Trackable (Non-bulk) items; the formula "Available = Tracked Items + Bulk Items Quantity" | Read-only |
| Card 4 Learning Steps | Card | Five steps in order: Inventory & Catalog setup; Create and manage sales orders; Create and manage schedules; More advanced features in Growth management; More in Finance management | The last step carries an Optional badge |
| Card 5 7 Levels of a Well-Managed Store | Card | Level 1–7: Operational (Run the daily counter), Organized (Master your stock & supply), Dependable (Schedule and serve reliably), Informed (See the business clearly), Sustainable (Know what you actually keep), Connected (Bring customers back), Intelligent (Outgrow the local market), each with five measures | The same staircase your Dashboard grades |
| Banner "You know the basics!" | Below the cards | "Next, set up your organization profile so the rest of the workspace can come to life." | Appears once all five cards are done |
| Continue to Step 2. Profile Setting (arrow icon) | In the banner | Switches to the Profile Setting tab | Only with all five done |
Tab: Step 2. Profile Setting — access, loading and wizard frame
Access and loading states:
| State | Where | What you see | Notes |
|---|---|---|---|
| Checking access… (shield icon) | Tab body, or the wizard's own page | Shown briefly while UpChannels checks you are an owner | |
| Owner Access Required — "Please switch to an owner account to edit the organization profile settings." | Tab body, or the wizard's own page | Replaces the whole wizard; no form is shown | Everyone who isn't an owner — Owner switch off in Settings → Team and no owner role — managers and staff included |
| We couldn't check your access — "Something went wrong while checking whether you own this store.", with Try again | Tab body, or the wizard's own page | Replaces the whole wizard, and offers the button | Shown when the check itself couldn't finish, to anyone. It retries twice on its own first; Try again runs it again without reloading |
| Spinner and "Loading your account..." | Wizard area | Your user details are loading | If the account cannot be read, the spinner is replaced by "We couldn't load your account", the reason, and a Try again button |
| Spinner and "Checking onboarding status..." | Wizard area | Your saved organization, location and tax details are loading | If they can't be loaded, the wizard opens anyway with a red box "Your saved setup couldn't be loaded, so saving is turned off to protect it. Reload the page to try again." plus a Try again button, and Complete Setup stays greyed out until the details load, so the placeholders can't overwrite your saved setup |
| We couldn't load your account | Wizard area | Replaces the spinner when your sign-in, your store or your profile could not be read at all. Shows the reason and a Try again button | Try again reads the account again without reloading the page |
| Sign-in page | — | Opens when you aren't signed in | |
| Profile Setup Complete summary instead of the wizard | Tab body | Shown when setup was completed before | Press Edit Setup to change anything. See the Summary panel |
Wizard frame (all three steps):
| Control | Where | What it does | Notes |
|---|---|---|---|
| Globe icon with pills English, Español, 中文 | Top-right of the wizard and of the Summary | Switches the wizard's text without losing what you typed | Remembered in this browser. Business type names and descriptions stay in English |
| Heading Profile Setting and "Let's set up your business profile and get you started" | Top, centre | Title | |
| Heading "Edit Your Business Setup, …!" and "Update your existing business profile and settings" | Top, centre | Title while you are editing a setup you have already completed | Stays for the whole visit, through Next, Previous and clicking a step. It goes back to "Profile Setting" once you press Complete Setup |
| Badge Editing Existing Setup (pencil icon) | Under the heading | Shows you are editing | Stays as long as the edit heading does |
| Blue box (pencil icon) "✏️ Editing Mode: …" | Under the heading | Says you are updating a setup that already exists | Shown from Edit Setup until you press Complete Setup, on every step |
| Red box (alert icon) | Under the heading | Shows a save error (see Messages) | A save error appears here without ending edit mode: the heading, badge and blue notice stay. When your saved setup couldn't be loaded, a second red box with "Your saved setup couldn't be loaded, so saving is turned off to protect it. Reload the page to try again." stays on every step until you reload |
| Illustration | Left column | Decoration only | Hidden on phone-width screens |
| Step button Step 1 / Business Type | Middle column (a row across the top on phones) | Jumps to Step 1 | Going back is always allowed. The current step is blue |
| Step button Step 2 / Owner | Middle column | Jumps to Step 2 | Going forward only works when every step before it is complete; otherwise it is greyed with a no-entry cursor. A step before the current one shows a green check instead of its number |
| Step button Step 3 / Location & Tax | Middle column | Jumps to Step 3 | Needs Steps 1 and 2 complete |
| "Step … of 3" | Bottom of the form card | Progress text | |
| Amber box "To continue, please:" (Steps 1–2) or "To complete setup, please:" (Step 3) | Under the form card | Lists every reason Next or Complete Setup is greyed out, as bullets. Updates as you type | Hidden once the step is complete. Every bullet is listed in the Messages panel |
| Previous (left arrow) | Bottom-left | Goes back one step, keeping what you typed and clearing any notice | Greyed on Step 1 |
| Next (right arrow, blue) | Bottom-right, Steps 1–2 | Goes to the next step | Greyed until the amber box is empty. Nothing is saved yet |
| Complete Setup (check icon, green), then Setting up... with a spinner | Bottom-right, Step 3 | Saves everything (see the "What Complete Setup saves" panel), then shows the Summary | Greyed until Step 3's amber box is empty, and while saving. Pressing Enter in a field does not submit |
Step 1: Business Type
| Control | Where | What it does | Notes |
|---|---|---|---|
| Heading Choose your Business Type and "We'll preconfigure your tools to match." | Form card | Heading | |
| Select Business Type * | Form card | Label for the drop-down | Required |
| Grey box "Loading industry profiles..." | Above the drop-down | The list is loading | |
| Red box "Error loading profiles. Using default templates." | Above the drop-down | The list couldn't load, so a built-in list is offered instead | You can still pick from it, or reload later |
| Drop-down (placeholder "Select a business type...") | Form card | Picks the business type. Each option shows an emoji and a name | On a first-time setup, picking a type sets Tax rate on Step 3 to that type's default rate (when it has one), until you type a rate yourself. It never changes a saved rate |
| Drop-down group Available Profiles | Inside the drop-down | The normal list, alphabetical, with Other / General Business pinned last. Includes, for example, Appliance Store, Auto Repair Shop 🚗, Restaurant & Cafe 🍽️, Beauty Salon & Spa 💇, Jewelry Store 💍, Landscaping & Lawn Care 🌿 and Other / General Business 🏢 | The list is maintained by UpChannels |
| Drop-down group Default Templates | Inside the drop-down | Built-in fallback list, one entry per business type, in the same order as the normal list: 🔌 Appliance Repair (8.25%), 🏠 Appliance Store (8.5%), 🚗 Auto Repair Shop (8.25%), 💇 Beauty Salon & Spa (8.0%), 👕 Clothing Store (8.75%), 📱 Electronics Store (8.0%), 🛋️ Furniture Store (8.25%), ❄️ HVAC Services (7.5%), 💍 Jewelry Store (8.0%), 🌿 Landscaping & Lawn Care (7.5%), 💰 Liquidation Store (7.75%), 🔧 Plumbing Services (7.0%), 🍽️ Restaurant & Cafe (8.5%), 🏢 Other / General Business (8.0%) | Only when the normal list is empty or failed to load. The percentages are the Tax rate each one pre-fills on a first-time setup. A pick from this list is linked to the matching business type when the setup is saved, so the features that read the business type work the same as after a pick from the normal list |
| Preview header: icon, type name, description | Below the drop-down | Describes the chosen type | Shows "Custom industry profile" when the type has no description |
| ✅ Core Features Included | Preview | Sales Management, Growth Management, Products/Services Catalog, Inventory Management, Finance Management, Comprehensive Reports | The same six for every type |
| 🎯 Tailored for … | Preview | "Partner Network: Pre-configured partner types with outreach templates" and "Local Vibes: Local News and Local Events search terms are pre-configured" | The type's default tax rate is not shown here |
| Amber-box bullet "Choose a business type" | Under the form card | Shown until a type is picked |
Step 2: Owner
Section Owner Information (person icon), then a divider and section Organization Information (building icon).
| Field | Required | Default | Rules and error text |
|---|---|---|---|
| First Name * (placeholder "e.g., William") | Yes | Your profile's first name; if there is none, the first word of your full name, your username or the start of your email address | Blank → "Enter your first name" |
| Last Name * (placeholder "e.g., Henderson") | Yes | Your profile's last name | Blank → "Enter your last name" |
| Mobile Phone * (placeholder "(555) 123-4567") | Yes | Your profile's mobile number | Formats as (555) 123-4567 while you type and keeps only the first 10 digits, so leave out the +1 country code. Not exactly 10 digits → "Enter a 10-digit mobile phone number" |
| Store Time Zone * | Yes | Your store's time zone; if the store has none, the zone the wizard recorded when the store was first set up, then your own saved preference, then your computer's time zone | Choices: Eastern Time (ET), Central Time (CT), Mountain Time (MT), Arizona (no daylight saving, MST), Pacific Time (PT), Alaska Time (AKT), Hawaii Time (HST), UTC — the same list as Settings → Organization. Empty → "Choose a time zone". Saved as the organization's time zone for reports and date filters. Because the box opens on the zone the store already has, finishing the wizard keeps a zone set in Settings → Organization unless you change it here. If the store is on a zone that is not on the list (for example Europe/London), that zone is added to the list and stays selected. A stored UTC stays UTC. A store that finished setup before but holds no zone shows "Your store has no time zone yet. Completing setup sets it to …" (amber) under the box, naming the zone the box holds and following it when you change it; completing the wizard stores that zone. Not shown on a first setup |
| Business Name * (placeholder "e.g., Joe's Coffee Shop, Tech Solutions Inc.") | Yes | Your organization's current name (the one given at sign-up unless changed since) | Blank → "Enter your business name" |
Beside the time zone (below it on a narrow screen): "Prices and payments are in US dollars." There is no currency box: every store works in US dollars, and completing setup saves US dollars.
The amber box lists Step 2's problems in this order: first name, last name, business name, store time zone, mobile phone.
Step 3: Location & Tax
Heading First store profile. Section Location (map-pin icon), then a divider and section Tax (receipt icon).
| Field | Required | Default | Rules and error text |
|---|---|---|---|
| Location name * (placeholder "Name (e.g., Main Store) *") | Yes | Your store's first active location name | Blank → "Give this location a name (e.g., Main Store)" |
| Location phone * (placeholder "Phone (on invoice) *") | Yes | That location's phone | Formats as you type, 10 digits. Not 10 digits → "Enter a 10-digit phone number for this location" |
| Street address * with the help line "Start typing and pick the suggestion that includes your street number — city, state and ZIP fill in automatically." | Yes | That location's street address | Google address box (placeholder "Street Address *"). See the Street address box panel and the address rule below |
| City * (placeholder "City *") | Yes | That location's city; filled from the Google match when you pick an address | Locked (read-only, green) while the address is verified. Blank → "Enter the city" |
| State (placeholder "State") | No | That location's state; filled from the Google match (two-letter code) | Locked while verified |
| ZIP (placeholder "ZIP") | No | That location's ZIP; filled from the Google match | Locked while verified |
| Tax profile name * (placeholder "Tax profile name") | Yes | "Default Sales Tax", or your saved default tax profile's name | Blank → "Enter a tax profile name" |
| Tax rate * (placeholder "Tax Rate *", % shown inside the box) | Yes | Your saved rate when editing. Otherwise 8.25, replaced by the business type's default when you pick a type | Steps of 0.01. Clearing it sets it to 0. Zero or empty → "Enter a tax rate greater than 0". More than 50 → "Enter a tax rate of 50% or less". Changing the Business Type never changes a saved rate or a rate you typed |
Not on the form:
| Item | What happens | Notes |
|---|---|---|
| Location type | A new location is saved as Store. An existing location keeps its type | Change it in Settings → Locations |
| Country | Taken from the Google match (for example United States or Canada). Defaults to United States | |
| Opening hours | A new location is saved with Monday–Saturday 9:00–17:00 and Sunday closed. A location that already has hours keeps them | The step says so, under the Location heading: "Opening hours are not asked for: this location starts on Monday to Saturday, 9:00 to 17:00, closed Sunday." Walk-ins and the Daily Journal's close of day use these hours |
The address rule (the order of Step 3's amber-box bullets is: saved setup not loaded, location name, location phone, address, city, tax profile name, tax rate, tax rate limit):
- The street address must not be blank → otherwise "Enter the street address".
- It must be verified — picked from the Google suggestions or confirmed with Verify Address — and include a building number. Not verified yet → "Verify the street address — pick it from the Google suggestions, or click "Verify Address"". A street or area with no number was picked → "The selected address is a street or area with no building number — pick a suggestion that includes your street number (e.g., "2415 S Bell Blvd")".
- When editing a store that already has a location, an unchanged street address needs no re-verification. City, State and ZIP stay editable in that case.
- City is checked separately. If Google's match has no city, City is locked and empty: edit the street text (which unlocks City), type the city, then pick the suggestion again — the city you typed is kept.
Step 3: Street address box
| Control or state | Where | What it does | Notes |
|---|---|---|---|
| Google suggestion list | Under Street address while you type | Picking a suggestion with a street number verifies the address: the street becomes "number + street", City, State and ZIP fill in and lock green, and the country is recorded | Suggestions cover the US and Canada only. If Google's match has no city, state or ZIP, whatever was already in that box is kept |
| Picking a suggestion without a street number (a whole street or area) | Under Street address | Not verified. An amber box reads: Street number missing. "…" is a street or area, not a specific building. Type your full address and pick the suggestion that includes your street number (e.g., "2415 S Bell Blvd"). | The amber checklist shows the street-number bullet too |
| Verify Address button, with "Click to verify this address with Google" | Under Street address | Looks up what you typed with Google. A full street address is verified exactly as if you had picked it. Shows Verifying... while it works | Shown whenever the box has text that isn't verified — including a saved address you haven't changed, which doesn't need it. Does nothing if Google Maps didn't load |
| Green box Address Verified with Show Details / Hide Details | Under Street address | Shows or hides the Full Address, Street, City, State, ZIP and Country Google matched | Only while verified |
| Red box "Unable to verify this address. Please check the spelling or try a more complete address." | Under Street address | Google found nothing for what you typed | After Verify Address fails, or when you press Enter without picking a suggestion |
| "Checking the address with Google — you can keep typing." | Under the box | Google is being asked about the address | The box itself is never locked while this shows, and a lookup that gets no answer is given up on after about eight seconds |
| "Loading address verification..." | Under the box | Google Maps hasn't loaded (or failed to) | A slow connection just takes longer: when it arrives the message goes and suggestions start working, however long it took. If it stays, suggestions and Verify Address won't work — you can still type the address by hand, or reload the page |
| Plain text box with "Address lookup is not set up, so addresses are not checked here. Type the address as usual." | Replaces the address box | Fallback when Google Maps isn't available | Not expected in normal use. A new address can't be verified, so contact support |
| Typing in Street address after it was verified | Street address | Clears the verification; City, State and ZIP unlock | Re-pick the suggestion or press Verify Address |
Sub-page: Profile Setup Complete (summary)
Appears right after Complete Setup succeeds, and whenever the tab is opened after setup was completed.
| Control | Where | What it does | Notes |
|---|---|---|---|
| Language pills | Top-right | As in the wizard | |
| Green check, Profile Setup Complete, "Welcome to UpChannels, …! Your business setup is now complete." | Top | Confirmation | |
| "3 of 3 steps" and a full green bar | Under the greeting | Progress | Always full |
| Edit Setup (circular-arrow icon, small link) | Right of "3 of 3 steps" | Reopens the wizard at Step 1 with your saved values filled in, in edit mode | Same as the Edit Setup button below. Always opens on the saved values: a change made here survives switching Get Started tabs, but reloading the page brings the saved values back |
| Setup Summary: Organization · Industry Presetting · Completed | Summary card, top row | Read-only | "Completed" is the date setup was first completed; later edits keep it. Industry Presetting can be blank if the type's name can't be found |
| Step 1: Industry Presetting | Summary card | The business type name | |
| Step 2: Owner & Organization Profile | Summary card | Profile: First name, Last name, Mobile phone, Currency (always "US dollars (USD)"), Store time zone. Organization: Organization Phone, Contact email, Description | "—" when empty. Time zone shows by name, as the Time Zone box does, for example "Central Time (CT)", or "None yet. Edit Setup to choose one." for a store that holds no time zone (the zone Edit Setup proposes is not shown as though it were already set). Organization Phone falls back to the owner's mobile; Contact email falls back to your sign-in email. Description shows what was saved, including the automatic "… - A … organization" when you left it empty |
| Step 3: First Store Location & Tax Setup | Summary card | Location: Name, Type, Location Business Phone, Description (if any), Address. Tax profile: Tax profile name, Tax rate | Type shows by name in the page's language, for example "Store" for a new location or "Service center". Description includes the automatic "Main location for …" when you left it empty. Tax rate is the saved rate of your default tax profile's main rule. Settings → Tax Profiles shows every rule and the total new sales use |
| Status: ✅ Ready to Use | Bottom of the card | Status badge | Always shown |
| Heading What's Next | Below the card | Heading | |
| Edit Setup (left arrow, outlined) | Bottom-left | Same as the Edit Setup link | |
| Step 3. Prepare to Sell (right arrow, blue) | Bottom-right | Inside Get Started: switches to the Prepare to Sell tab and scrolls to the top. On the wizard's own page: opens the Prepare to Sell checklist page |
Tab: Step 3. Prepare to Sell
Documented in full on Prepare to Sell. The parts that touch onboarding:
| Control | Where | What it does | Notes |
|---|---|---|---|
| No profile step | Prepare to Sell | The checklist has two steps, Inventory & Services and Start Selling & Servicing. The store profile is set up here on Step 2. Profile Setting instead | |
| Create Your First Sale and Schedule Services cards | Prepare to Sell, Start Selling & Servicing | Stay locked until the store has an active location and an active tax profile with an active rate. Create Your First Sale also needs a product or service; Schedule Services needs a service | Completing this wizard creates the location and the tax profile |
What Complete Setup saves
| Saved to | What |
|---|---|
| Organization | Business Name (also used as the short name). Description: kept if you already had one, otherwise "… - A … organization" (business name and type). Contact email and phone (phone falls back to the owner's mobile). Business address = the location's address. Business type. Organization time zone — the one date filters and reports use. Currency: always USD. The "setup completed" mark and first completion date. Your logo, branding and other settings are left as they were |
| Your user profile | First and last name, display name, mobile phone, currency (always USD), time-zone preference |
| First location | Updates the location the wizard showed — your store's oldest active location — and creates one only when the store has none. Name, description (falls back to "Main location for …"), type, email (the location's own, otherwise the organization's contact email), phone, address, opening hours, currency (always USD) and time zone. The location is marked active. Its Google review link and other location settings are kept |
| Sales tax | Updates your default tax profile (if none is marked default, your oldest active one; deleted profiles are skipped) and its first active rate — adding the rate if the profile has none — and creates a profile with one rate named "Sales Tax" only when the store has no profile. The profile gets your Tax profile name, is marked default and active and tied to that location, and the rate is set to your Tax rate. If a different profile became the default after the wizard opened (for example, changed in Settings in another tab), the save updates that current default instead, so the store never ends up with two default profiles |
| Afterwards | The Summary appears, the setup nudges re-check straight away, and the sidebar re-opens if it had folded itself away |
Everything is saved together: if any part fails, nothing is saved and the red box shows why, so pressing Complete Setup again is safe. Saving again — later, or straight after Edit Setup in the same visit — updates the same location, tax profile and rate; it never adds a second one. Only an owner's save is accepted: the owner check runs again on every save, however the wizard was opened.
Setup nudges on other pages
Rules:
- Owners only. Managers and staff never see nudges. If the owner check can't finish, no nudge is shown.
- Three steps, checked in order: 1. Finish your store profile — done when there is an active location and an active tax profile with an active rate, or the wizard was completed. 2. Add your first product or service — done when there is a switched-on stock record or an available serialized unit at an active location, or any service. 3. Create your first order — done when any sale, quote, return or scrap order exists.
- Once the organization has any sale, quote, return or scrap order, every nudge disappears for good, even if the profile or catalog is incomplete.
- "Setup … of 3" counts the finished steps.
- The nudges re-check straight away when onboarding completes, a stock import finishes, stock is received or transferred, a service is added or an order is created, and also when you move to another page or come back to the browser tab (a reading from the last 15 seconds will do then).
| Control | Where | What it does | Notes |
|---|---|---|---|
| Setup strip (checklist icon): "Setup … of 3 · …." plus one sentence | Thin blue bar at the top of the page | Names the next step | Owners with an unfinished step. Not shown on Get Started, the wizard's own page or the Prepare to Sell page. The sentence is hidden on narrow screens |
| Strip text, step 1 | Setup strip | "Finish your store profile." — "Add a store location and a tax rate so orders can be priced and invoiced." | |
| Strip text, step 2 | Setup strip | "Add your first product or service." — "Orders are built from your inventory and services, so add at least one to sell." | |
| Strip text, step 3 | Setup strip | "Create your first order." — "You are ready to sell. Ring up a sale or a quote to see the whole flow." | |
| Finish store profile / Add a product / Create an order (right arrow) | Setup strip, right | Opens Get Started on the Profile Setting tab / Procurement's Import tab / Sales → New | Label follows the current step |
| Link or add a service | Setup strip, next to the button | Opens the Add Service tab of Services | Step 2 only. Hidden on narrow screens |
| X (tooltip Hide for now) | Setup strip, far right | Hides the strip for the current step in this browser tab | Comes back when the next step becomes current, in a new tab, or in a new browser session. Doesn't hide the sidebar row |
| Sidebar row (rocket icon): "Setup … of 3", the step name, right arrow | Sidebar, under the store-name box and trial line | Opens that step's page (same targets as the strip button) | Owners with an unfinished step, until the first order. Can't be hidden. Also shows while you are on Get Started |
| Callout "Finish your store profile before creating an order" — "Orders need a store location and a tax rate to be priced and invoiced. It takes about two minutes." | Top of Sales → New, amber box | Explains why an order can't be built yet. The order form stays visible underneath | Owners, profile unfinished, no orders yet. Adds " After that, add your first product or service." when the catalog is empty too |
| Callout button Finish store profile (shop icon, right arrow) | In the callout | Opens Get Started on the Profile Setting tab | Profile version |
| Callout "Add a product or service before creating an order" — "Orders are built from your inventory and services. Add at least one and come straight back here." | Top of Sales → New | Owners, profile done, empty catalog, no orders yet | |
| Callout button Add a product (box-plus icon) | In the callout | Opens Procurement's Import tab | Catalog version. See Procurement |
| Callout button Add a service (wrench icon, purple outline) | In the callout | Opens the Add Service tab of Services | Catalog version. See Services |
Rare "no organization" states (every account gets an organization at sign-up, so these should not normally appear):
| Control | Where | What it does | Notes |
|---|---|---|---|
| Full-page spinner "Redirecting to onboarding..." | Any page | Sends you to the wizard's own page | Only when the signed-in account has no organization. Not on onboarding or billing pages |
| Card Complete your setup — "Create your organization to unlock the full dashboard." — button Go to Onboarding | Sidebar header | Opens the wizard's own page | No organization only |
| Pending Setup (dashed box) | Sidebar, in place of the store-name box | Placeholder | No organization only |
| Sidebar folds away | Sidebar | The sidebar closes itself while there is no organization and re-opens once setup finishes | Desktop only. Reopen it any time with the toggle next to the logo |
Messages you may see
| Message | When it appears | What to do |
|---|---|---|
| "Owner Access Required" — "Please switch to an owner account to edit the organization profile settings." | Someone who isn't an owner opens Step 2. Profile Setting | Ask an owner to do it, or to turn on your Owner switch in Settings → Team |
| "We couldn't check your access" — "Something went wrong while checking whether you own this store." | The check couldn't finish | Click Try again |
| "Checking access…" | Owner check in progress | Wait |
| "Loading your account..." | The wizard is loading your user details | It clears on its own. If the account cannot be read at all, "We couldn't load your account" takes its place with a Try again button |
| "We couldn't load your account" | Your sign-in, your store or your profile could not be read, so the wizard has nothing to open with. The reason is shown underneath | Press Try again. If it keeps failing, sign out and back in |
| "Checking onboarding status..." | The wizard is loading your saved details | Wait |
| "Loading industry profiles..." | The business type list is loading | Wait |
| "Error loading profiles. Using default templates." | The business type list failed to load; the built-in list is shown | Pick from it, or reload later |
| "To continue, please:" / "To complete setup, please:" | Next or Complete Setup is greyed out | Fix each bullet below it |
| "Choose a business type" | Step 1, no type picked | Pick one. Use Other / General Business if nothing fits |
| "Enter your first name" / "Enter your last name" / "Enter your business name" | A Step 2 field is blank | Fill it in |
| "Choose a time zone" | The Store Time Zone box is empty (rare) | Pick one |
| "Enter a 10-digit mobile phone number" | Step 2 mobile isn't exactly 10 digits | Enter a 10-digit US or Canada number without the country code |
| "Give this location a name (e.g., Main Store)" | Step 3 location name is blank | Fill it in |
| "Enter a 10-digit phone number for this location" | Step 3 location phone isn't 10 digits | Same as the mobile phone |
| "Enter the street address" | Step 3 street address is blank | Type it |
| "Verify the street address — pick it from the Google suggestions, or click "Verify Address"" | Street address typed but not verified | Pick a Google suggestion, or press Verify Address |
| "The selected address is a street or area with no building number — pick a suggestion that includes your street number (e.g., "2415 S Bell Blvd")" | A street or area was picked | Type the address with the house number and pick that suggestion |
| "Street number missing. "…" is a street or area, not a specific building. Type your full address and pick the suggestion that includes your street number (e.g., "2415 S Bell Blvd")." | Same case, shown in an amber box under the address | Same as above |
| "Unable to verify this address. Please check the spelling or try a more complete address." | Verify Address found nothing | Fix the spelling, or add the city and state |
| "Address Verified" | The address is verified | Nothing to do. Show Details shows what Google matched |
| "Click to verify this address with Google" | Next to the Verify Address button | Informational |
| "Verifying..." / "Checking the address with Google — you can keep typing." / "Loading address verification..." | Google lookups are loading | Carry on typing. The box is not locked while they run |
| "Address lookup is not set up, so addresses are not checked here. Type the address as usual." | Google Maps isn't available | Contact support; a new address can't be verified |
| "Enter the city" | City is blank (for example, Google's match had no city) | See the address rule, point 4, in the Step 3 panel |
| "Enter a tax profile name" | Tax profile name is blank | Type a name, for example Default Sales Tax |
| "Enter a tax rate greater than 0" | Tax rate is 0, blank or not a number | Enter your local rate, for example 8.25 |
| "✏️ Editing Mode: You are updating your existing onboarding setup. Changes will be saved to your current organization." | After pressing Edit Setup, in a blue box | Nothing to do. It stays while you move between steps, and goes when you press Complete Setup |
| "Edit Your Business Setup, …!" / "Update your existing business profile and settings" / "Editing Existing Setup" | Edit-mode heading and badge, for as long as you are editing | Informational |
| "⚠️ Please verify the location address before completing setup." | Safety check when saving with an unverified address (normally Complete Setup is greyed out first) | Verify the address |
| "No user found. Please sign in again." | Saving without a signed-in user | Sign in again |
| "No organization found for your session." | Saving with no organization in your session | Sign out and back in. Contact support if it repeats |
| "An error occurred during setup. Please try again." | An unexpected save failure | Try again. Contact support if it repeats |
| "Enter a tax rate of 50% or less" | Tax rate is over 50 | Type the percentage with its decimal point, for example 8.25 |
| "Only the store owner can change the store profile." | Complete Setup was pressed by someone who is no longer an owner (for example, their Owner switch was turned off after they opened the wizard) | Nothing was saved. Ask an owner to finish it |
| "Store profile save failed: …" | The save was rejected | Nothing was saved. Press Complete Setup again. Contact support with the text after the colon if it repeats |
| "Some setup details are missing or invalid. Check each step and try again." | A field the save needs was empty or not valid | Nothing was saved. Go through the three steps, then press Complete Setup again |
| "Enter a tax rate greater than 0% and no more than 50%." | The rate reached the server outside 0–50% (normally the amber box stops this first) | Nothing was saved. Fix Tax rate and try again |
| "Choose your time zone from the list." | The time zone sent with the save isn't one the app recognises | Nothing was saved. Pick a time zone on Step 2 and press Complete Setup again |
| "Your organization could not be found." | Your store was deleted or couldn't be found when you saved | Nothing was saved. Sign out and back in. Contact support if it repeats |
| "Your saved setup couldn't be loaded, so saving is turned off to protect it. Reload the page to try again." | Red box on every step: your saved organization, location or tax details couldn't be loaded, so the fields show placeholders | Reload the page. Until then Complete Setup stays greyed out, so the placeholders can't replace your saved setup |
| "Reload the page: your saved setup couldn't be loaded" | First bullet in Step 3's amber box, for the same reason | Reload the page |
| "Your session has ended. Sign in again." | You were signed out before saving | Sign in again; nothing was saved |
| "Profile Setup Complete" — "Welcome to UpChannels, …! Your business setup is now complete." | Saving succeeded, or you reopened after completing | Press Step 3. Prepare to Sell |
| "✅ Ready to Use" | Summary status | — |
| "Setup … of 3 · Finish your store profile." / "Add your first product or service." / "Create your first order." | Setup strip and sidebar row (owners) | Press the button, or X to hide the strip for this tab |
| "Finish your store profile before creating an order" / "Add a product or service before creating an order" | Callout on Sales → New (owners) | Use the callout's buttons |
| "Redirecting to onboarding..." | The account has no organization | Complete the wizard |
| "403 - Forbidden" — "You do not have permission to view this page. Contact your organization owner." | Opening the wizard's own page (sidebar Profile Setup) when that item is hidden in your menu | Ask the owner to show it again in Settings → Team, or ask an owner to do the setup |
| "You know the basics!" — "Next, set up your organization profile so the rest of the workspace can come to life." | All five Knowing Basics cards marked | Press Continue to Step 2. Profile Setting |
| "Demo mode — a guided overview of the Get Started steps. Nothing here changes your account." | The demo page | Informational |
Who can use what
"Owner" means anyone whose Owner switch is on in Settings → Team, or who has the owner role; a store can have more than one.
| Capability | Owner | Everyone else (managers, staff) |
|---|---|---|
| Open Get Started, Knowing Basics, Prepare to Sell and the Demo | Yes | Yes |
| Fill in and save the wizard on Get Started → Step 2. Profile Setting | Yes | No — "Owner Access Required" |
| The wizard on its own page (sidebar Get Started → Profile Setup) | Yes | No — "Owner Access Required", the same as the tab (or "403 - Forbidden" when Profile Setup is hidden in their menu) |
| Save the store profile, locations or tax rates by any route | Yes — the owner check runs again on every save | No. Their saves are refused, and they can still see the store's locations and tax rates |
| Onboarding Setup card on Shortcuts | Yes — the Owner switch or the owner role, the same rule the wizard itself uses | Hidden |
| Setup strip, sidebar setup row, Create Order callout | Yes, with the Owner switch on, until the first order | Never. These three follow the Owner switch alone, so an owner by role only doesn't see them |
| Plans and add-ons | Onboarding and the setup nudges are on every plan | Same |
To change the profile later without the wizard, the owner can use Settings: Business Type, Organization, Primary User, Locations (including Location Type) and Tax Profiles. Team management is in Settings → Team.
Demo mode (/initialize/demo)
- Open it: Demo (Play icon, amber outline) at the right of the Get Started header, on any tab. Anyone can open it — there is no owner check.
- Header: title Get Started — Demo, with "A quick tour of the three steps that get your workspace ready to sell."
- Banner: eye icon and "Demo mode — a guided overview of the Get Started steps. Nothing here changes your account." with a Take a Tour button (question-mark icon) that starts the tour again from step 1.
- Intro line: "Get Started walks you through three steps — learn the basics, set up your business profile, then prepare everything you need to make your first sale."
- Tour: starts by itself the first time the page opens.
- Disabled: there are no tabs, no wizard, no form fields, no language switch and no data — nothing is read from or written to your account. Still works: Exit Demo Mode, Take a Tour, and the tour's own buttons.
- Leave: Exit Demo Mode (left-arrow, blue outline) in the header returns to Get Started on the tab you opened the demo from, here Step 2. Profile Setting.
The page shows three read-only cards:
| Card | Badge | Text |
|---|---|---|
| Knowing Basics (green) | Step 1 | "Learn how the app fits together in about two minutes — before you configure anything." Bullets: Basic Workflow — set up your catalog, create a sales order, then schedule the service work. / What's a Catalog — products vs. services, and how catalog (what you sell) differs from inventory (how many you have). / How Inventory is Calculated — the Available → Reserved → Sold → Scrapped lifecycle, plus bulk vs. trackable items. / Learning Steps — the recommended order to learn the app: inventory, sales, scheduling, then growth and finance. / 7 Levels of a Well-Managed Store — the milestones your dashboard grades you against as you grow. |
| Profile Setting (purple) | Step 2 | "The owner's one-time setup wizard that tailors the workspace to your business." Bullets: Business Type — pick an industry template that preconfigures your tools and default tax rate. / Owner — your name, phone and time zone, plus your organization name. Prices and payments are in US dollars. / Location & Tax — your first store location, its address, and the tax profile that applies to sales. / Opening hours are not asked for: a new location starts on Monday to Saturday, 9:00 to 17:00, closed Sunday. / A setup summary confirms everything and hands you off to Step 3. / Owner-only — team members skip this step; the owner completes it for the organization. |
| Prepare to Sell (blue) | Step 3 | "A guided checklist of everything you need before your first sale — it checks itself off as you go." Bullets: Inventory Setup — add your products by importing or creating procurement orders. / Services Setup — configure the services your business provides. / Create Your First Sale — ring up a sales order or quote for a customer. / Schedule Services & Order Management — book service jobs and track your order history. / Steps unlock as you go, and each one turns green automatically once it's done. |
| # | Tab | Tour step | What it points at |
|---|---|---|---|
| 1 | — (no tabs in the demo) | Get Started, in Three Steps | All three cards together. "Get Started guides you from zero to your first sale: learn the basics, set up your business profile, then prepare everything you need to start selling. Here is a quick look at each step." |
| 2 | — | Step 1 — Knowing Basics | The Step 1 card. "A two-minute crash course in five core concepts: the basic workflow, what a catalog is, how inventory is calculated, the recommended learning order, and the 7 levels of a well-managed store." |
| 3 | — | Step 2 — Profile Setting | The Step 2 card. "The owner completes a short wizard: choose a business type, fill in the owner and organization details, and set up your first location and tax rate. This tailors the whole workspace to your business." |
| 4 | — | Step 3 — Prepare to Sell | The Step 3 card, with the tooltip above it. "A guided checklist for going live: add inventory and services, create your first sale, and schedule service work. Each task checks itself off automatically as you complete it." |
Tour controls:
| Control | What it does |
|---|---|
| Progress dots and "… of 4" | Show where you are |
| Back | Previous step. Hidden on step 1 |
| Skip | Closes the tour |
| Next (right arrow), Got it! on the last step | Next step; on the last step it closes the tour |
| Clicking the dimmed background | Closes the tour |
| Keyboard | Esc closes. Right arrow or Enter goes to the next step (closes on the last). Left arrow goes back |
| A missing highlight target | If a step's card can't be found within about 3 seconds, the tour moves on to the next step |
| Reopening | Take a Tour starts again from step 1 |
Differences from the live page: the demo is a static overview of all three Get Started tabs — it has none of the wizard's fields, checks, address verification or summary, and no owner check. Its Step 2 card says opening hours are not asked for, which matches the wizard (hours are saved with defaults). The setup strip isn't shown on the demo page.
Common questions
Why can't my manager open Profile Setting? The wizard is for owners only — the Owner switch, or the owner role — both on Get Started → Step 2. Profile Setting and on its own page (sidebar Profile Setup). A manager role is not enough, and neither is being the store's only active person (that lets you into Settings, not into the wizard). Anyone else sees "Owner Access Required — Please switch to an owner account to edit the organization profile settings." An owner has to complete or edit it, or turn on the manager's Owner switch in Settings → Team.
Why is Complete Setup greyed out? Read the amber "To complete setup, please:" box under the form — it lists every missing item. Most often the street address isn't verified: pick the Google suggestion that includes your building number, or press Verify Address. A saved address you haven't changed doesn't need verifying again.
Will changing the Business Type change my tax rate? Only on a first-time setup, before you have typed a rate: picking a type fills in its default rate. Once your store has a saved rate — or you have typed one — the wizard keeps it, whatever type you pick, and reopening the wizard always shows the saved rate. The rate actually in use is in Settings → Tax Profiles.
Where do I set opening hours or the location type? Not in the wizard. A new location is saved as a Store, open Monday–Saturday 9:00–17:00 and closed Sunday. Change the location type in Settings → Locations.
I finished setup — how do I change something? Open the wizard (Shortcuts → Onboarding Setup, or Profile Setup in the sidebar's Get Started group). It opens on the Profile Setup Complete summary; press Edit Setup, make the change, and press Complete Setup on Step 3. Saving again updates your existing location and tax rate — it never adds a second one, even straight after your first setup.
Which time zone do reports use? The organization time zone, which the wizard sets from Step 2's Store Time Zone. The box opens on the zone your store already has, so reopening the wizard and pressing Complete Setup leaves it alone. A zone that is not on the list — your store's own, however it was set — is added to the list and stays selected. Every store holds one zone, and the wizard always stores one: a store that has none yet is told under the box which zone completing setup will set, so you can pick the right one first. You can change it later in Settings → Organization, but not clear it.
Can my store use a currency other than US dollars? No. Every store works in US dollars: prices, invoices, reports and card payments are all in dollars, so the wizard does not ask for a currency, and completing setup saves US dollars.
How do I get rid of the blue setup bar? Press its X (Hide for now) to hide it for the current step in this browser tab. It stops for good once your store has its first order. Only owners see it.
Does the Demo change anything in my account? No. The demo is a read-only overview with a four-step tour. Nothing is read from or saved to your store.