New (Create Order)
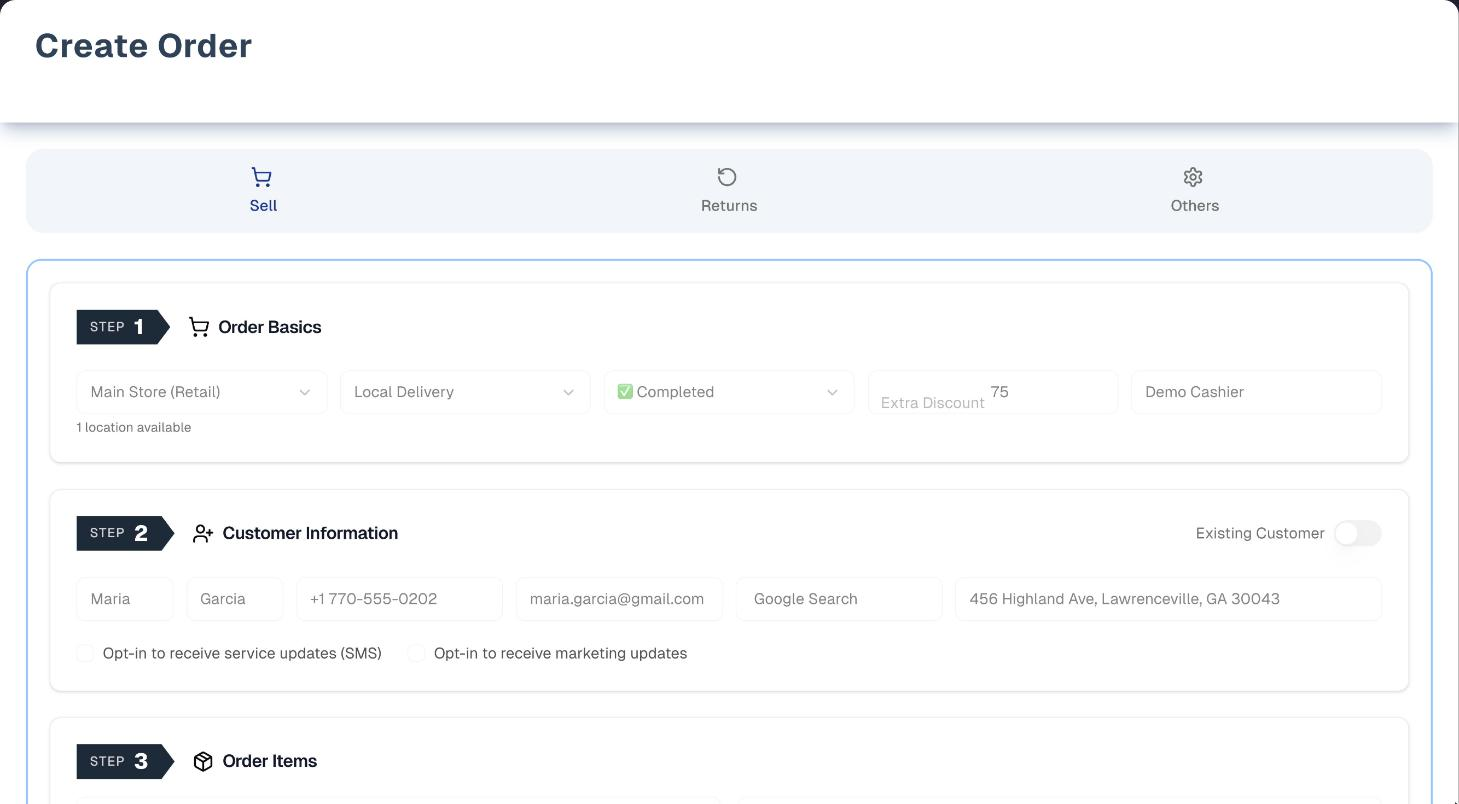
Create Order is your register. It has three tabs: Sell (a step-by-step sales form), Returns (sends you to the order list, where returns start) and Others (quotes and scrap write-offs). Open it from Sales → New.
Overview
On Sell, the store location is picked for you. Attach a customer, add items, check tax, promotions and loyalty, record the payment and click Create Order. The steps unlock in order: the customer step once a store location is set, items once there is a customer, and everything else once there is at least one item.
Nothing is saved until you click Create Order (or Create Quote / Create Scrap Order on Others). There are no drafts: switching tabs, or following a link off the page, clears what you have entered.
Tabs in detail
Sell
- Order Basics
- Store Location: picked automatically (your primary location, or the first one). It sets where stock is taken from and which tax profile is used.
- Fulfillment Options: Store Pickup (default), Local Delivery, Shipping, Service, or Mixed (Delivery + Service).
- Order Status: decides what happens to stock (see the table below). The default is Completed. While Delivery & Routes is on, choose Local Delivery or Mixed and it moves itself to 🚚 Pending Delivery, so the order can be scheduled on a route later; pick a status yourself and it stays as you set it.
- Extra Discount: a dollar amount off the whole order. Anyone who can ring up a sale can use it, and can type any price on a line: there is no limit on how much a sale may be discounted, and no approval step behind it. The Manager approval required badge below is about pricing rules, not about discounts in general.
- Cashier: a list of your store's team, set to you. Pick somebody else to credit the sale to them. The saved order records who you pick; it also records you as the person who rang it up.
- Invoice #: optional. Enter your own invoice number, for example from a paper invoice book. It is printed next to the system order number.
- Customer Information (required)
- For an existing customer, turn on Existing Customer and search by name, phone or email.
- For a new customer, type First and Last (both required). Phone, email, delivery address and the SMS and marketing opt-ins are optional.
- The Customer Source you pick is optional, and it is saved on the new customer. You can see it later on their record in Growth → Customers.
- Order Items
- Type in Add product (3 or more characters) or Add service (2 or more) and pick a result. Product search matches name, SKU, barcode, model, serial number and description, and shows the serials it matched.
- Each line has Qty and Price. Product lines also have warranty fields:
- Warranty $
- Terms: No Warranty, 3, 6 or 9 Months, 1 to 5 Years
- Provider: Store, Manufacturer, Combination, Assurant, CPS, OnPoint, SquareTrade, Upsie, Clyde, Others
- Details
- The warranty you pick is saved on the order and printed. The order page uses the same list when you edit it later.
- Tracked products can be tied to a specific serial-numbered unit. The sale holds and sells that unit, even when the product also has bulk stock: it shows Reserved (or Sold at the counter) straight away and its sales history records the sale. Service lines have Schedule Now; nothing in that dialog reaches the line until you press Save Schedule. They also have + Add service subject, to record the customer's item, equipment or site with this visit's findings and photos (see Service Intake). A service is booked as one visit: repeat visits are booked one at a time, each on an order of its own.
- Adding the same item twice is blocked. Raise Qty instead.
- Tax Settings: one unified rate, filled in from the store's tax profile. Turn on Separate Tax to set Taxable and Rate % per line.
- Order Notes (optional, starts collapsed): Customer, Shipping and Internal notes.
- Payment Details
- Payment 1: Method (default Cash), Status (default Completed) and Amount. The amount fills itself in with the total, and keeps up with it until you type your own figure there, for example a deposit.
- With Order Status ❌ Cancelled, the amounts go to $0 and the payment fields are greyed out: a cancelled order takes no payment.
- Turn on Separate Payment to split across Payment 2 and 3. Those start as Pending. A strip at the bottom of the card adds up Amount due, Entered and what is Remaining, so you can see what is still to collect.
- Existing customers with loyalty credit can redeem it here.
- Payments are recorded, not charged. There is no card reader or payment link on this page.
- Promotions & Loyalty Benefit
- Product, category and volume pricing rules that match switch on by themselves.
- Promotions and every other rule type start off. Switch them on yourself.
- Rules marked Manager approval required never switch on by themselves, and only a manager can switch one on. For everyone else the switch is greyed out and the card says "Ask a manager to switch this on".
- Enrol a new customer in a loyalty program, or redeem an existing member's points.
- Delivery zone fee: on a Local Delivery or Mixed order whose address zip is in one of your delivery pricing zones, a pre-ticked checkbox appears under Fulfillment Options: "Delivery zone … (zip …): add $… delivery fee".
- While it is ticked, the fee is part of the order: the Order Summary lists it as "Delivery fee — …", and it is in the Subtotal, the Tax, the Total and the auto-filled Payment 1 amount. It is taxed at the order's tax rate, like the other lines.
- The order is saved with the same fee line and the same Total.
- Untick the box to leave the fee off.
- Order Summary: a live recap, never greyed out.
- Left side: customer, delivery address, store, fulfillment, cashier, payment method, payment status and amount paid.
- Right side: product and service totals, the delivery fee, discount, subtotal, tax, loyalty credit, points to earn, and the Total.
What Order Status does to stock:
| Order Status | Stock |
|---|---|
| ✅ Completed (default), 🚛 Shipped, 📦 Delivered | Leaves now: on hand and available both drop. The goods count as handed over, so a delivery order at one of these stages cannot be scheduled on a route. Units another order has already claimed can't be sold this way unless you tick Allow Oversell |
| 🚚 Pending Delivery, ⚙️ Processing | Reserved: available drops, and on hand stays until the order is fulfilled. The order is saved at the stage you picked. This is what a delivery order needs, and, while Delivery & Routes is on, Create Order picks it for you when you choose Local Delivery or Mixed |
| ❌ Cancelled | No stock change. The order is filed as Cancelled and takes no payment: choosing Cancelled sets every payment amount and the loyalty credit to $0 and greys out the payment fields, and nothing is recorded as paid. Its scheduled services aren't put on the schedule |
Returns
The Returns tab has no return form. It shows a Create a Return Order card listing the steps below, and a Go to Order Management button, which opens the order list.
To make a return:
- Open the original order in Sales → List.
- Choose ⋯ More actions → Create return.
- Pick the items and click Process Return.
The return is recorded on the original sale. It doesn't create a new order. You find that sale on the Return tab of Sales → List, by the day the return was made.
Returns can't be made from quotes, scrap orders or other returns, and only units that left the store (sold at the counter, fulfilled or delivered) can come back. A cancelled order takes no return at all, not even units handed over before it was cancelled: return the delivered items first, then cancel what is left.
Others (Quote / Scrap)
- Pick Quote (no stock change, no payment) or Scrap (writes stock off). Quote is the default.
- Step 1 also has Priority (Urgent or Emergency marks the order as rush), Store Location and Required By Date (defaults to today at your store).
- Quote then has these steps:
- Customer: a new customer needs First, Last and a full delivery address of 10 or more characters.
- Items, Tax and Notes.
- Create Quote opens a success dialog with Print Quote.
- To turn the quote into a sale later, open it in Sales → List and click Convert to Sale.
- Scrap hides the customer and tax steps and the service search.
- Only products with stock at the location can be added — anything with nothing available there is left out of the search — and every price is set to $0.00. Qty can't go above what's available, and there are no warranty fields: a write-off is worth nothing, so the totals stay at $0.00.
- Switching back to Quote puts the prices back as they were, including any you typed by hand, and says how many lines it restored. A line you added while Scrap was on comes back at its catalog price.
- A product stocked at the store as two or more variants (colours, sizes) asks which one you are writing off: pick it in Variant on the line, which lists each variant with what is on the shelf, or pick the unit being written off, which names its own. The line's stock then shows that variant's.
- The Scrap Summary shows each item's on-hand stock before and after, and when part of a write-off is not free it says how much is held off sale (a damaged or defective return) and how much is promised to open orders, taking free stock first, then stock held off sale, then promised stock, as the save does.
- Create Scrap Order deducts the stock straight away. The order and the write-off are saved together: if any line can't be written off — more than is on the shelf, nothing in stock at that store, a serialized unit an order is holding, or a variant not picked — nothing is saved and the message says which item and how many there are.
- When the write-off takes stock that is not free, Record the loss? asks first, and recording it records only what that window showed. If a sale or a reservation lands before you answer, so the write-off would now take more, nothing is saved and the window opens again with the new figures and "The stock changed after you confirmed".
- Damaged stock that is promised to an open order can be written off too. When a write-off takes more than is free to sell, nothing is saved yet: a Record the loss? window names each order it leaves short, for example "Writing off 2 Dryer leaves order 1043 short by 1." Record the loss saves it: on hand goes down, Available goes below zero, the write-off is booked as usual, and the orders keep their place, short until the stock is received or the orders are changed. Go back saves nothing. A serialized unit an order holds has to be freed on that order first.
- Others has no fulfillment, order status, discount, payment, pricing-rule or loyalty steps.
- A quote saves what you see: each line's own Taxable box and Rate %, its warranty details, and a service line's service and the visit the customer asked for. The total on the quote is the total that is saved.
- A new customer's Customer Source is saved, the same as on Sell, along with their name, phone, email, address and opt-ins.
When an item is out of stock
A product can have more than one stock record at a store — one per variant, since receiving and transfers file a variant's units on its own record. A sale names no variant, so it draws on all of them: what is available to sell is their total, and the units come off the oldest record first, then the next when that one runs out. A line tied to a specific unit (Specific Item) is the exception for that unit: it comes off the unit's own record, its variant's, first, and only the rest of the line comes off the oldest record on. The tied unit itself goes with its line whatever bulk stock the product also has: it is held when the line is saved, sold when the order is completed or delivered, back on the shelf when the order is cancelled, and back when the line is returned. The same holds when the order is completed, delivered or cancelled, so each record's figures match the units on its shelf, and a return puts the unit's count back on its record first. A line with no unit picked takes the serial-numbered units of the record its count comes off, so each record's serials match its figures too, and leaves alone a unit another line of the same sale picks while any other unit will do. Each unit a sale holds is on record as that order's, so cancelling or completing an order frees or sells the units its own lines hold, never another open order's while any other unit will do. Lowering a line tied to a unit gives its other units back first: the tied unit stays on the order until the line is lowered to nothing. Lowering another order leaves a unit an open order holds alone while any other unit will do. Product search and the line's Max show that total, so a product whose first variant is empty but whose other variant is on the shelf is in stock.
Product search tells two different things apart.
- The shelf is empty. The result says Out of stock at …. Picking that row, or its Allow Oversell button, adds it as an Oversell line (red chip). An oversell line can take stock below zero, which is how you sell on backorder.
- The goods are here but promised. The result says None free to sell at … — … promised to open orders. Picking that row adds an ordinary line, capped at nothing and with no red chip, and a message names how many are held and the two ways on: free a unit on the other order, or remove the line and add the product again with Allow Oversell. Only that button sells goods another customer is waiting for, so it can never happen by a single click.
On a quote neither applies: a quote holds no stock and moves none, so a quote for goods that are promised is ordinary work and the stock is checked again when the quote becomes a sale.
The form also has a lost-sale prompt, "Nothing available here.", with one-tap reasons. It appears on the Sell tab, on a tracked line with nothing available that you added by clicking the search result — the usual way you find out an item is not there. Pressing Allow Oversell instead is you saying you mean to sell it anyway, so no prompt is offered on that line. Tap a reason if the customer leaves without it and it counts in the Lost Sales Report; the order line stays either way, in case they buy after all. You can still log the whole visit in Walk-ins.
You can also start an order from a walk-in visit. Use Start order (after marking a visit Sold) or Save & start order in Walk-ins, or Start special order in the Special order dialog in Procurement. The order opens here with a blue chip ("From visit …" or "Special order"), and the visit's location, customer and item are already filled in. What they asked for is added as an Oversell line when the shelf here cannot cover it and every unit that is here is free to sell — nothing here, or fewer than they asked for and none of them claimed. That is what a special order is. If any unit on the shelf here is promised to another open order, it is added as an ordinary line instead — whether all of the shelf is promised or only the part that would make up the difference — and a message names how many are here, how many are held, how many they asked for and the ways on. That is the same treatment as picking the product by hand, so the two ways of adding it answer the question the same way. Creating the order closes that visit as a sale.
Step by step: create a sale
- On Sell, check the Store Location. It is already picked.
- Set Fulfillment Options and Order Status.
- Add the customer. Turn on Existing Customer and search, or type First and Last.
- Type in Add product or Add service and pick the results.
- Check the tax rate, then review Step 7. Switch on any promotion you want to apply.
- Set the payment Method, Status and Amount.
- Click Create Order, then choose Print Invoice, Create New Order or View Orders History.
Step by step: create a quote
- Open Others and leave Quote selected.
- Add the customer and the items.
- Click Create Quote, then Print Quote if the customer wants a copy.
- When the customer says yes, open the quote in Sales → List and click Convert to Sale.
Tips & best practices
- Check the Store Location before adding items. Stock limits, the tax profile and location-specific pricing rules depend on it.
- Search for an existing customer before typing a new one. Every new name creates a new customer record, and redeeming loyalty points only works for existing customers.
- Use Others → Quote for estimates, then convert the quote to a sale from Order Management.
- Turn on Separate Tax only when items need different tax rates.
- When you split a payment, set Payment 2 and 3 to Completed if they were collected. Pending payments don't count as paid. The strip at the bottom of Step 6 shows what is still Remaining as you type.
- If the customer leaves without buying, log it in Walk-ins before you forget why.
- The delivery distance is a guide, not a gate. If it can't be worked out, or the address is more than 25 miles away, carry on: the order still saves.
Troubleshooting
| Issue | Fix |
|---|---|
| Create Order is greyed out | There are no items yet, or the order is saving. Steps stay greyed until a store location and a customer are set |
| Red banner in the Submit Order card | It names the field that is wrong, for example "Payment 1 Status: …" or "First Name: …"; after a refused press a message says the same thing and the page scrolls to that field. Fix what it names and the banner goes by itself — by typing in the box it names, by picking the customer it asked for, or by changing the Order Status so the money isn't due yet. If it changes to another field name, that is the next thing to fix |
| "Insufficient stock for product …" | Stock changed, or the Store Location changed, after the line was added — or another order has already claimed the units. The message says how many are promised to open orders. Lower Qty, or remove the line and re-add it with Allow Oversell to backorder |
| "… Available is below zero at this location: more is promised or sold than is on hand. …" | More of this product is promised or sold at this store than is on hand, for example after an Allow Oversell backorder. Open Inventory → Snapshot and press Audit: the finding under Needs manual review names any open orders holding it (none when more was simply sold than ever arrived). Receive the stock, correct the count, or free units on one of those orders; the line can then be sold normally. Nothing in the Audit recomputes a real shortfall away |
| "… Available is below zero at this location because its stock counts disagree with each other (on hand …, promised to orders …, held off sale …, Available …) …" | The store's own counts for this product don't add up (Available should be on hand less what is held and promised), so the figures in the message are not what the shelf holds |
| Pricing rule didn't apply | Promotions and approval rules start switched off. Switch the rule on in Step 7. To check its conditions, go to Catalog → Products → Pricing Rules |
| Loyalty points not showing | Loyalty details appear only after you pick an existing customer. If they aren't enrolled, use Enroll on submit in Step 7, or enrol them in Growth → Customers |
| Order shows a balance even though it was paid in full | Check that every payment you collected is Completed: Pending payments don't count as paid. With Separate Payment on, the strip at the bottom of Step 6 must read Fully covered before you save — while it reads Remaining $…, the amounts do not add up to the amount due |
| "Payment recording failed for order …" | The order saved without its payment. Open it from Order Management and add the payment there |
| Create Quote / Create Scrap Order is greyed out | The reason is shown in the grey box under the button |
| "Only … on hand of … at … to write off." | The quantity is more than that store has on the shelf. Typed in the Qty box, it's put back to what's on hand; if a save still reports it, nothing was saved — lower the quantity, switch the Store Location, or count the stock first |
| "… has nothing on hand at this location to write off." | That product has no stock at the chosen store, so there is nothing to scrap. Switch the Store Location or receive the stock first |
| Record the loss? window: "This write-off takes stock at … that open orders are counting on, or that is held off sale." and a line such as "Writing off 2 Dryer leaves order 1043 short by 1." or "Writing off 2 Dryer takes 1 unit held off sale (a damaged or defective return) and leaves order 1043 short by 1." | The write-off takes more than is free. What it can't take from free stock comes first out of stock held off sale (a damaged or defective return), then out of stock promised to those open orders, so an order is named only for what it is really left short ("… takes 1 unit held here that no open order is waiting for." is stock set aside that no order is waiting for). Nothing is saved yet |
| "… is stocked at … as more than one variant (…), so which one to write off is not clear. Pick the unit being written off on the line, or count that variant down in Inventory → Management → Count." | The product's stock at that store is kept per variant, two or more variants hold some, and the line doesn't say which variant broke |
| "Unit … of … at … is held by order …: free it on the order, then write it off." | Every free unit of that product is used up, and the one left is held for an order (picked on it, or held for the open orders it names) |
| "Units … (order …), … of … at … are held by open orders: free the broken one on its order, then pick that unit on this line to write it off." | Every free unit is used up and more than one unit is held, so the message names each (up to five) with the order that picked it |
| Record the loss? opens again with "The stock changed after you confirmed: this write-off now takes more than you were shown." | A sale or a reservation landed between the first question and your answer, so the write-off would take more promised stock, more stock held off sale, or leave another order short. Nothing has been written off |
| "Pick the variant being written off for …: it is stocked here as more than one." | A Scrap line for a product stocked at this store as two or more variants names none |
| The answer to Create Quote or Create Scrap Order never came back, so you don't know whether it saved | Press the button again. The same quote or scrap is never written twice: if the first press did save it, the second hands you back that same order, with its number and the usual confirmation. Change something on the form first and it counts as a different order, which does save as a second one — so check Order Management before you change anything |
What's next
- Schedule any service items: Sales → Schedule
- Track, edit, convert or return orders: Sales → List
- Log visitors and lost sales: Walk-ins
- Manage stock impact: Inventory → Snapshot
Detailed reference
Every button, icon, field and message on this page, for when you need the exact detail. Each panel starts closed — open the one you need.
Page header and toolbar
| Control | Where | What it does | Notes |
|---|---|---|---|
| Title Create Order, subtitle "Build, price, and submit a new retail order. Orders default to Store Pickup with Completed delivery status." | Header | Page heading | Always shown |
| Demo (Play icon, amber) | Header, right | Opens the demo copy of this page with sample data. The guided tour starts by itself the first time | Everyone, and the demo copy opens even for someone whose menu doesn't include Sales → New. Opens in the same browser tab. See Demo mode |
| Setup callout "Finish your store profile before creating an order" | Amber box above the tabs | Explains "Orders need a store location and a tax rate to be priced and invoiced. It takes about two minutes." If the catalog is empty too, it adds "After that, add your first product or service." | Owner only. Shown while the store has no active location with an active tax rate. Hidden once the store has taken any order. The form underneath still works |
| Finish store profile (store icon, arrow) | Setup callout | Opens Get Started on the Step 2. Profile Setting tab | Profile version of the callout. See Onboarding |
| Setup callout "Add a product or service before creating an order" | Amber box above the tabs | "Orders are built from your inventory and services. Add at least one and come straight back here." | Owner only. Shown when the profile is done but there are no products, stock or services yet |
| Add a product (box-with-plus icon) | Setup callout | Opens Procurement on the Import tab | Catalog version of the callout. See Procurement |
| Add a service (wrench icon) | Setup callout | Opens Catalog → Services on the Add Service tab | Catalog version of the callout. See Services |
| Callout refresh | Setup callout | Re-checks when you return to the browser tab, move around the app or finish onboarding, and disappears once the step is done | No button needed |
| Tab Sell (cart icon, blue) | Tab bar | Shows the sales form | Default tab |
| Tab Returns (circular-arrow icon, orange) | Tab bar | Shows the Create a Return Order card, which lists the steps and opens the order list | No return form here |
| Tab Others (gear icon, purple) | Tab bar | Shows the Quote / Scrap form | |
| Switching tabs | Tab bar | Clears anything unsaved on the tab you leave | Coming back shows a fresh form |
| New Sales Order, New Quote Order, New Scrap Order, New Return Order | Shortcuts page, Sales group | Open this page on Sell, on Others with Quote picked, on Others with Scrap picked, or on Returns | All four are left off the Shortcuts page for anyone whose menu doesn't include Sales → New. See Shortcuts |
Tab: Sell — step locks and Step 1 Order Basics
| Control | Where | What it does | Notes |
|---|---|---|---|
| STEP 1 to STEP 7 arrow badges | Left of each step heading | Labels only | Clicking does nothing |
| Grey cover over Step 2 | Customer card | Blocks clicks | Until a Store Location is set, which normally happens automatically |
| Grey cover over Step 3 | Items card | Blocks item search and line controls | Until an existing customer is picked, or both First and Last are typed. Flipping the Existing Customer switch empties those boxes, so the cover comes back until you fill them in again |
| Grey cover over Steps 4 to 7 and Submit Order | Those cards | Blocks tax, notes, payment, promotions, Reset Form and Create Order | Until at least one item is on the order. The Order Summary is never greyed |
| Store Location dropdown (placeholder "Store Location *") | Step 1 | Sets which store the order belongs to, where stock is checked and taken from, and which tax profile loads. Options read "Name (location type)" | Picked automatically: your primary location if active, otherwise the first active location by name. Only active locations are listed. Re-picked after Reset Form. While the list is still being read the dropdown holds one greyed-out entry, "Loading locations…"; once it has been read and there is nothing in it, that entry reads "No locations available" |
| Helper under Store Location | Step 1 | One of three: "Loading locations…" while the list is being read, "… location(s) available" once it has arrived, or "No locations available — add one in Settings → Locations." when the store has none | Always shown, and the same on both tabs |
| Fulfillment Options dropdown | Step 1 | Store Pickup, Local Delivery, Shipping, Service, Mixed (Delivery + Service). Saved as the order's fulfillment type | Default Store Pickup |
| Checkbox "Delivery zone … (zip …): add $… delivery fee" | Teal box under Fulfillment Options | When ticked, a "Delivery fee — …" line for the zone's surcharge is part of the order: it shows in the Order Summary and is saved with the order. Untick to leave it off | Ticked by default. Shown only when all of these are true: the Delivery feature is on, delivery zones exist, fulfillment is Local Delivery or Mixed, and the last 5-digit number in the delivery address matches a zone zip. The fee is not listed in Step 3. It is taxed at the order's tax rate and is in the on-screen Subtotal, Tax and Total and in the auto-filled Payment 1 amount. It earns no loyalty points and pricing rules ignore it. A zone with no fee ($0) shows no checkbox, because there is nothing to add. Your zones are re-read whenever the last read is over a minute old, so a zone saved in Settings is priced the next time you open Create Order, with no browser reload. If that read cannot be made, the zones from the last one that worked are used rather than none; on a store whose zones have never been read the checkbox simply does not appear, and the order still saves |
| Order Status dropdown | Step 1 | 📦 Delivered, 🚛 Shipped, 🚚 Pending Delivery, ⚙️ Processing, ✅ Completed, ❌ Cancelled. Decides what happens to stock (see "Tab: Sell — what Create Order does") and the stage the saved order is filed at | Default ✅ Completed. The order is saved at the stage you picked, in one step. While Delivery & Routes is on, choosing Local Delivery or Mixed moves an untouched status to 🚚 Pending Delivery and explains itself underneath; choosing another fulfillment puts it back to ✅ Completed. Once you pick a status yourself it never moves again |
| Grey note "Set to 🚚 Pending Delivery so this order can be scheduled on a route. Change it if the goods are leaving with the customer now." | Under Order Status | Says the form moved the status for you | Only after a delivery fulfillment moved it, and only until you pick a status yourself |
| Amber note "✅ Completed counts the goods as handed over at the sale, so this delivery order cannot be scheduled on a route afterwards. Choose 🚚 Pending Delivery to send it out later." | Under Order Status | Warns that this delivery order will drop out of the delivery workflow | Only on a Local Delivery or Mixed order set to ✅ Completed, 🚛 Shipped or 📦 Delivered, and only while Delivery & Routes is on. The status name in the message matches the one you picked. It is a warning, not a block: the order still saves |
| Extra Discount (number) | Step 1 | A dollar discount off the whole order, before tax, spread across the lines for tax | Minimum 0, cents allowed. The subtotal never goes below $0. Open to everyone who can create an order — there is no per-store cap on it and no manager approval behind it, and the same is true of typing a price straight onto a line. Errors: "Discount cannot be negative", "Discount cannot exceed $99,999.99" |
| Cashier (dropdown, placeholder "Cashier") | Step 1 | Lists everyone on your team who can still sign in, set to you. Shows as "Cashier:" in the Order Summary, and the order is credited to whoever is picked — that is the name the order list's Cashier filter and the order's Cashier field then show | Only your own store's active team is listed, and only a person from that list can be credited. The list is read when the page opens, so somebody turned off while the form is open is still offered; the sale is then credited to you instead and the Order Created box says so. Whoever pressed Create Order is recorded on the order as well, so crediting a colleague never hides who rang the sale. Back to you after Reset Form |
| Invoice # (text, placeholder "Optional") | Step 1 | Your own invoice number, for example from a paper invoice book. Printed next to the system number and shown in the success dialog | Optional, need not be unique. The box stops accepting text at 50 characters ("Invoice # must be 50 characters or fewer") |
| Blue chip (cart icon) "Special order · from visit 10:42 AM", "Special order" or "From visit …" | Above the Customer step | Shows the order was started from a walk-in visit. The visit's location, customer and item are filled in | Only when opened from a walk-in visit (Start order, Save & start order) or a Procurement Special order. Creating the order closes the visit as a sale (not when the order is Cancelled). Reset Form removes the chip and the link. The filled-in line follows the same rule as a line you pick by hand: a shelf that is empty, or short of what they asked for, arrives as an Oversell line; a shelf that is full but entirely promised to open orders does not, and a message names how many are held and the two ways on. There is no Allow Oversell button on a filled-in line, so that message says to remove the line and add the product again through Add product, where the button is |
Tab: Sell — Step 2 Customer Information
The icon is a person-with-plus for a new customer and two people for an existing one.
| Control | Where | What it does | Notes |
|---|---|---|---|
| Existing Customer switch | Step 2 header, right | On: shows Search Customer and opens the search. Off: shows the new-customer fields | Off by default. Flipping it either way empties every customer box — First, Last, Name, phone, email, delivery address and source — so the customer you had chosen can't be saved as a new one, and a half-typed new customer can't ride along into an existing-customer order. With First and Last empty, Step 3 closes again until you type them |
| First (required) | New-customer row | Customer first name | Step 3 stays locked until First and Last are filled. A refused press puts "Enter the customer first and last name." under the First box and reads "First Name: Enter the customer first and last name." in the red banner. The message under the box goes on your first keystroke in either name box; the banner line stays until both boxes have a name in them |
| Last (required) | New-customer row | Customer last name | Same as First |
| Phone | New-customer row | Formats as you type, e.g. (555) 123-4567. A leading 1 on 11 digits is dropped. Saved in +1 international format | Optional. Error: "Please enter a valid phone number" |
| New-customer row | Customer email | Optional. Error: "Please enter a valid email address" | |
| Customer Source (searchable picker button) | New-customer row | Opens the Customer Source picker. What you pick is saved on the new customer as where they came from | Optional |
| Delivery Address (address box with map-pin icon and Google suggestions) | New-customer row | Saved as the new customer's address. Also drives the "📍 Delivery" summary line, the delivery-zone fee match, the distance check and the default service location | Optional on Sell, and not marked with an asterisk. On Others the same box is marked required and is enforced. Up to 200 characters: "Address must be less than 200 characters". See "Section: Address box and delivery distance" |
| Checkbox Opt-in to receive service updates (SMS) | Below the new-customer row | Saves SMS consent on the new customer | Unchecked by default. New customers only |
| Checkbox Opt-in to receive marketing updates | Below the new-customer row | Saves marketing consent on the new customer | Unchecked by default. New customers only |
| Search Customer (button with magnifier; shows "Name - phone" once picked) | Existing-customer view | Opens the Search Customer dropdown. Picking fills name, phone, email, address and source, then loads order totals and loyalty | Required when Existing Customer is on. A refused press says "Please select an existing customer" under the search and "Customer: Please select an existing customer" in the red banner; both go as soon as you pick somebody, or turn Existing Customer off to type a new one |
| Basic Info column: Name, Phone, Email, Source, Customer Since, tiles Total Orders and Total Spent | Under the search, once picked | Read-only summary. Shows "Loading orders..." while loading | Total Orders counts the customer's completed, shipped and delivered sales. Total Spent is what they have paid, less refunds, on any of their orders whatever its status. Both match the same figures on the customer's record in Growth → Customers. Hovering a tile says so. The customer's whole history is counted, however long it is. When anything went back, a line under Total Spent says "$X received − $Y refunded" — the refund is already taken off |
| Address column (editable address box, placeholder "Delivery Address") | Under the search, once picked | Shows the customer's address and verifies it automatically. Editing changes this order's zone-fee match, distance check, summary and printed invoice | Does not update the customer record |
| Loyalty Info column | Under the search, once picked | Each program as "… pts ~ $…" (with "(… usable)" when some points have expired), then "Total available credit: $…". The dollar figures count unexpired points only. "No loyalty memberships found" when none. Footnote: "Earnings are based on subtotal excluding discounts, redeemed credit, tax, shipping, and gift cards." | Read-only |
Section: Address box and delivery distance (Sell and Others)
| Control | Where | What it does | Notes |
|---|---|---|---|
| "Loading address verification..." | Under the address box | Google address checking hasn't loaded yet | Suggestions and Verify Address work once it has loaded. You can still type the address |
| Google suggestion list | Under the address box while typing | Picking one fills in the formatted address, marks it verified and starts the distance check | US and Canada addresses only. The box is never locked while Google is working: you can type an address at any time, and a line under it reads "Checking the address with Google — you can keep typing." A saved address is checked once you leave the box, not letter by letter, and any check that gets no answer is given up on after about eight seconds |
| Verify Address (shows "Verifying..." while working) | Under the address box | Looks the typed address up with Google and replaces it with the formatted version if found | Shown when there is unverified text. Hint: "Click to verify this address with Google". Existing-customer addresses verify automatically. Verification is optional |
| "Address Verified" box with Show Details / Hide Details | Under the address box | Shows or hides Full Address, Street, City, State, ZIP and Country | After verification. Picking another customer clears it: their address is checked on its own account, so one customer's tick and distance are never shown under another's address |
| "Street number missing." warning | Under the address box | Says the pick is a street or area, not a building: "Type your full address and pick the suggestion that includes your street number (e.g., "2415 S Bell Blvd")." | When the chosen suggestion has no street number |
| "🚚 Delivery Distance" card | Under the address | Badge "✓ In Delivery Zone" or "⚠ Outside Zone", Distance, Est. Travel Time, and "From: … - …" (the store and its address) | After verification, when the store address can be located. The zone is a fixed 25 driving miles, separate from your delivery pricing zones. Shows "Calculating delivery distance..." while working. The card is information only and never stops an order being created |
| Outside-zone warning | Distance card | "⚠️ This address is outside our standard 25-mile delivery zone. Additional delivery charges may apply. You can still create the order." | Information only. No fee is added |
| "📍 Select an address from the dropdown to calculate delivery distance" | Under the address | Prompt to verify | Typed address not yet verified |
| Amber note "We could not work out the driving distance for this address. You can still create the order." with a Why? link | Replaces the distance card | Says the distance is not available and that the sale is unaffected. Why? shows the reason | Whenever the lookup fails, is refused or gets no answer |
| Plain text box with "Address lookup is not set up, so addresses are not checked here. Type the address as usual. The delivery distance is not worked out, and the order can still be created." | Replaces the address box | Type the address by hand | Only when Google Maps isn't set up for the site |
Tab: Sell — Step 3 Order Items
| Control | Where | What it does | Notes |
|---|---|---|---|
| Add product search box (box icon) | Step 3 header, left | Opens the product results (see "Dialog: Add product search"). Picking one adds a product line | 3 or more characters. Only active products, with stock shown for the chosen Store Location |
| Add service search box (gear icon) | Step 3 header, right | Opens the service results (see "Dialog: Add service search"). Picking one adds a service line | 2 or more characters. Services come from your services catalog, active ones only |
| Reminder with links Procurement and Services Catalog | Under the search boxes | "Reminder: Please ensure inventory items and service profiles are created before adding them to the order. If you can't find product or services here, go Procurement or Services Catalog to create them." Links open those pages | Leaving the page discards the unsaved order without a warning |
| "No items added yet" (box icon) | Step 3 body | Placeholder | When there are no lines |
| Blue numbered circle (1, 2, 3…) | Top-left of each line | Line number | Display only |
| Line name plus Product / Service badge | Line card | Item name and type | Display only |
| SKU: … badge | Line card | The item's SKU | When the item has one |
| Bulk Stock ▾ / Specific Item ▾ badge (tooltip "Choose a specific tracked unit or bulk stock") | Line card | Opens Select Specific Item. Enter or Space also opens it | Products that track stock only. Clickable only when there are tracked units or bulk stock. Starts as Specific Item when tracked units exist, but no unit is linked until you pick one |
| "ID: …" | Line card | First 8 characters of the chosen unit's ID | After a specific unit is picked |
| Badge Scheduled (calendar icon) with date "at …" and "• …" (team member) | Service line heading | Scheduling summary | After Save Schedule in the Service Scheduling dialog. Opening the dialog and cancelling leaves the line unscheduled |
| Badge No Schedule (calendar icon) | Service line heading | The service has no schedule yet | Unscheduled service lines |
| Blue box "Address:", "Service Note:", "Customer Note:" | Service line, right | Scheduling details | When a scheduled service has an address or notes |
| Schedule Now | Service line, top right | Opens Service Scheduling | Service lines only |
| Trash icon (red, no tooltip) | Line card, top right | Removes the line at once, with no confirmation. Totals recalculate | Nothing is saved until Create Order |
| Qty | Line field 1 | Quantity. Line total recalculates | Minimum 1 (blank or 0 becomes 1). For tracked, non-oversell lines, the maximum is the stock available when the line was added. Typing more caps it with the toast "Only … in stock. For the extra … unit(s), please create a separate order and select "Allow Oversell" when adding the item." — or, when nothing at all is free to sell, "Nothing here is free to sell. Remove the line and re-add it with "Allow Oversell" to sell it anyway." The mouse wheel doesn't change it |
| Red chip Oversell | Under Qty | This line may sell more than is in stock. Stock can go below zero (backorder) | When the shelf here was empty when the line was added, when you pressed Allow Oversell, when the product doesn't track stock, or when it came from a walk-in want the shelf here cannot cover and every unit on that shelf is free to sell. Stock that is here but promised to open orders does not set it — whether the line was picked by hand or filled in from a walk-in want, and whether all of it is promised or only the part that would make up the difference |
| "Max: …" | Under Qty | The quantity cap | Tracked, non-oversell lines |
| Price | Line field 2 | Unit price. Starts at the product's Sale Price or the service's base price. Editable | Minimum 0. When a pricing rule is on, the old price shows struck through in red and the new one in green. The mouse wheel doesn't change it. Typing a price here prices this sale only — the product keeps its own price in the catalogue — and the saved order keeps both, so a deal given at the counter is recorded as a deal rather than as a sale at full price. A line with nothing in the catalogue behind it (a one-off line, a delivery fee, a product or service priced at nothing, or one that was never priced) records the price charged and no catalogue price at all. A service booked from a service profile records that profile's base price as its catalogue price |
| Green pricing-rule chip(s) (tooltip such as "10% off", "$5 off" or "$5 points") | Under Price | Name of each rule switched on for this line | When an enabled rule affects the line |
| Warranty $ | Line field 3 (products) | Warranty charge, added to the line Subtotal and order subtotal, and taxed with the order in unified mode | Optional, minimum 0 |
| Terms dropdown | Line field 4 (products) | No Warranty, 3 Months, 6 Months, 9 Months, 1 Year, 2 Years, 3 Years, 4 Years, 5 Years | Optional |
| Provider dropdown | Line field 5 (products) | Store, Manufacturer, Combination, Assurant, CPS, OnPoint, SquareTrade, Upsie, Clyde, Others | Optional. The order page uses the same list |
| Details | Line field 6 (products) | Free-text warranty details, such as a contract number | Optional |
| Subtotal (read-only) | End of the line | Products: Price × Qty + Warranty $. Services: Price × Qty | Display only |
| Taxable checkbox | Line row (services: second row) | Unticked lines are not taxed | Only with Separate Tax on. Ticked by default. An unticked line stays untaxed in either mode: switch Separate Tax back off and the order is taxed at the one rate again, but only on the lines that are still ticked, and the order total drops by the tax that line was never meant to carry |
| Rate % | Line row (services: second row) | This line's tax rate | Separate Tax only. Starts at the unified rate. 0 to 100, up to 3 decimals |
| Tax (read-only) | Line row (services: second row) | This line's tax | Separate Tax only |
| Amber "Nothing available here." prompt | Bottom of a line card | Lost-sale reasons (see "Prompt: Nothing available here.") | Sell only. On a tracked line with nothing available here, unless you added it with Allow Oversell or it came from a walk-in want |
Tab: Sell — Step 4 Tax Settings and Step 5 Order Notes
| Control | Where | What it does | Notes |
|---|---|---|---|
| Separate Tax switch | Step 4 header, right | Off: one rate, charged on every line whose Taxable box is ticked (items plus warranty, minus discount). On: each line gets its own Taxable and Rate %, starting at the unified rate | Off by default. Either way, a line you have unticked is left out of the tax and nothing is charged in its place |
| "Unified Tax Mode" / "Same tax rate will be applied to all taxable items." | Under the switch | Explains the mode | Separate Tax off |
| Unified Tax Rate (%) | Step 4 body | The order tax rate. Filled in from the chosen store's tax profile, and refilled when the Store Location changes | Hidden while Separate Tax is on. 0 to 100, up to 3 decimals. Until the profile has been read it shows a default (8.25 or your industry default) for the first moment only. Errors: "Tax rate cannot be negative", "Tax rate cannot exceed 100%", "Allow up to three decimal places" |
| "Profile: … (… active rules)" | Under the rate | The tax profile in use | When a profile loaded |
| Blue box Item-Level Tax Mode | Step 4 body | "Individual tax rates will be set for each order item. You can specify different tax rates for different items below." and "Default rate: …% (will be applied to new items)" | Separate Tax on |
| Step 5 header (click anywhere) or chevron button | Step 5 header | Expands or collapses the notes | Collapsed by default. A refused Create Order that names a note opens it and scrolls to the note |
| Customer Notes (placeholder "Notes visible to the customer (shown on invoice and delivery documents)") | Step 5 | Saved as the customer note. Helper: "✅ Visible to customer • Shown on invoice and delivery documents" | Optional, up to 2000 characters |
| Shipping Notes (placeholder "Special shipping instructions, delivery preferences, etc.") | Step 5 | Saved as the order's delivery notes. Helper: "📦 Visible to customer • Shown on invoice for shipping coordination" | Optional, up to 2000 characters |
| Internal Notes (placeholder "Internal staff notes, special handling instructions, etc.") | Step 5 | Staff-only note. Helper: "🔒 Internal only • Not visible to customer or on invoice" | Optional, up to 4000 characters. Switching a pricing rule on adds a line here automatically (for example "…: -10%/item (all items)"), and switching it off removes it. On submit, a "PRICING RULES APPLIED" block and a "[Loyalty] Redeemed … pts ($…) from …" line are added |
Tab: Sell — Step 6 Payment Details
| Control | Where | What it does | Notes |
|---|---|---|---|
| Separate Payment switch | Step 6 header, right | On: shows Additional Payments (Payment 2 and 3) and stops Payment 1 following the total. Off: Payment 1 Amount follows the amount due, and changes with the total, until you type your own amount in it | Off by default. Greyed out while Order Status is Cancelled |
| Amber note "A cancelled order takes no payment. Nothing entered here is recorded." | Top of Step 6 | Explains why the payment fields are greyed out | Only while Order Status is ❌ Cancelled. Choosing Cancelled sets Payment 1, 2 and 3 and the Redeem Amount to $0, and every field in Step 6 is greyed out. Choosing another status fills Payment 1 in again (unless Separate Payment is on) |
| Loyalty Redemption box: Program (placeholder "Select program", options "… pts", or "… of … pts usable" when some have expired; a deactivated program adds "(inactive: redeem only)") | Top of Step 6 | Chooses the program to redeem from. Same setting as Step 7's Redeem points. Picking a program with less credit lowers the amount to fit | Only when an existing customer is picked. "No loyalty memberships for this customer." when they have none |
| Redeem Amount ($) | Loyalty Redemption | Dollar credit to redeem, in cents. Anything above the program's credit or the order total is lowered automatically. When the order is created it is recorded as a Store Credit payment and the points are deducted, together | Greyed out until a Program is chosen. Helper: "Available credit: $… (Selected program: $…)", or "Choose a program first."; "Expired points can't be redeemed." when a balance includes expired points. Credit counts unexpired points only |
| Earnings note "Earnings are based on subtotal excluding discounts, redeemed credit, tax, shipping, and gift cards." and "Estimated earn this order: …: … pts" | Loyalty Redemption | Information | Customers with programs. Estimates cover active programs only |
| Payment 1 Method (searchable button) | Payment row 1 | Opens the payment-method picker | Default Cash. Error: "Please select a payment method" |
| Payment 1 Status (placeholder "Status") | Payment row 1 | Pending, Processing, Completed, Failed, Refunded. Only Completed payments count toward the order being paid | Default Completed. On a sale the customer takes away — Order Status ✅ Completed, 🚛 Shipped or 📦 Delivered — an Amount equal to the total with a Status that isn't Completed is refused: "Payment status should be Completed when payment amount matches total". The refusal goes the moment it is met — set the Status to Completed, or move the Order Status to one where the goods have not gone yet — without pressing Create Order again. The total it checks includes a delivery zone fee and each line's Warranty $, but it uses the one unified rate, so it may not fire when Separate Tax is on. On an order the goods have not left on yet (🚚 Pending Delivery, ⚙️ Processing) the same entry is allowed, so the driver can collect on delivery; an amber note appears instead: "Payment 1 covers the whole amount due but is not marked Completed, so this order is saved as unpaid. Mark it Completed once the money is taken." The amount it compares against is what the box fills in — the total less any loyalty credit — so the note still appears on an order with credit redeemed. A ❌ Cancelled order is different: every payment amount is set to $0 and the fields are greyed out, so there is nothing to note |
| Payment 1 Amount $ | Payment row 1 | Amount tendered. Fills in the total minus any redeemed loyalty credit, or $0 when Order Status is Cancelled | Follows the total as it changes — an item added, the discount, the tax rate, a delivery zone fee — until you type an amount here yourself, which then stays as you typed it (the strip below Payment 3 shows what is left). A link "Use the amount due ($…)" appears under it while your figure differs from the amount due, and puts the box back to following the total. Reset Form and choosing Cancelled do the same. Never filled in while Separate Payment is on. Recorded only if more than 0. Error: "Payment amount cannot be negative". The mouse wheel doesn't change it. A Cash payment above what is due is recorded at the amount kept, with "Tendered $X, change $Y" in its note: the change you hand back is not money the store took. The change comes off the last completed cash payment first. A card payment is recorded as typed, since a card gives no change; the order then shows the extra as credit due |
| Payment 1 Note | Payment row 1 | Note saved on the payment | Optional, up to 500 characters: "Payment notes must be less than 500 characters" |
| Payment 2: Method (searchable), Amount $, Status, Note | Additional Payments | A second payment, recorded if the amount is over 0 and a method is chosen | Separate Payment on. Status starts at Pending, so it isn't counted as paid until set to Completed |
| Payment 3: Method (plain grouped dropdown, not searchable), Amount $, Status, Note | Additional Payments | A third payment, same rules | Separate Payment on. Status starts at Pending |
| Payment strip: Amount due, Loyalty credit applied, Entered, then Remaining $…, Change $… or Fully covered | Bottom of Step 6 | Adds up what the order owes against what you have typed, in real time | Shown whenever Separate Payment is on, whenever what you typed does not cover the amount due, and whenever it is over. A plain counter sale that fills itself in shows nothing. Loyalty credit applied appears only when credit is being redeemed. While Order Status is ❌ Cancelled the strip reads "$0.00 due — nothing is recorded" |
| Card reader, online charge or payment link | Not on this page | Payments here are recorded, not charged | If card payments are set up for your store, take them from the order afterwards. See Card payments |
Tab: Sell — Step 7 Promotions & Loyalty Benefit
| Control | Where | What it does | Notes |
|---|---|---|---|
| Step 7 header (click, chevron) | Step 7 header | Collapses or expands the card. Status text: "Add items to apply", "… active", "Saving $…" or "No rules available" | Expanded by default |
| Pricing Rules panel (tag icon) with "Saving $…" badge | Left column | Lists rules that apply to this order: active, within their dates and valid for this location | Empty states: "Add products to see pricing rules", "No pricing rules available". Loyalty-type rules aren't listed here. Every active rule your store has is read, however many there are |
| + Add Rule link | Pricing Rules header | Opens Catalog → Products → Pricing Rules in a new browser tab | Always shown. See Products |
| Rule card: name, type badge (Promotion, Product, Customer, Volume, Seasonal, Bundle or the type in words), adjustment badge ("10% off", "$5.00 off", "Fixed: $…", "$… points") | Pricing Rules list | Describes the rule. Faded when switched off | |
| Badge Manager approval required | Rule card | The rule never switches on by itself, and only the owner or a manager can switch it on | For anyone else the switch beside it is greyed out and the card reads "Ask a manager to switch this on". Switching the rule back off is always allowed. If the switch is somehow used anyway, saving the order is refused with "A manager has to approve the pricing rule …". A rule set to need approval only above a certain discount shows the badge, and is refused, only once that rule's own discount reaches it — what other rules take off the same line makes no difference. Your store works that discount out for itself when the order is saved, from the rule's own setting and the product's catalogue price, so a request that claims the rule took less off than it did is refused just the same. A line the rule's own conditions leave out — below its minimum quantity, or outside its price range — is not weighed against it, so a rule whose card shows no badge never refuses the sale. A rule's discount is counted over the whole line, so raising the quantity can take a rule that was switched on freely over its limit: the card then reads "This one now needs a manager. Ask one to approve it, or switch it off." and the switch stays live so you can switch it off |
| Badge Not combinable | Rule card | When on, it is the only rule applied to that item; the highest-priority one wins | |
| "Condition: …", "Applies to: All eligible items" or the item names, "Saves … per item" / "Would save … per item", "Adds +$… surcharge" / "Would add +$… surcharge" | Rule card | Explains the effect. Conditions read like "Qty ≥ 3", "Customer: …", "Emergency", "After Hours" | Surcharge wording when the rule raises the price. A rule that is not targeted at particular products still prices only the lines that meet its own conditions: with "10% off, minimum quantity 5", a line of 1 keeps its price and is left out of the badge. While no line on the order qualifies, the card stays on the list as a promotion worth knowing about, shows what the line would cost, and takes nothing off — the surcharge wording then reads "Would add +10% per item" rather than naming a figure |
| Rule switch | Right of each rule card | Applies or removes the rule. Line prices change (old price struck through) and Internal Notes gain or lose a line | Starts on only for matching product, category and volume rules. Starts off for promotions, seasonal, bundle, customer and every other type, and for any approval rule. Your choice is usually kept while you edit, but adding or removing a product, or a quantity change that makes a rule start or stop applying, can put the switch back to its starting position |
| Loyalty Program panel (gift icon) | Right column | Enrolment or redemption | |
| + Add Program link | Loyalty Program header | Opens the Loyalty Program page in a new browser tab, on the Create Program tab | Always shown. See Loyalty Program |
| "Select a customer to see loyalty info" | Loyalty panel | Prompt | Existing Customer on, nobody picked |
| "New customer - not enrolled" / "Not enrolled in any program" with Enroll on submit switch | Loyalty panel | When on, the customer joins the chosen program when the order is created, and this order earns points in it | New customers, or existing customers with no program. The points match Points to earn in the summary. With Order Status ❌ Cancelled the customer still joins, but the cancelled order earns nothing |
| Program dropdown (placeholder "Select program..."; options show "Earn … pts/$… (=$…)" or "1 pt = $…") | Loyalty panel | Program to enrol in | After Enroll on submit is on. With no programs the panel reads "No loyalty programs yet. Create one in Growth → Loyalty Program." — "No loyalty programs yet — set one up in Growth → Loyalty Program." with the switch off — and the words Growth → Loyalty Program open that page in a new tab |
| Member card (check icon): program, "… pts", "… usable", "($…)", "Earn +… pts from this order" | Loyalty panel | Existing member's balance, credit and estimated earn | Existing members. The credit counts unexpired points only; "… usable" shows when some points have expired. A deactivated program shows "Inactive: redeem only" and no earn line |
| Redeem points switch (per program) | Member card | Selects this program for redemption and resets the amount to $0. Off clears the redemption | "No credit available" when the program has no unexpired credit |
| Redeem slider with "$…", "$0" and "Max: $…" | Member card | Drag to set the credit to redeem, in cents | Redeem points on. Max is the smaller of the program credit (unexpired points) and the order subtotal |
Tab: Sell — Order Summary and Submit Order
| Control | Where | What it does | Notes |
|---|---|---|---|
| Order Summary card (receipt icon): "Double check the key points and values before you click the "Create Order" button." | Below Step 7 | Live, read-only recap | Never greyed out |
| Customer:, 📍 Delivery: | Summary, left | Customer name and delivery address | Each line shows only when it has a value |
| Store Location:, Fulfillment:, Cashier:, and the payment lines | Summary, left | Echo the form; Cashier: is the team member the sale will be credited to. With one payment and no loyalty credit the lines are Payment:, Payment Status: and Paid:, and they describe the payment actually being taken — even when that is Payment 2 or Payment 3 and Payment 1 was left empty. As soon as the money is split across more than one payment, or a loyalty credit is paying for part of it, each one gets its own line instead — "Payment 1: Cash — Completed — $50.00", "Payment 2: …", "Payment 3: …" — followed by Loyalty credit: when there is one, then Tendered: and Remaining: (or Change: when more was taken than is due). Only payments the order will actually record are listed, which is the same rule the save uses: Payment 1 whenever it has a method and an amount, and Payments 2 and 3 only while Separate Payment is on. With Order Status Cancelled every payment line is replaced by "Payment: No payment (order cancelled)" | Fulfillment and the payment method read as the form shows them, for example "Store Pickup" and "American Express" |
| Total Products (…) with chips "… x …", Total Services (…) | Summary, right | Product and service totals | Warranty isn't in these lines |
| Delivery fee — … | Summary, right | The delivery zone fee | Only while the zone-fee checkbox is ticked |
| Discount (green, minus) | Summary, right | Extra Discount | When above 0 |
| Subtotal "(Item prices + Warranty prices) - Discounts" | Summary, right | Subtotal after discount | Reads "(Item prices + Warranty prices + Delivery fee) - Discounts" when a zone fee is on the order |
| Tax (…%) or Tax (Item-level) with a line per taxable item | Summary, right | Tax | Depends on Separate Tax. The delivery fee is taxed at the order's rate and has its own line under Tax (Item-level) |
| Loyalty Credit (purple, minus) | Summary, right | Redeemed credit | When above 0 |
| Points to earn (…) "+… pts" (gift icon) | Summary, right | Points this order earns: the subtotal after discounts (without the delivery fee), minus loyalty credit, times each active program's earn rate, rounded down. Includes a program joined with Enroll on submit | When above 0. The program name shows when only one program earns |
| Total | Summary, right, large | Total after tax minus loyalty credit | Includes a ticked delivery zone fee and its tax. This is the amount Payment 1 fills in, and the order is saved with the same total. There is no separate "amount due" line |
| Red banner naming the field, for example "Payment 1 Status: Payment status should be Completed when payment amount matches total" | Top of Submit Order card | Names whatever is wrong at that moment | The banner is drawn from what is wrong right now: if a different field goes wrong it names that one instead. It goes as soon as everything is right. Ordinary boxes are checked as you type, so the line can appear before Create Order is pressed. Three rules read more than one box and complain about one of them: the customer to pick, the customer's name, and the payment status against the total. The payment one is checked as you type like an ordinary box, because Payment 1 Status is a field on the form; the other two appear only after a refused press. They are re-checked as soon as anything they read changes, so picking the customer, typing both names, or changing the Order Status, the Amount, the discount, the tax rate, the items or the delivery fee clears the line the moment the rule is met, without pressing the button again; a rule that is still not met keeps its line, and what is wrong next takes its place. A rule about the customer as a whole is pointed at the box that is actually empty. A refused press also shows a message and scrolls to the field. "Please fix the highlighted fields before submitting." is used only when something is marked wrong without a message of its own |
| Reset Form (circular-arrow icon) | Submit Order card | Clears everything at once, with no confirmation: customer, items, notes, payments and loyalty. Starts a fresh order and removes any walk-in link | Store Location and tax are re-picked automatically. Cashier goes back to you. Disabled while saving |
| Create Order (green; "Creating..." with spinner while saving) | Submit Order card | Checks the form, then creates the order (see "Tab: Sell — what Create Order does"). Opens Order Created Successfully! or Order Creation Failed | Disabled with no items or while saving. Double-clicks can't create two orders |
Tab: Sell — what Create Order does
| Step | What happens | Notes |
|---|---|---|
| 0. Totals | The order is saved with the totals the summary showed: each line is its Price × Qty plus its Warranty $, less any line discount, and the order subtotal, tax and total are added up from those. A line whose total doesn't match its price, quantity and warranty is refused rather than saved, so the saved order can never disagree with the printed one | A line's Warranty $ is part of the saved subtotal, tax and total |
| 1. Loyalty check | Stops before anything is saved when loyalty credit can't be used: too much credit ("Redeem amount exceeds available credit for selected program."), no program chosen for a customer with points in several ("Choose the loyalty program to redeem from."), or a Cancelled order | Only when redeeming |
| 2. New customer | Creates the customer (name, phone, email, Customer Source, SMS and marketing consent) and their address. Both tabs build the customer the same way | The SMS opt-in is kept only when a phone number was entered |
| 3. Stock and stage | Completed, Shipped, Delivered: stock leaves now (on hand and available drop) and lines are marked fulfilled. Pending Delivery, Processing: stock is reserved (available drops, committed rises). Cancelled: no stock change; order filed as Cancelled | The order is filed at the stage you picked, in the same step as the stock. Both stages are checked against the same number — see the next row. The stock record is held while the order saves, so two people selling the last unit at the same time queue up and the second is refused rather than both going through |
| 4. Stock guard | Every stage is checked against available — what is on the shelf less what other orders have already claimed, over every one of the product's stock records at this location (one per variant) added together — and fails with "Insufficient stock for product … at location …: available …, requested … — … unit(s) are promised to open orders (enable Allow Oversell to backorder)." A Completed, Shipped or Delivered order is checked against what is on the shelf as well, and fails with "…: on_hand …, requested … (enable Allow Oversell to backorder)" if the shelf itself would go below zero | Counter sales and deliveries face the same check, so a line refused one way is refused the other. The line's units come off the product's records oldest first: each gives what it has free, and the next record is used when one runs out, one stock movement per record. A unit picked on the line (Specific Item) comes off its own record first, even when that record is not the oldest, and the rest of the line by the same rule. That unit has to still be free to sell here: one another order holds or has sold, one at another location, one switched to Not Available, or one already on another line of the sale is refused with "Unit … of … is no longer available at …: …", naming why, and nothing is saved. A unit that isn't one of this store's units of the line's product is refused on a quote too. With Allow Oversell, what none of them has free goes below zero on the oldest record, the same one every time. A product with one record here is sold from it. Either check is satisfied by ticking Allow Oversell on the line, which is what lets a backorder go below zero. Triggered when stock changed after the line was added, or the Store Location changed after adding lines. A Completed, Shipped or Delivered sale of a product that tracks inventory but has no stock record at this location is not refused: the goods leave now, so the record is made at this location at 0, at the line's cost, and taken below zero, as a delivery does. The sale is booked with its cost, and Inventory → Snapshot → Audit lists the product under Negative on-hand until the stock is received or counted there. A Pending Delivery or Processing sale of such a product counts it as 0 there too: without Allow Oversell it is refused with "Insufficient stock for product … at location …: available 0, requested … — there is no stock record for it at this location yet (enable Allow Oversell to backorder, or receive it there first)." With it (the form ticks it for a product picked from an empty shelf) the record is made at 0, at the line's cost, and the units are reserved on it below zero, so the order holds them and the Audit lists the product under Over-reservation until the stock arrives. A product with Track inventory off and no stock record moves no stock |
| 5. Payments | Records Payment 1, 2 and 3 (only those over 0 with a method) | A Cancelled order records no payment at all. If recording fails, the order still exists (see Messages) |
| 6. Loyalty | Saved together with the order in step 3: enrols the customer (Enroll on submit), deducts the redeemed points and records the credit as a Store Credit payment, and adds this order's points in every active program the customer belongs to, including one joined now | If the points can't be deducted (for example they expired after the page loaded), the order isn't created and a message says why. A customer created in step 2 is kept. Cancelled orders don't earn or use points, but Enroll on submit still enrols the customer. The credit counts toward the order being paid; it doesn't change the status the order is filed with |
| 7. Scheduled services | Books one appointment for each scheduled service, on its date. Nothing books repeat visits: each later visit is booked on an order of its own | A service without a date isn't booked: "…: Scheduled date is required to book this service". Not for a Cancelled order |
| 8. Pricing rule usage | Updates each applied rule's usage count | Never blocks the order. Not for a Cancelled order |
| 9. Walk-in | Closes the linked walk-in visit as a sale and marks that customer's matching requests fulfilled | Only for orders started from a walk-in, and not when Cancelled |
Tab: Returns
| Control | Where | What it does | Notes |
|---|---|---|---|
| Card Create a Return Order (circular-arrow icon), "Return orders are processed from existing sales orders" | Returns tab | Heading | Always shown |
| Numbered list "How to create a return:" — "Open Sales → List", "Find the original sales order and open it", "Choose ⋯ More actions → Create return", "Pick the items and quantities coming back", "Press Process Return to record the refund" | Grey box | Guidance | Followed by "Returns can't be made from quotes, scrap orders or other returns, and only units that left the store can come back — a cancelled order takes no return at all, so return the delivered items before you cancel what is left." |
| Go to Order Management (arrow icon) | Card | Opens the order list | Always enabled. Helper under it: "Open the sale you are taking goods back on, then use ⋯ More actions." See Order Management |
| Real return flow | Order Management | Open the order, ⋯ More actions → Create return, dialog "Return Items from Order …", Process Return | Not offered on quotes, scrap orders or return orders. Only units that left the store can come back, and a cancelled order takes no return at all |
Tab: Others — Step 1 and customer
Steps lock in order, like Sell. The customer step unlocks once a store location is known. Items unlock once a customer is picked or First and Last are typed; for Scrap, straight away. Tax, Notes and Submit unlock once there is an item. For Scrap, the customer and tax steps are hidden, so the badges read STEP 1, STEP 3, STEP 5.
| Control | Where | What it does | Notes |
|---|---|---|---|
| Quote card "Generate quote for customer - allows product selection, no inventory impact" | Step 1 Special Order Basics, left | Selects Quote. The card turns blue with a check | Default. No payment, no stock change |
| Scrap card "Scrap inventory items - deducts from inventory quantity" | Step 1, right | Selects Scrap. The card turns red with a check. Hides the customer step, tax step, service search and the warranty fields, and sets every line price to $0.00 (toast "Scrap Order", "Item prices set to $0.00 for inventory write-off.") | Switching back to Quote restores each line's price, rate and Taxable setting exactly as they were, and says so: toast "Quote Order", "Prices restored on … line(s)." A line added while Scrap was on comes back at its catalog price; a line you had deliberately priced at $0.00 stays at $0.00. A Warranty $ typed before the switch is ignored while Scrap is chosen: the totals and the saved order both stay at $0.00 |
| Priority dropdown (placeholder "Priority Level *") | Step 1 | Low, Normal, High, Urgent, Emergency. Urgent or Emergency marks the order as rush | Default Normal |
| Store Location dropdown (placeholder "Store Location *") | Step 1 | Store the quote or scrap is written against. For Scrap, where stock is deducted. Also sets the stock shown in product search. Options show "Name (location type)" | Pre-filled with your primary location if active, else the first active location. Only active locations are listed. The dropdown holds one greyed-out entry — "Loading locations…" while the list is being read, "No locations available" once it has been read and is empty |
| Helper under Store Location | Under Store Location | The same three states as Sell: "Loading locations…", "… location(s) available", or "No locations available — add one in Settings → Locations." | Always shown |
| Required By Date | Step 1 | Date the quote or scrap is needed by; saved on the order | Optional. Defaults to today's date in your store's time zone. Set the time zone in Settings → Organization; without one it follows the browser |
| Existing Customer switch | Step 2 header | Same as Sell | Flipping it either way empties every customer box, so the previous customer's name never rides along. Type First and Last for the new customer |
| Search Customer and customer results | Step 2 | Same as Sell (see "Dialog: Search Customer") | Required when Existing Customer is on |
| Selected customer: Basic Info, Address, Loyalty Info | Step 2 | Same as Sell | An edited address is used on the printed quote only. Quotes and scrap don't earn or redeem loyalty |
| First, Last (required) | Step 2 | Customer name | A new customer needs a full name of 2 or more characters: "Enter the customer first and last name" |
| Phone | Step 2 | Formats as you type | Optional. If typed, must be valid: "Enter a valid phone number, or leave it blank". Saved on the new customer in +1 international format, as on Sell, and printed on the quote |
| Step 2 | Customer email | Optional. Saved on the new customer and printed on the quote | |
| Customer Source | Step 2 | Same picker as Sell, and saved on the new customer the same way | Optional |
| Delivery Address (Google suggestions) | Step 2 | Saved as the new customer's address | Required: 10 or more characters, "Enter the full delivery address". See "Section: Address box and delivery distance" |
| Opt-in to receive service updates (SMS), Opt-in to receive marketing updates | Step 2 | Saved on the new customer | Unchecked by default. The SMS opt-in is saved only when a phone number is entered; without one the customer is saved as not accepting texts |
Tab: Others — Items, Tax and Notes
The items step works like Sell, with these differences.
| Control | Where | What it does | Notes |
|---|---|---|---|
| Add product search | Step 3 | Same as Sell. Products are added at their Sale Price (Scrap: $0.00) | Scrap: every product with nothing on hand at this store, on any of its stock records (one per variant), is hidden from the list, whether or not it tracks stock — there would be nothing to write off, and the save refuses such a line. Stock on the shelf that is all promised is listed, with its "None free to sell … promised to open orders" strip |
| "Out of stock at …" and Allow Oversell | Product results | Adds the product as an Oversell line | Quote only. Never on Scrap. On Scrap a product with nothing on hand here can't be picked at all; "… has nothing on hand at this location to write off." if one is reached another way |
| Add service search and "Can't find it? Add Service" | Step 3 | Adds a service line | Hidden on Scrap. On a quote the line is saved as a service, with the service it came from |
| Schedule Now and scheduling badges | Service line | Same dialog as Sell | On a quote the date, time and note are saved as the visit the customer asked for, read in your store's time zone. No technician is booked and nothing appears on the calendar until the quote becomes a sale |
| Qty | Line | Same as Sell, capped at stock for tracked, non-oversell lines, and for every line of a scrap | On Scrap the cap is what's on hand at the store, promised or not, and the toast reads "Only … on hand at this location to write off." — it does not offer Allow Oversell, which Scrap doesn't have. A quantity above what is free is asked about when you save |
| Price | Line | Unit price | On Scrap, any price is reset to $0.00 with the "Item prices set to $0.00…" toast, and comes back when you switch to Quote. Pricing-rule chips never appear on Others |
| Warranty $, Terms, Provider, Details | Product line | Same lists as Sell | Quote: saved on the line, as on Sell, and the line total includes Warranty $. Not shown on Scrap: a write-off line is always $0, and its Subtotal reads $0.00 |
| Taxable, Rate %, Tax | Line | Per-line tax | With Separate Tax on. Each line is saved with its own rate and its own Taxable setting, and the quote's tax is those lines added up — the same figure the summary and the printed quote show |
| Trash icon, Bulk Stock / Specific Item badge, Oversell chip, "Max: …" | Line | Same as Sell | On Scrap the specific unit you pick is the one written off |
| Variant ("Pick the variant being written off"), with "Stocked here as more than one variant: pick the one being written off, or pick the unit." | Scrap line, under the name | Lists each variant of the product with stock on the shelf at this store, "White (3 on hand)", with "No variant" for stock kept without one. The one picked is written off, and the line's stock, cap and units list become that variant's | Only on Scrap, and only when two or more variants have stock here. Picking a unit sets it to the unit's variant; a unit of another variant is let go when you change it. Required before saving unless a unit is picked. A product with stock under one variant only is written off from that one without asking |
| Separate Tax switch | Step 4 Tax Settings header | Off: one rate. On: "Item-Level Tax Mode", "Individual tax rates per item. Default rate: …%" and per-line tax fields | Hidden for Scrap. Off by default |
| Tax rate (placeholder "Tax Rate", % suffix) | Step 4 | Order tax rate | Filled from your default tax profile, or 8.25% until it has been read. Reset Form and Create Another keep the rate that was read, so a follow-on quote is taxed the same as the first one. 0 to 100, up to 3 decimals |
| "Profile: … (… active rules)" and "Same tax rate applied to all taxable items." | Step 4 | Explain the rate | Profile line only when a profile loaded |
| Step 5 Order Notes (Optional) header or chevron | Step 5 | Expands or collapses | Collapsed by default. A refused Create Order that names a note opens it |
| "Customer Note — visible on order documentation" | Step 5 | Saved as the customer note and printed | Up to 2000 characters |
| "Delivery Note — delivery instructions, special handling" | Step 5 | Saved as the delivery note | Up to 2000 characters |
| "Internal Note — staff only, not visible to customer" | Step 5 | Saved as the internal note | Up to 4000 characters |
Tab: Others — Summary and Submit Special Order
| Control | Where | What it does | Notes |
|---|---|---|---|
| Quote Summary (receipt icon), "Double check the key points and values before you click the "Create Quote" button." | Below Step 5 (Quote) | Customer, "📍 Delivery", "Store Location", "Total Products (…)" / "Total Services (…)" with chips, "Subtotal", "Tax (…%)" or "Tax (Item-level)", "Total" | Display only. There is no Discount line, because Others has no discount field |
| Scrap Summary (red), "Confirm inventory write-off details. This action will permanently deduct items from stock." | Below Step 5 (Scrap) | "Scrap Location:", an Inventory Impact table (Item, Qty "-…", Stock Level "before → after" on hand, Status "SCRAPPED", with, when the write-off takes more than is free, "… held off sale (a damaged or defective return) and … promised to open orders — you will be asked to confirm" (either part alone when that is all it takes), or "Pick the variant being written off" on a line that still has to say), and "Items will be marked as SCRAPPED and removed from AVAILABLE inventory immediately upon submission." | Display only. "No items selected for scrap" when empty. The grey "SKU: …" under an item is its SKU, and is left out for an item without one. Stock numbers are from when the line was added, read off the record the write-off takes — for a line added while Quote was picked too: switching to Scrap puts that record's figures on it, and switching back to Quote puts the sale's back |
| Create Quote / Create Scrap Order ("Creating..." while saving, "Loading..." while the store loads) | Submit Special Order card | Quote: creates the customer if new, then saves the quote and every line in one go, and opens the success dialog. Scrap: saves the order (no customer), its $0 lines and the stock write-off in one go, shows the scrap toast and resets the form | Disabled with no items, while the store loads, if the store couldn't be loaded, with no location, or while saving. A scrap is confirmed only when it takes more than is free (the Record the loss? window). If anything is refused, nothing at all is saved and the message says why |
| Reset Form (circular-arrow icon) | Submit card | Clears the whole form with no confirmation. Type goes back to Quote, Priority to Normal, Required By to today at your store, and the tax rate to your store's own rate. The Store Location box goes blank, and the order would then use your own or the first location | Disabled while saving |
| Grey box under the buttons | Submit card | Why the button is disabled: "Loading organization data...", "Organization data not available. Please refresh the page and try again.", "Please add at least one item to create the special order.", "Please select a store location." or "Please fix the highlighted fields." | Only while disabled |
| Red box under the buttons | Submit card | What is wrong with the form right now, as "…: …" (field and message), or why the last save was refused | The field line is read from the form as it is now, as on the Sell tab: it goes as soon as the field it names is put right, and names the next field if another is wrong. A refused save stays until the next submit or Reset |
Tab: Others — what gets saved
| Topic | Quote | Scrap |
|---|---|---|
| Order | A quote, status Completed, with a new order number | A scrap order, status Completed, no customer |
| All-or-nothing? | Yes for the order: the order and all its lines are saved together, or nothing is. A new customer is saved first and stays if the quote is then refused; correct the quote and save again, and the same customer is reused | Yes: the order, its lines and every stock write-off are saved together, or nothing is |
| New customer | First and last name, phone (+1 format), email, address, Customer Source and the two opt-ins (the SMS opt-in only with a phone). A retry after a failed save reuses the customer the first attempt created, unless you changed their details | None |
| Lines | Qty, price, each line's own Taxable setting and rate, warranty details, and for a service its service and the visit asked for. A service line waits for the quote to be accepted before it can be dispatched | Qty, $0 price, no warranty, status SCRAPPED, and the serial numbers of any tracked units written off |
| Totals | Added up from the saved lines: subtotal (including Warranty $) and the lines' own tax, so the saved quote always matches the one on screen and printed | $0, and the Scrap Summary on screen shows $0 too |
| Stock | No change | Picked specific units are written off first. For the rest of the quantity the system picks other available tracked units at that store, then takes any remainder from bulk stock. When the product is stocked per variant, the write-off comes off the variant of the unit you picked, and the other units it takes are that variant's too. With no unit picked it comes off the product's stock with no variant, or the one variant holding any; if two or more variants hold stock it is refused, naming them, because it can't tell which one broke. More than is on hand at that store is refused, so a write-off can never take on hand below zero. More than is free to sell is saved once you confirm it: it comes first out of stock held off sale (a damaged or defective return, so the product's Reserved goes down and Available doesn't), and only the rest out of stock promised to open orders, taking Available below zero; the orders it leaves short keep their reservations. The part held off sale writes off the serial-numbered units a damaged or defective return holds there, with their serials on the line: those held on the stock record being written off first (where the product has more than one record at that store), then the oldest hold. A serialized unit an order holds is refused until it is freed; a unit a damaged return holds is held by no order, so it never is. Stock history reads "Inventory scrapped - damage" for the bulk part. The toast says the inventory was deducted only when every line was |
| Payment | None | None |
| Later | In Sales → List: Convert to Sale, and ⋯ More actions → Mark lost… | Returns aren't offered |
Dialog: Add product search
| Control | Where | What it does | Notes |
|---|---|---|---|
| Empty-state text | Dropdown | "Searching...", "Start typing to search products...", "Type at least 3 characters to search...", "No products found." plus "You can search by:" Product name, SKU, Barcode, Model, Serial Number, Description, and "Matching is case-insensitive and matches partial text." | Searches a moment after you stop typing |
| "Search failed. Please try again." (red) | Dropdown | The search errored | Retype to retry |
| Result row (click, or Enter) | Dropdown list | Adds the product as a line (qty 1, Sale Price) with "Added … to order". The dropdown closes and clears | In-stock products are listed first, most available first. Already on the order: "… is already in the order" and the list stays open. Location not loaded yet: "Location not loaded. Please wait and try again." A row with an empty shelf here is added as an Oversell line so it can still be sold on backorder. A row whose stock is all promised to open orders is added as an ordinary line instead, capped at nothing, with the "… all promised to open orders …" message in place of "Added … to order" — on a quote it is still added as an Oversell line. Both offer the "Nothing available here." lost-sale prompt |
| Row details | Result row | Name, variant, "SKU: …", "• Model: …", "• Barcode: …", "• S/N: …" (matched serials, up to 3 then "+…"), "Bulk Stock: …", "Trackable Stock: …", "Below Minimum", a "… available" or "Out of Stock" badge. Right side: "Sale Price: $…" and, when the product has one, "MSRP: $…" | "Sale Price" is the product's selling price, and "MSRP" is the manufacturer's suggested retail price from the product record. Most catalogs leave MSRP empty, and then no second price is shown. What you paid for the item is never shown here |
| "Out of stock at …" strip | Result row | Warns there is nothing on the shelf at this location | Tracked products with 0 available and nothing on the shelf, counting every one of the product's stock records here (one per variant): a product whose first variant is empty but whose other variant has stock is in stock and shows no strip |
| "None free to sell at … — … promised to open orders" strip | Result row | Warns that the units here are all claimed by open orders | Tracked products with 0 available but stock on the shelf. Without the count of promised units when the available figure has simply drifted below zero — run the stock check on Inventory → Snapshot then |
| Allow Oversell (small red button) | Out-of-stock strip | Adds the product as an Oversell line (stock may go below zero) and closes the list | Not on Scrap. Using this button says you mean to sell what is not there, so the line offers no lost-sale prompt |
| "Can't find it? Add Inventory" | Dropdown footer | Opens Procurement on the New Order tab in the same browser tab | The unsaved order is lost. A store with no purchase orders yet lands on the Import tab instead |
Dialog: Add service search
| Control | Where | What it does | Notes |
|---|---|---|---|
| Empty-state text | Dropdown | "Searching...", "Start typing to search services...", "Type at least 2 characters to search...", "No services found." plus "You can search by:" Service name, Description, and "Matching is case-insensitive and matches partial text." | Only active services are listed: a service switched off in the catalog gives "No services found." |
| Service row (click) | Dropdown list | Adds a service line (qty 1, base price, the service's duration or 60 min) with "Added … to order". Row shows name, description, "$…" and "… min" | Already on the order: "… is already in the order" |
| "Can't find it? Add Service" | Dropdown footer | Opens Catalog → Services on the Add Service tab in the same browser tab | The unsaved order is lost |
Dialog: Search Customer
| Control | Where | What it does | Notes |
|---|---|---|---|
| Search box (placeholder "Search by name, phone, or email...") | Dropdown | Searches your store's customers by name, phone and email | 2 or more characters. Up to about 10 results. Phones are stored as +1 and digits, so search with digits rather than "(555) …". Archived customers and Partners Network contacts are not offered: restore the customer from Growth → Customers first (start adding them again and use Restore customer) |
| Empty-state text | Dropdown | "Searching your organization...", "Type at least 2 characters to search...", "No customers found in your organization." | |
| Customer row | Dropdown | Picks the customer. Row shows name, phone, address, email, "Source: …" and "ID: …" |
Dialog: Customer Source picker
| Control | Where | What it does | Notes |
|---|---|---|---|
| Search box (placeholder "Type to search source...") | Dropdown | Filters the list. Enter picks the first match | "No sources found." when nothing matches |
| Source options (check on the chosen one) | Dropdown | Walk-In, Repeat Customer, Drive By, Google Search, Website, Facebook, Yelp, Craigslist, Nextdoor, OfferUp, Wechat, Referral - Friend, Referral - Financing Company (e.g. SNAP, Okinus), Email Campaign, Billboard, Radio, TV Ads, Online Purchase, Online Purchase - Facebook, Online Purchase - Google, Online Purchase - Referral, Others | Saved on a new customer on both tabs, and shown on their record afterwards. Picking one for a customer who already exists changes nothing about them |
Dialog: Payment method picker
Used by Payment 1 and Payment 2. Payment 3 shows the same list as a plain dropdown.
| Control | Where | What it does | Notes |
|---|---|---|---|
| Search box (placeholder "Type to search payment method...") | Dropdown | Filters by method or group. Enter picks the first match | "No methods found." when nothing matches |
| Cash & Check | Dropdown | Cash, Check | |
| Credit Cards | Dropdown | Visa, Mastercard, American Express, Discover, JCB, Diners Club, Other Credit Card | |
| Debit Cards | Dropdown | Debit Card, Debit - Visa, Debit - Mastercard | |
| Bank Transfers | Dropdown | ACH Transfer, Wire Transfer, Bank Transfer | |
| Financing | Dropdown | SNAP Financing, Acima Financing, Progressive Leasing, Koalafi (Okinus), American First Finance, Katapult, FlexShopper, Other Financing | |
| Digital Wallets | Dropdown | Apple Pay, Google Pay, Samsung Pay | |
| Payment Apps | Dropdown | Zelle, Cash App, Venmo, PayPal | |
| Store Value | Dropdown | Store Credit, Gift Card, Trade-in Credit | |
| Other | Dropdown | Warranty Claim, Insurance Payout, Other Payment Method | There is no loyalty payment method: loyalty credit is taken only in the Loyalty Redemption box at the top of Step 6, which deducts the points with it |
Dialog: Select Specific Item
| Control | Where | What it does | Notes |
|---|---|---|---|
| Title Select Specific Item, item name, "Choose a specific tracked item or select from bulk quantity" | Header | Opened from the Bulk Stock / Specific Item badge | |
| × | Top right | Closes without changes | Clicking outside or pressing Escape doesn't close it |
| Tracked-unit row (click, or Enter / Space) | List | Links that exact unit (serial) to the line, sets Specific Item, toast "Specific item selected". Row shows SKU, "S/N: …", "• …" (condition), "• Grade: …", a price and "Cost: $…" | The row price is information only; the line price doesn't change. On Scrap this is the unit written off |
| Bulk Stock row "… units available from bulk inventory" | List, last | Switches the line to bulk stock (no serial), toast "Switched to bulk stock selection" | When bulk quantity is above 0 |
Dialog: Service Scheduling
| Control | Where | What it does | Notes |
|---|---|---|---|
| Title Service Scheduling, "Configure scheduling and team assignment for this service" | Header | Opened by Schedule Now. Opening it changes nothing on the line: the service is scheduled only when you press Save Schedule | |
| "Repeat visits are booked one at a time: when this visit is done, add the service to a new order to book the next one." | Top of the dialog | Says how the next visit is booked | A service is one visit; there is no repeating schedule. A line still marked to repeat shows an amber note instead: "Only this visit is booked, not the repeats this service was set to." followed by the same sentence, and Save Schedule keeps just the one visit |
| Service Date | Dialog | Appointment date | No past dates: the earliest you can pick is today in your store's own time zone, so an evening booking for the same day is still allowed. Required: Save Schedule refuses without it and says "Pick a service date before saving the schedule." |
| Start Time | Dialog | Appointment time | Optional |
| Duration (minutes) | Dialog | Estimated length | Minimum 15, steps of 15. Starts at the service's duration or 60. Emptying the box, or typing 0 or a number below 0, puts it back to 60 |
| End Time (calculated) | Dialog | Greyed out. Shows the start time plus the duration, and is saved with the appointment | Blank until a start time and a duration are both set. A job running past midnight wraps round to the next day's clock |
| Assign Team Member dropdown: No assignment (default) plus team members (green dot when their employment status is Active) | Dialog | Assigns a worker | Lists all active users in your store. "(Loading...)" beside the heading and the dropdown greyed out while the list loads. Then "Found … worker(s) in your organization", or a greyed-out "No workers found in your organization" option. Error "Error loading workers: …" with "You can still proceed without assigning a worker." |
| Service Location (placeholder "Enter service address...") | Dialog | Where the job happens | Pre-filled from the customer's delivery address |
| Priority | Dialog | Low, Normal, High, Urgent, Emergency | Default Normal |
| Can reschedule switch | Dialog | Whether the appointment can be rescheduled | On by default |
| Service Notes (for worker) (placeholder "Special instructions for the worker...") and Customer Notes (placeholder "Notes for the customer...") | Notes | Saved on the appointment | |
| Cancel | Footer | Closes the dialog and keeps nothing you changed in it | Nothing typed here reaches the line until Save Schedule, so a line that was not scheduled before stays unscheduled. Outside click and Escape don't close it; there is no × |
| Save Schedule | Footer | Puts everything in the dialog onto the line and closes. The line then shows Scheduled and the date | The only thing that changes the line. Refused with no Service Date |
Prompt: Nothing available here. (lost sale)
| Control | Where | What it does | Notes |
|---|---|---|---|
| Amber strip (box-with-x icon) "Nothing available here." with "… at … · …" (up to 3 other stores that have it) and "If the customer leaves without it, log the lost sale now:" | Bottom of a line card (Sell) | Offers lost-sale reasons | On a tracked product line with nothing available here, including one added by clicking an out-of-stock search result (that line is also an Oversell line, so both the red chip and this strip show). Not offered when you pressed Allow Oversell, and not on a line filled in from a walk-in want, because that ask is already on the walk-in log and would otherwise be counted twice. Not offered on the Others tab either: a quote for something the store does not stock is ordinary, and a quote that comes to nothing is logged from the quote itself |
| Reason buttons (up to 5) | Inside the strip | One tap logs a lost sale for that item at this store, linked to the selected existing customer if any. The order line stays | The first 5 reasons from Settings → Lost sales. Defaults: Out of stock, Wrong size, Wrong finish / color, Price, Delivery timing. Reasons you could have sold (buyable) are in slightly heavier text. All buttons are disabled while saving. It doesn't count as a store visitor |
| Green confirmation "Logged as a lost sale — …. It shows up in Replenish and on the Lost sales report." and toast "Logged as a lost sale — …" | Replaces the strip | Confirms the log | A line can't be logged twice. "Pick a location for the order first." with no location; "Could not log the lost sale." (or the error) on failure. See Lost Sales Report |
Dialog: Order Created Successfully! (Sell)
| Control | Where | What it does | Notes |
|---|---|---|---|
| Title "🎉 Order Created Successfully!", "Your order has been created and saved to the system." | Header | Can't be closed with ×, Escape or an outside click. Pick one of the three buttons | |
| Order #:, Total:, Status:, Invoice #:, Created: | Green box | Receipt of what was saved | Order # is the full order number, for example "ORD-20260918-0003 (#E5F8)" — the number the order list's Order Number search finds, with the short #code the list shows beside it. Status is the saved status (for example Completed or Pending). Invoice # only if entered. Created is in your store's time zone |
| "Filed as Cancelled: no payment was recorded, no services were scheduled and it earns no loyalty points." | Grey box | Confirms what a cancelled sale left out | Only when the order was created with Order Status Cancelled. Print Invoice then lists no payments |
| "⚠️ Action needed — the order saved, but:" with a list | Amber box | Lists anything that failed after saving: payments, point deductions or scheduled services, and a sale credited to you because the cashier you picked could no longer be credited | Only when there are warnings |
| "What would you like to do next?" | Body | Prompt | |
| Print Invoice (document icon) | Buttons | Opens the invoice in a pop-up window and starts the print dialog | Built from what is on screen. Nothing happens if pop-ups are blocked. Error alert: "Failed to open print preview. Please try again." |
| Create New Order (plus icon) | Buttons | Closes the dialog and resets the form | |
| View Orders History (history icon) | Buttons | Opens the order list | See Order Management |
Dialog: Order Creation Failed (Sell)
| Control | Where | What it does | Notes |
|---|---|---|---|
| Title Order Creation Failed with the error text | Dialog | Why the order wasn't created (see Messages) | Closes with ×, Escape or an outside click |
| Try Again | Footer | Closes the dialog and keeps everything you entered | Fix the problem and click Create Order again. A refused save writes no order — but a customer you typed in rather than picked was already saved before the order was attempted, and stays. Pressing again does not save that person a second time: the form remembers the customer it created and re-uses them, and only creates another if you change their name, phone, email, opt-ins or address. If the first press did save and only the answer was lost, pressing again without changing anything hands you that same order rather than a second one, and the payment on the form is recorded on this press — the first press stops at the order itself, so nothing is recorded twice. Correct the order first and it is saved as a new order, as you would expect |
Dialog: Special Order Created Successfully! (Quote)
| Control | Where | What it does | Notes |
|---|---|---|---|
| Title "Special Order Created Successfully!" (green), "Your special order has been created and is ready for processing." | Header | After a quote saves. A toast says "Order … has been created and is ready for processing." | |
| Order #, Order Type, Priority, Total, Status | Body | Receipt: order number, Quote, priority, on-screen total, Completed | Order # reads as on the Sell tab's box: the full order number and the short #code the list shows, for example "ORD-20260918-0004 (#A1B2)" |
| Print Quote (receipt icon) | Body | Opens the quote with your letterhead in a pop-up window and starts the print dialog | Uses what is on screen, including warranty and notes. Nothing happens if pop-ups are blocked. If store details can't load, the letterhead shows "UpChannels Business" with a placeholder address. Error: "Failed to open print preview. Please try again." |
| Create Another | Footer | Closes the dialog and resets the form | |
| × (Close), Escape, outside click | Dialog | Closes the dialog and also resets the form |
Toast: Scrap Order Created Successfully
| Control | Where | What it does | Notes |
|---|---|---|---|
| "Scrap Order Created Successfully", "… items written off. Inventory has been deducted for Order …" | Toast, about 8 seconds | Confirms the scrap and says how many units left stock. The form resets at once | No dialog for Scrap. Only shown when every line was written off; a write-off that can't be made is refused before the order is saved |
| "Scrap Order Created", "Order … was saved, but check the stock counts for the items on it." | Toast, same place | The wording the toast falls back to when a line wrote off less than it asked for | Rare: a write-off that can't be made is refused before anything is saved |
| Create Another Scrap (circular-arrow icon) | Toast | Resets the form again | The form comes back with Quote selected; pick Scrap again |
| Go to Orders List (document icon) | Toast | Opens the order list |
Dialog: Error Creating Special Order (Quote / Scrap)
| Control | Where | What it does | Notes |
|---|---|---|---|
| Title "Error Creating Special Order" (red) with the error text | Dialog | Why the save failed. A red toast shows the same | A refused save writes no order at all; a new customer you typed is kept (see "Tab: Others — what gets saved") |
| Close (and ×, Escape, outside click) | Footer | Closes; your entries stay | A refused save writes no order, and a new customer you typed is kept and reused when you save again, so fix what the message names and save again. If the message was that the server could not be reached, press the button again rather than rebuilding the order — the same one can't be saved twice |
Messages you may see
| Message | When it appears | What to do |
|---|---|---|
| "Pricing rules unavailable — discounts not applied to this order." | Pricing rules failed to load. A store holding more than 100,000 active rules is also refused here rather than priced from part of them | Reload the page. Until then use Extra Discount. If it keeps happening, contact support |
| "That walk-in visit could not be found." | Opened from a walk-in whose visit no longer exists | Carry on; the order just isn't linked to the visit |
| "The walk-in details could not be loaded." | Walk-in prefill failed | Enter the customer and item by hand |
| "Location not loaded. Please wait and try again." | Picked a product before locations loaded | Wait a moment and pick again |
| "Added … to order" | Item added | None |
| "… is already in the order" | Same product or service added twice | Raise Qty on the existing line |
| "Only … in stock. For the extra … unit(s), please create a separate order and select "Allow Oversell" when adding the item." | Qty above stock on a tracked, non-oversell line that still has some stock free | Sell the extra on a separate order using Allow Oversell (not possible on Scrap) |
| "Nothing here is free to sell. Remove the line and re-add it with "Allow Oversell" to sell it anyway." | Qty raised on a line with nothing free to sell | Free a unit on the order that holds it, or re-add the line with Allow Oversell |
| "…: … at …, all promised to open orders (… held). The line was added with no free stock — free a unit on the other order, or press "Allow Oversell" to sell it anyway." | A result whose stock is all claimed by open orders was picked from the search. A want for more units than are on the shelf adds " and this line asks for …" after the held count. Where open orders hold more than is on the shelf (stock the Audit has not yet squared), the brackets read ", which are counting on …" instead | The line is on the order but cannot be sold as it stands. Free a unit, or re-add it with Allow Oversell |
| The same message ending "…or remove the line and add it again with "Allow Oversell" to sell it anyway." | Same stock, but the line was filled in from a walk-in visit rather than picked, so there is no Allow Oversell button beside it | Free a unit on the order that holds it, or remove the line and add the product again through Add product |
| "…: … at …, but its available count is …. Run Inventory → Snapshot → Audit to recompute it, or press "Allow Oversell" to sell it anyway." | Same, but nothing is held: the store's available figure has drifted away from what is on the shelf, which is a counting error rather than a shortfall | Run the stock check on Inventory → Snapshot and apply Available mismatch. A line filled in from a walk-in visit ends "…or remove the line and add it again with "Allow Oversell" to sell it anyway." instead |
| "…: … at …, but only … free to sell (… promised to open orders) and this line asks for …. Free a unit on the other order, lower the quantity, or press "Allow Oversell" to sell them all." (a line filled in from a walk-in visit ends "…or remove the line and add it again with "Allow Oversell" to sell them all." instead) | More units asked for than are free here, on a shelf that has some free and some promised to other open orders — whether or not the shelf itself can cover the ask | Lower Qty to what is free, free a unit on the other order, or remove the line and add the product again with Allow Oversell |
| "… has nothing on hand at this location to write off." | Scrap with a product that has no stock at the chosen store | Switch the Store Location, or receive the stock first |
| "Only … on hand at this location to write off." | Scrap Qty above what the chosen store has on the shelf | The quantity is put back to what is on hand. Lower it, switch the Store Location, or count the stock first |
| "Specific item selected" / "Switched to bulk stock selection" | Choice in Select Specific Item | None |
| "Scrap Order" — "Item prices set to $0.00 for inventory write-off." | Scrap picked, or a price typed on Scrap | Expected |
| "Search failed. Please try again." | Product search error | Retype the search |
| "Pick a location for the order first." | Lost-sale reason tapped with no location | Choose a Store Location |
| "Logged as a lost sale — …" | Lost-sale reason tapped | None |
| "Could not log the lost sale." | Lost-sale save failed | Try again, or log it in Walk-ins |
| "Redeem amount exceeds available credit for selected program." | Create Order with too much credit. Only unexpired points count | Lower Redeem Amount or the slider |
| "Choose the loyalty program to redeem from." | Create Order with a Redeem Amount but no program, for a customer with points in more than one program | Pick the Program in the Loyalty Redemption box |
| "This customer has no loyalty credit to redeem." / "Choose one of the customer's loyalty programs to redeem from." | Create Order with a Redeem Amount the customer has no points for | Set Redeem Amount to 0, or pick one of their programs |
| "A cancelled order can't use loyalty credit. Set the Redeem Amount to 0." | Create Order with Order Status Cancelled and loyalty credit (for example from the Step 7 slider) | Set Redeem Amount to 0 |
| "A cancelled order takes no payment. Nothing entered here is recorded." | Order Status set to Cancelled | Expected. Choose another status to take a payment |
| "Check " followed by the field name (message), and the same wording in the red banner, for example "Payment 1 Status: …" | Sell: Create Order refused | The named field is the one to fix. The page scrolls to it; for a note that is too long, the Order Notes card opens first |
| "Check Customer Notes" — "Keep the customer note to 2000 characters or fewer" (Shipping Notes: "Keep the shipping note to 2000 characters or fewer"; Internal Notes: "Keep the internal note to 4000 characters or fewer") | Sell: a note is too long, worded as on the Others tab | Shorten the note |
| "The order could not be saved. Please review the highlighted fields and try again." | Sell: refused without a named field | Review the form; reload if it repeats |
| "Please fix the highlighted fields before submitting." | A Sell field is marked wrong but carries no message of its own | Look for red text under fields; check Steps 2 and 3 |
| "Please select an existing customer" | Existing Customer on, nobody picked. It appears under Search Customer, and the red banner reads "Customer: …" | Pick a customer or turn the switch off. It goes as soon as you do |
| "Enter the customer first and last name." | Sell: new customer missing First or Last. It appears under the First box, and the red banner reads "First Name: …" | Fill both boxes. The message under the box goes on your first keystroke in either one; the banner line stays until both have a name |
| "Please enter a valid phone number" / "Please enter a valid email address" / "Address must be less than 200 characters" | Sell customer fields | Fix or clear the field |
| "Name must be less than 100 characters" (red banner only) | Sell: First and Last together are longer than 100 characters | Shorten the name |
| "Discount cannot be negative" / "Discount cannot exceed $99,999.99" | Extra Discount out of range | Fix the amount |
| "Tax rate cannot be negative" / "Tax rate cannot exceed 100%" / "Allow up to three decimal places" | Tax rate out of range | Fix the rate |
| "Invoice # must be 50 characters or fewer" | Field too long | Shorten it |
| "Please add at least one item to the order" | Sell with no items | Add an item |
| "…: the line total must be quantity x price, less any line discount, plus warranty." | A line reached the save with a total that doesn't add up (an out-of-date browser tab, or another program sending the order in) | Reload the page and enter the order again |
| "…: this service has been switched off. Switch it back on in Catalog -> Services, or pick another service." | A service line names a service that was switched off after this page was opened. Nothing is saved — not the order, not its other lines. The message names the line | Switch the service back on in Catalog → Services, or take that line off and pick another service, then save again |
| "…: this service is not in your store." | A service line names a service that is not one of yours (an out-of-date browser tab, or another program sending the order in) | Reload the page and pick the service from the Add service search |
| "…: this product is not in your store." | Sell or a quote: a product line names a product that is not one of yours (an out-of-date browser tab, or another program sending the order in). The first such line is named. Nothing is saved | Reload the page and add the product again from the search |
| "The location this order is filed at is not one of your store's. Pick one of your own locations and save again." | Sell or a quote: the order names a location that belongs to another store. Nothing is saved | Reload the page and pick one of your locations |
| "The customer on this order is not one of your store's customers. Pick the customer again and save." | Sell or a quote: the order names a customer who belongs to another store. Nothing is saved. A sale with no customer (a walk-in) is not refused | Reload the page and pick or add the customer again |
| "The shipping address on this order is not one of your store's customers' addresses. Pick the address again and save." (or "The billing address …") | Another program sending the order in named an address of another store's customer. Nothing is saved | Send the order again without it, or with one of your customers' addresses |
| "Ask a manager to apply this rule" | You tried to switch on a rule marked Manager approval required and you are not the owner or a manager | Ask a manager to switch it on |
| "Pick a service date before saving the schedule." | Save Schedule in the Service Scheduling dialog, with no Service Date | Choose a Service Date, or press Cancel to leave the service unscheduled |
| "A manager has to approve the pricing rule …" | A rule marked Manager approval required was still on the order at save time and the person saving is not a manager (an out-of-date browser tab, or another program sending the order in). It is also refused when the request under-states what that rule takes off: the store measures the rule's own discount itself. The message names the rule. Nothing is saved | Reload the page, then have a manager switch the rule on, or leave it off |
| "Payment status should be Completed when payment amount matches total" | Payment 1 equals the total but isn't Completed, on a sale the customer takes away (Order Status Completed, Shipped or Delivered) | Set Status to Completed, change the Amount for a part payment, or move the Order Status to 🚚 Pending Delivery or ⚙️ Processing. The refusal goes as soon as you do, without pressing Create Order again. An order still to be delivered is not refused for this |
| "Payment 1 covers the whole amount due but is not marked Completed, so this order is saved as unpaid. Mark it Completed once the money is taken." | The whole amount due (the total less any loyalty credit) entered on an order the goods have not left on yet: 🚚 Pending Delivery or ⚙️ Processing | A note, not a refusal. Leave it for collect-on-delivery, or set Status to Completed |
| "Please select a payment method" / "Please select payment status" / "Payment amount cannot be negative" / "Payment notes must be less than 500 characters" | Payment 1 problems | Fix the field |
| "Organization ID not available. Please refresh the page and try again." | Your store couldn't be read (Sell or Others) | Refresh; sign in again if needed |
| "Failed to create customer: …" | New customer couldn't be saved | Check the fields, or pick the existing customer |
| "No customer ID available" | No customer could be resolved | Re-pick or re-enter the customer |
| "Insufficient stock for product … at location …: available …, requested … — … unit(s) are promised to open orders (enable Allow Oversell to backorder)." | Stock changed, or the location changed, after the line was added — from another till, another browser tab, or an open order claiming the units | Lower Qty, or re-add the line with Allow Oversell |
| The same message with " Available is below zero at this location: more is promised or sold than is on hand. Receive the stock, correct the count, or free units on an order holding them; Inventory → Snapshot → Audit names those orders." on the end | As above, and this product's available figure at this store is already below zero: more is promised or sold than is on hand | Open Audit on Inventory → Snapshot to see the orders holding it. Receive the stock, correct the count, or free units on one of them |
| The same message with " Available is below zero at this location because its stock counts disagree with each other (on hand …, promised to orders …, held off sale …, Available …), so the figures above are not what the shelf holds. Inventory → Snapshot → Audit lists it as an Available mismatch, and Recompute available puts it right; if Available is still below zero after that, more is promised or sold than is on hand." on the end | This product's counts at this store don't add up, so the available figure is wrong, not the shelf | Open Audit on Inventory → Snapshot and apply Recompute available on its Available mismatch finding, then sell again. If Available is still below zero, see the row above |
| "Insufficient stock for product … at location …: on_hand …, requested … (enable Allow Oversell to backorder)" | A Completed, Shipped or Delivered order would take the shelf itself below zero | Lower Qty, or re-add the line with Allow Oversell |
| "Unit SN-1 of Dryer is no longer available at Katy: it is held for order 1043. Pick another unit on the line and save again." — or "…: it was sold on order …", "…: it is held off sale (a damaged or defective return)", "…: it is at …" (another location), "…: it is marked Not Available", "…: it has been written off", "…: it is already on another line of this sale" | Sell: the serial-numbered unit picked on a line (Specific Item) was held, sold, moved or switched off after it was picked — at another till, in another tab — or is picked on two lines of the same sale. Nothing is saved | Open the line's Specific Item list and pick another unit, or switch the line to Bulk Stock, then press Create Order again |
| "…: the unit picked for this line is not in your store." / "…: the unit picked for this line (…) is a unit of another product. Pick one of this product's units." | Sell or a quote: the unit the line names isn't one of this store's units of that product (an out-of-date browser tab, or another program sending the order in). Nothing is saved | Reload the page, add the product again and pick its unit |
| "locationId is required" / "at least one item is required" / "no organization context" / "createOrderAtomic returned no data" | Rare save checks | Reload and retry; contact support if it repeats |
| "This order was already saved. Check Order Management before saving it again." | Sell: a safety net for a press that does not match the order already saved under the same save slip. The everyday lost-answer case does not produce it — pressing Create Order again returns the order the first press saved, and correcting the order first saves it as a new one | Open Order Management to see what was saved before you save anything else |
| "This order is already being saved. Give it a moment." | Sell: an earlier press of Create Order is still running | Wait a few seconds instead of pressing again |
| "Payment recording failed for order …. Record the payment manually on the order page." | Order saved, payments didn't | Open the order from Order Management and add the payment |
| "Insufficient loyalty points in "…": redeeming $… needs … points, but only … unexpired points ($…) can be redeemed." | The points changed or expired after the page loaded. The order isn't created | Lower Redeem Amount and create the order again |
| "Loyalty credit of $… is more than the order total of $…." | Loyalty credit above the order total. The order isn't created | Lower Redeem Amount |
| "That loyalty program is not active in this store, so the customer can't join it." | Enroll on submit with a program deactivated after the page loaded. The order isn't created | Pick another program, or turn Enroll on submit off |
| "Some scheduled services were not created: …: …" | For example, a service with no date | Schedule it from Schedule or the order |
| "…: only this visit was booked. Repeat visits are booked one at a time: when this visit is done, add the service to a new order to book the next one." | After Create Order, in the Action needed list and a toast, for a service line still marked to repeat: its one visit was booked, and no repeats were | Book each later visit on a new order when the one before is done |
| "Scheduled service(s) could not be created: …. Schedule them manually." | Scheduling failed entirely | Schedule by hand |
| "Failed to open print preview. Please try again." | Print Invoice or Print Quote failed | Allow pop-ups and retry, or print from the order |
| "Unable to verify this address. Please check the spelling or try a more complete address." | Verify Address found nothing | Fix the address or pick a suggestion |
| "Street number missing." | Picked a suggestion without a building number | Pick one with the street number |
| "⚠️ This address is outside our standard 25-mile delivery zone. Additional delivery charges may apply. You can still create the order." | Verified address over 25 driving miles away | Information only. No fee is added by it, and the order still saves |
| "We could not work out the driving distance for this address. You can still create the order." | The distance check couldn't run — no answer from Google, the request was refused, or the store address couldn't be located | Nothing to do: carry on and create the order. Why? shows the reason |
| "Address lookup is not set up, so addresses are not checked here. Type the address as usual. The delivery distance is not worked out, and the order can still be created." | Maps not set up | Type the address by hand |
| "Error loading workers: …" / "You can still proceed without assigning a worker." | Team list failed in Service Scheduling | Continue and assign later |
| "Check Customer Name" — "Enter the customer first and last name." | Others: the new customer's name is missing or too short | Type First and Last |
| "Check Delivery Address" — "Enter the full delivery address." | Others: address under 10 characters | Enter the full street address |
| "Check Customer Phone" — "Enter a valid phone number, or leave it blank." | Others: invalid phone | Fix or clear it |
| "Check Customer Selection" — "Please select an existing customer" | Others: Existing Customer on, nobody picked | Pick a customer |
| "Check Tax Rate" — tax rate error | Others: invalid rate | Fix the rate |
| "Check Customer Note" — "Keep the customer note to 2000 characters or fewer" (and the same for the Delivery Note; the Internal Note allows 4000) | Others: a note is too long. The Order Notes card opens and scrolls to that note | Shorten the note |
| "Could Not Create Order" — "The order could not be saved. Please review the highlighted fields and try again." | Others: rejected without a named field | Review the form; reload if it repeats |
| "Store location not selected. Please choose a location and try again." | Others: no location at save | Pick a Store Location |
| "Loading organization data..." / "Organization data not available. Please refresh the page and try again." / "Please add at least one item to create the special order." / "Please select a store location." / "Please fix the highlighted fields." | Others: submit button disabled | Do what the message says |
| "Special Order Created Successfully!" — "Order … has been created and is ready for processing." | Quote saved | None |
| "Scrap Order Created Successfully" — "… items written off. Inventory has been deducted for Order …" | Scrap saved and the stock written off. After a confirmed Record the loss? it ends "It leaves order … short." | Nothing to do. The orders named are short until the stock is received or they are changed |
| "Only 2 on hand of Dryer at Katy to write off." / "There is no stock of Freezer at Katy to write off." | The write-off is more than the store has on the shelf | Nothing was saved. Lower the quantity, pick the right store, or count the stock first |
| "Unit SN-1 of Dryer at Katy is held by order 1043: free it on the order, then write it off." | The write-off needs a serialized unit an order is holding | Nothing was saved. Free the unit on that order, then scrap it |
| "Units SN-1 (order 1043), SN-2 (order 1050) of Dryer at Katy are held by open orders: free the broken one on its order, then pick that unit on this line to write it off." | The write-off needs a serialized unit, and more than one is held by orders | Nothing was saved. Free the broken unit on its order, add the product again and pick that unit |
| "Scrap Order Created" — "Order … was saved, but check the stock counts for the items on it." | Scrap saved, but a line wrote off less than the quantity on it | Open that product in Inventory and check its count |
| "Unit … of … is no longer available at …." / "…: the unit picked for this line is not in your store." | Others: the serial-numbered unit picked on a line was sold, moved or written off after the line was added | Nothing was saved. Remove the line, add the item again and save |
| "…: this product is not in your store." / "…: enter a quantity above 0." / "…: prices can't be negative." / "…: a line that isn't taxable can't carry tax." / "The discount can't be more than the subtotal." | Others: the save checks every line again and refuses the one it names | Nothing was saved. Fix the line named and save again |
| "Your account is not an active member of this store." | Others: the store doesn't list your account as one of its active people | Ask the owner to check your account in Team |
| "We could not reach the server. Check your connection and press Save again." | Others: the save never reached UpChannels, so nobody knows whether it was written | Check your connection and press Save again. The same order can't be created twice this way — if the first press did save it, the second gives you that order back, with its number |
| "This order is already being saved. Give it a moment." | Others: an earlier press of Save is still running | Wait a few seconds instead of pressing again |
| "This order was already saved. Check Order Management before saving it again." | Others: a safety net for a second press that does not match the order UpChannels already saved. The everyday lost-answer case does not produce it — pressing the button again returns the order the first press saved. Sell says the same thing in the same case | Open Order Management to see what was saved before you save anything else |
| "Error Creating Special Order" — any other error text | Quote or scrap save failed | Nothing was saved except a new customer. Fix what the message names and save again |
| "Finish your store profile before creating an order" / "Add a product or service before creating an order" | Owner, setup not finished | Follow the callout's button |
Who can use what
| Item | Rule |
|---|---|
| The page, all tabs, Quote and Scrap | Anyone on the team who can open Sales → New. No owner or plan check on the page itself; the one manager-only control is the pricing-rule switch below |
| Setup callout | Owner only. Never shown to other team members, or once the store has any order |
| Pricing rule marked Manager approval required | It never switches on by itself, and only the owner or a manager can switch it on. Everyone else sees the switch greyed out |
| Cashier dropdown | Anyone can credit the sale to any team member who can still sign in — and only to one of them, here and on the order window alike. Whoever pressed Create Order is recorded on the order as well |
| Delivery zone fee checkbox | Only when the Delivery feature is switched on and delivery zones are set up. See Delivery |
| Loyalty panels | Need at least one loyalty program. Redeeming needs an existing customer with credit |
| Lost-sale reasons | Anyone can tap one. The list itself is edited in Settings → Lost sales, which opens for the owner and for the store's only active member — but saving there needs the owner |
| Card, terminal or payment-link charging | Not on this page. Payments are recorded only |
| Demo | Everyone. The demo copy opens even when Sales → New is hidden from that person's menu |
Demo mode (/sales/create/demo)
- Open it: the Demo button (Play icon, amber) at the right of the Create Order header.
- Header: "Create Order — Demo", "Sample order populated with demo data. All actions are disabled."
- Banner: "Demo mode — forms are populated with sample data. All actions are disabled." with a Take a Tour button that restarts the tour from step 1.
- Tour: starts by itself the first time you open the demo. The tooltip shows progress dots, "… of 16", Back (from step 2), Skip, and Next (Got it! on the last step). Keys: right arrow or Enter for next, left arrow for back, Escape to close. Clicking the dark backdrop closes it. Each step switches to its tab; a step whose target never appears is skipped.
- Disabled: every input, dropdown, switch and checkbox, the Trash icon, Reset Form, Create Order, Create Quote and Go to Order Management.
- Still works: the Sell / Returns / Others tabs (the address bar doesn't change), Take a Tour, Exit Demo Mode, the tour buttons, and the + Add Rule and + Add Program links, which open the real pages in a new browser tab.
- Leave: Exit Demo Mode (left-arrow icon, header right) returns to Create Order.
| # | Tab | Tour step | What it points at |
|---|---|---|---|
| 1 | Sell | Order Types | The tab bar |
| 2 | Sell | Step 1: Order Basics | Step 1 card |
| 3 | Sell | Step 2: Customer Information | Step 2 card |
| 4 | Sell | Step 3: Order Items | Step 3 card |
| 5 | Sell | Step 4: Tax Settings | Step 4 card |
| 6 | Sell | Step 5: Order Notes | Step 5 card |
| 7 | Sell | Step 6: Payment Details | Step 6 card |
| 8 | Sell | Step 7: Promotions & Loyalty | Step 7 card |
| 9 | Sell | Order Summary | Order Summary card |
| 10 | Sell | Submit Order | Submit Order card |
| 11 | Returns | Returns — Start From an Order | Returns card heading |
| 12 | Returns | How to Process a Return | The "How to create a return:" steps |
| 13 | Others | Special Order Type | Others Step 1 card |
| 14 | Others | Customer Information | Others customer card |
| 15 | Others | Quote Items | Others items card |
| 16 | Others | Quote Summary & Submit | Quote Summary |
What each step says:
- 1. Order Types: switch between Sell (regular sales), Returns (refunds from existing orders) and Others (special orders).
- 2. Step 1: Order Basics: set the store location, fulfillment method, order status, any extra discount, and a cashier.
- 3. Step 2: Customer Information: contact info, delivery address and communication preferences for a new customer. The "Existing Customer" toggle switches to search instead.
- 4. Step 3: Order Items: search and add products or services. Each item shows quantity, unit price, warranty options and total.
- 5. Step 4: Tax Settings: this demo uses unified mode; "Separate Tax" switches to per-item rates.
- 6. Step 5: Order Notes: Customer Notes (on the invoice), Shipping Notes (shipping and delivery preferences, printed on the invoice and the Service sheet for the customer, not sent to the driver) and Internal Notes (staff only). The step adds that a driver's instructions come from the customer's saved delivery address or the Schedule delivery dialog.
- 7. Step 6: Payment Details: method, status and amount. The amount fills in the total, and "Separate Payment" splits it.
- 8. Step 7: Promotions & Loyalty: toggle applicable pricing rules (some need manager approval or are not combinable). Enrol new customers, or redeem points for existing members.
- 9. Order Summary: customer, delivery address, itemized totals, tax, loyalty credit and points to earn, updated live.
- 10. Submit Order: click "Create Order" when ready, or "Reset Form" to start over.
- 11. Returns — Start From an Order: returns are always created from an existing sales order, so items, prices and customer carry over.
- 12. How to Process a Return: find the original order, choose the return action, pick items and quantities, then process the refund.
- 13. Special Order Type: Quote (no inventory impact) or Scrap (write off damaged or lost stock), plus priority, location and required-by date.
- 14. Customer Information: capture the customer for the quote, or use "Existing Customer". Opt-ins work as on a sale.
- 15. Quote Items: add the products and services being quoted. A quote never reserves or deducts stock.
- 16. Quote Summary & Submit: review the totals with tax and create the quote, or Reset Form.
Differences from the live page:
- Sample data: chosen by your store's industry, with Electronics if none is set. The sale uses Cashier "Demo Cashier", Completed, Store Pickup, a $50 Extra Discount, 8.25% tax, Visa / Completed for the full total, and Enroll on submit on with "Rewards Plus". The rules are "Summer Sale — 10% Off" (on), "Oversized Handling Fee" (surcharge, off) and "Multi-Item Bundle Discount" (approval required, not combinable, off).
- Step 1: only 5 fields, with no Invoice #. The location is fixed to "Main Store (Retail)", and there is no delivery-zone checkbox or walk-in chip.
- Customer: always the new-customer view with a plain address box. There is no address verification, distance check or customer search.
- Item lines:
- The labels read "Unit Price $" and "Total $".
- Warranty fields appear only when a warranty is priced, and show as plain text.
- There is no Details field, stock badge, Schedule Now, Oversell or Max chip, or rule chips.
- The Step 3 reminder and empty state aren't shown.
- Notes start expanded. There is no Loyalty Redemption block in Step 6. Step 7 is always expanded.
- Promotions: "Summer Sale" shows as on, but prices and totals aren't reduced.
- Others:
- Only the Quote layout is shown.
- Extra labels appear ("Order Type * - Please Select", "Unified Tax Rate (%)").
- Notes start expanded, with labels ("Customer Notes", "Delivery Notes", "Internal Notes") and helper lines the real Others form doesn't show.
- The Quote Summary shows a $100 discount that the real Others form can't apply.
- Returns: a numbered "How to create a return:" list instead of the paragraph.
- There are no setup callout, dialogs, toasts, validation, search, lost-sale prompt or scheduling dialogs.
Common questions
What do Total Orders and Total Spent on the customer panel count? Total Orders counts completed, shipped and delivered sales; a quote, an order still being worked on, a cancelled order and a refunded one are not sales. Total Spent is what the customer has paid, less refunds, on any of their orders — a deposit on an order still being worked on counts, and a sale they haven't paid for doesn't yet. Both match the customer's record in Growth → Customers. When anything went back, "$X received − $Y refunded" under Total Spent says what came in and what went back.
Can I credit a sale to someone else on the team? Yes. Open the Cashier dropdown in Order Basics and pick them before you press Create Order. The order is then credited to them, and the order list's Cashier filter finds it under their name. Only people who can still sign in are listed, so a team member who has been turned off cannot be credited — and if they are turned off while your form is open, the sale is credited to you and the Order Created box tells you it moved. Whoever actually pressed Create Order is recorded on the order too.
The customer paid the full Total, but the order shows a balance. Why? Check that Payment 2 and 3 are Completed, not Pending: pending payments don't count as paid. A delivery zone fee is not the cause: while its box is ticked, the fee is already in the Order Summary Total and the auto-filled Payment 1 amount, and the order is saved with that same Total.
I created a sale as Cancelled. Why was no payment recorded? A cancelled order takes no payment. Choosing ❌ Cancelled sets every payment amount and the loyalty credit to $0 and greys out the payment fields, and Create Order records no payment for it. It also doesn't put its services on the schedule. To take a payment, choose another Order Status.
How do I process a return? Not on this page. Open the original order in Sales → List and choose ⋯ More actions → Create return. Then pick the items and click Process Return. The Returns tab only shows those directions and a Go to Order Management button. The return is recorded on the original sale, not as a new order, and that sale then shows on the Return tab of Sales → List.
My promotion is listed in Step 7 but didn't apply. Why? Promotions, seasonal, bundle and customer rules, and any rule marked Manager approval required, start switched off. Flip the rule's switch on. Only matching product, category and volume rules switch on by themselves. A rule marked Manager approval required can only be switched on by the owner or a manager — everyone else sees it greyed out.
Can I charge a card or send a payment link here? No. This page records how the customer paid (cash, card, financing and so on). It does not charge anything. Take card or online payments from the order afterwards.
Does the Order Status I pick stick? Yes. The order is saved at the stage you picked, in the same step that moves the stock. Pending Delivery and Processing both reserve the goods; Completed, Shipped and Delivered all take them off the shelf. You can still change the stage later from the order itself. The one time the form moves it for you is when Delivery & Routes is on, you choose Local Delivery or Mixed, and you have not picked a status yourself: it becomes 🚚 Pending Delivery, with a line underneath saying so, because a delivery counted as handed over at the sale can never be put on a route. With Delivery & Routes off there is no route to miss, so nothing moves.
Does the saved quote match the one I printed? Yes. The quote is saved from the same lines the summary adds up, so its subtotal, tax and total are the figures on screen and on the printed copy. Each line keeps its own Taxable setting and Rate %, its warranty details, and — for a service — the service it came from and the visit the customer asked for.
I scrapped more than the store had. What happened? Nothing was saved. A write-off for more than is on the shelf at that store is refused with the figure ("Only 2 on hand of Dryer at Katy to write off."), and so is a product with no stock there at all. Lower the quantity, switch the Store Location, or count the stock first, then save again.
The unit that broke is promised to a customer's order. Can I still scrap it? Yes. Scrap it as usual. Because the write-off takes stock an open order is counting on, the Record the loss? window asks first and names the order it leaves short. Record the loss saves it: the stock goes down, Available goes below zero, and the order keeps its place until you receive more stock or change the order. If the product is serialized and the broken unit is the one the order holds, free it on the order first; the message names the order. When several units are held, it names each with its order: free the broken one, then pick that unit on the scrap line, so the unit written off is the one that broke.
I made a quote for a new customer. Are their phone and email saved? Yes. On the Others tab a new customer is saved the same way as on Sell: first and last name, phone (in +1 format), email, address, Customer Source and the opt-ins, so you can call, text or email them about the quote from Growth → Customers. The SMS opt-in is kept only when a phone number was entered.
The delivery distance won't load. Can I still take the order? Yes. The distance card is information only. If Google can't be reached, the key isn't set up, the store address can't be located or the request is refused, you get an amber note saying "We could not work out the driving distance for this address. You can still create the order." — and that is exactly what happens. An address more than 25 miles away, or one in none of your delivery zones, doesn't stop the order either: the far-away note and the zone fee are both advisory. The address box itself is never locked while Google is working, so you can always type or correct the address.
The customer is paying the driver on delivery. Can I save that? Yes. Leave Payment 1 at the amount it filled in — the total, less any loyalty credit being redeemed — and set its Status to Pending; an order still to go out (🚚 Pending Delivery, ⚙️ Processing) saves that way and shows an amber note reminding you it is saved as unpaid. Mark the payment Completed from the order once the money is in. On a sale the customer takes away, the full amount still has to be marked Completed.
When does the red line above Create Order go away? As soon as the thing it names is put right: the line is read from what is wrong at that moment. That includes the three rules that read several boxes at once: pick the customer it asked for, type both names, or move the Order Status to one where the money isn't due yet, and the line clears without pressing Create Order again. If it changes to a different field name, that is simply the next thing to fix.
The out-of-stock item didn't show the "Nothing available here." prompt. Why? Either you added the line with Allow Oversell, which says you mean to sell it anyway, or the line came from a walk-in want, which is already recorded as an ask, or you are on the Others tab, where a quote for something not in stock is ordinary. The prompt also needs a product that tracks stock with nothing available at the store on the order. Clicking an out-of-stock search result on the Sell tab does show it.