Procurement
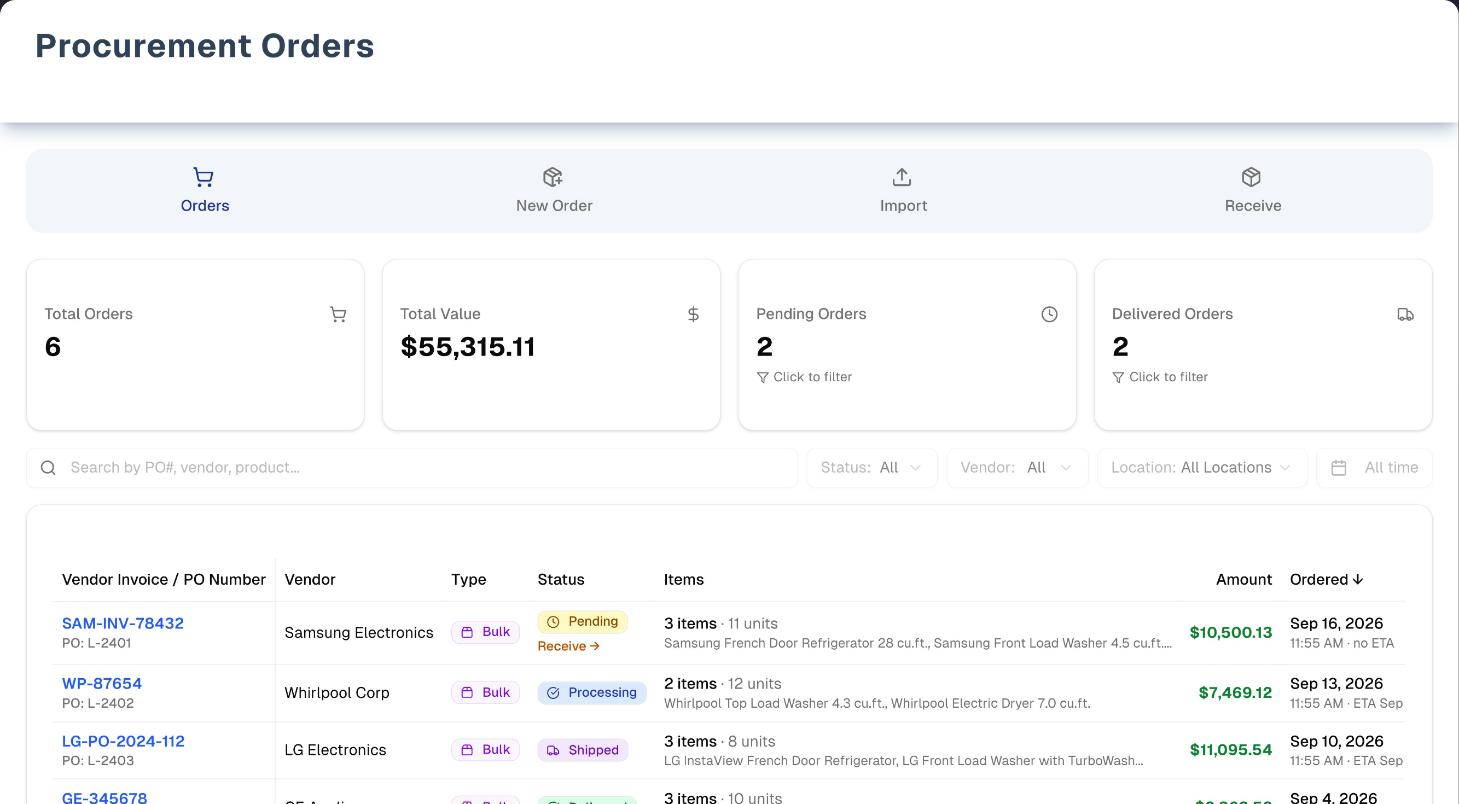
Procurement Orders (Inventory → Procurement) manage buying across four tabs — Orders, New Order, Import and Receive — from creating a purchase order (PO) to receiving goods into stock.
Overview
Build purchase orders to vendors, track them, and receive against them so stock updates at the right location.
- A new store starts on Import. Until your store has its first procurement order, Orders, New Order and Receive are locked (lock icon) with the note "Orders, New Order and Receive unlock after your first import." They unlock as soon as that first import finishes. If a link or bookmark asked for one of the locked tabs — Open Replenish on Lost sales is the usual one — the note names it instead: "New Order needs a purchase order to work on, and this store has none yet — so this is Import, where the first one is created. Orders, New Order and Receive unlock after it."
- Staff and cost. While the owner hides cost from staff in Settings → Team (on by default), staff can open, read and receive purchase orders without their prices and totals, and an owner or manager creates them.
- Stock only goes up when goods are received — on the Receive tab, with the Received into inventory now box on New Order, or by an import (every import is received at once). Changing an order's status by hand never adds or removes stock.
- In your books, an order puts only its goods into Inventory, each part on the day it happened. Goods go into Inventory and Accounts Payable on the day each delivery is received. Once the order is Delivered (or Completed), Accounts Payable holds the whole order total, and the rest of the total — Other Expenses & Fees, Shipping and Tax, less any Discount — is an expense on the Profit & Loss, on the Freight & Fees on Purchases line, on the day the order was marked Delivered. So goods that arrive in October on an order placed in September are October's, and a later save or receipt never moves a month you have already reported. An import of goods already in your store books what it received on the day the load arrived, and its charges on that day too when every row went through. Some older orders keep their one entry on the order date. Amounts are never changed by the day, only where they fall.
- The Demo button (top right) opens a sample-data copy of the page with a guided tour. See Demo mode.
Tabs in detail
Orders
- Summary cards: Total Orders, Total Value, Pending Orders, Delivered Orders. Click Pending Orders or Delivered Orders to filter the table to that status; click again to clear.
- Columns: Vendor Invoice / PO Number (your vendor's invoice number, with the full PO number under it), Vendor, Type (Itemized, Bulk or Mixed), Status, Items (with total units), Amount, Ordered (date, time and ETA). Pending rows show a Receive → shortcut that opens that order on the Receive tab.
- Search (PO #, vendor, vendor invoice, product) and filters for Status, Vendor, Location and a date range. Active filters show as removable chips. 10 orders per page.
- Click a row to open Order Details, where you can Print the purchase order, Edit Order (status, vendor, invoice number, costs including Other Expenses & Fees, line quantities and prices, notes) or Delete Order.
- Rules to know:
- Cancelled, Completed and Refunded are final — they cannot be set back to an open status, and a cancelled or refunded order can no longer take stock: it is left out of the Receive tab and receiving against it is refused. To reverse goods already received on one, delete the order.
- A line's quantity cannot be set below what has already been received.
- An order can be set to Delivered or Completed only once every item on it is received. Until then those two are greyed out in Status, and a save that tries them is refused with: "Some items on this order are not received yet. Receive them on the Receive tab, or, if they will not come, lower their ordered quantity to what arrived." Go to Receiving takes you straight to that order on the Receive tab. You can lower a quantity and choose Delivered in the same save. A line with no product (a text-only line) cannot be received and never holds the order up. The Receive tab, Received into inventory now and the import mark the order Delivered by themselves once everything is in.
- An order already marked Delivered or Completed with items still missing shows … not received yet in Order Details, with the same advice. Receiving the rest, or lowering the quantity, puts the order's books right by itself.
- Only Draft, Saved, Pending or Cancelled orders can be deleted, and only by the owner or a manager. Orders with payments, or whose received serialized units were already sold or reserved, are blocked. To remove any other order, set it to Cancelled first.
New Order
The New Order tab is a two-step form that creates a purchase order to a vendor. Above it, Requested, not stocked lists items walk-in customers asked for that you did not have — Add to PO puts one on this order as a line (see Walk-ins).
Step 1 — Order Basics
- Store Location (active locations only) and Vendor — both required, with the first of each pre-selected.
- Vendor Invoice / PO Number (required) — filled in for you from the vendor's initials plus the date and time. Click into it to type the vendor's real number; leave it empty and a fresh one comes back.
- Shipping Note — delivery instructions / special handling; printed on the vendor copy.
- Internal Note — for your team only. It is never printed on the purchase order.
Step 2 stays greyed out until location, vendor and invoice number are all filled in.
Step 2 — Order Lines
- Add Line, then type in Product Name or SKU and click a search result. Typing alone does not add the product: a line with no picked product is tinted amber and left out of the order. Set Qty and Unit Cost (filled from the product's cost), with a live Line Total and an optional per-line note.
- Received into inventory now (update stock levels) — when ticked, creating the order immediately receives every line in full and marks the order Delivered (no separate Receive step needed).
- Order Summary with an editable Tax % and a live total. If something is missing, an amber line above the buttons says what.
- Reset clears the order lines only. Create Procurement Order saves the order as Pending (or Delivered if received now); the confirmation offers Print PDF (a printable purchase order for the vendor).
Import
One upload creates one procurement order and receives it into stock straight away — it is marked Delivered when every row imports (if some rows fail, the order stays Pending and the failed rows are listed). There is no "not yet received" option for imports.
- Step 1: pick the location, the vendor (or New Vendor at the top of the vendor list), and check the Vendor Invoice # or PO # — filled in for you; click it to type the real one. An invoice number already on another procurement order (imported or made on New Order) cannot be imported again. Other Settings holds Other Expenses & Fees and a note.
- Step 2: choose A - Trackable Items (serialized units, one row per unit) or B - Bulk Items (one row per product, with a quantity). Download the template first — Excel (.xlsx) (recommended) or CSV — it comes filled with sample products from your industry.
- Step 3: upload your filled file (.xlsx up to 10 MB, or .csv). Every row is previewed and checked straight away — there is no separate preview button. Rows missing a required value (such as SKU, cost price or retail price) are listed in red and keep the Import button disabled until you fix the file; amber notes still import.
- Press Import … Trackable Items / Import … Bulk Products. SKUs not in your catalog are created as products, and stock is added at the chosen location.
- SKU, model, serial number and barcode each have one job (the open fold in Step 2 explains them):
- SKU says which product. Every unit of one product shares it. It is saved exactly as you type it. Keep it short (up to 15 characters prints as bars on every standard label, 20 at most), using letters, numbers and hyphens. A row with no SKU uses its model instead, in capitals with spaces and slashes turned into hyphens (
MRXV3LL/AbecomesMRXV3LL-A). - Serial number says which unit (Trackable only), and no two units in your store can share one. A unit with no serial in the file is given one: U, the day the load arrived and that day's number, such as
U-2610050042. It prints as a scannable barcode on a standard label. - Barcode is the UPC or EAN on the box. It is the same on every unit of a model, so it is saved on the product, not the unit. Leave it blank if there is none: labels and price tags use the SKU instead.
- SKU says which product. Every unit of one product shares it. It is saved exactly as you type it. Keep it short (up to 15 characters prints as bars on every standard label, 20 at most), using letters, numbers and hyphens. A row with no SKU uses its model instead, in capitals with spaces and slashes turned into hyphens (
- The importer reads currency-formatted prices (
$1,299.00) and CSV files saved with Excel's plain CSV (Comma delimited) option (symbols such as ® and ™ come through intact), and names the column at fault when a cell will not parse. - Mixing the templates is blocked both ways: a Bulk file under Trackable, or a Trackable file under Bulk, is rejected with "This file does not match the inventory type you selected".
- The screen can be read in English, Español or 中文 (switch at the top right).
The Demo button opens a four-tab demo with a 12-step tour. Press it while you are on the Import tab and you get an import-only demo instead — a sample file already loaded and an 11-step tour of that screen — so you can see what a good file looks like before you touch a real one.
Receive
- Metrics: Received (30 Days), Missing (30 Days), Receiving Accuracy, Pending Orders.
- A list of the store's open procurement orders with Expected (the ordered quantity), Received, Missing and a Receiving Status of Pending, Partial, Received or Overdue (Overdue needs a promised delivery date, which nothing here sets yet). Search (PO number, vendor invoice number, vendor or product) and a Status filter; 5 orders per page. Only purchase orders are listed and only they can be received — never a sales order, and never a cancelled or refunded one.
- Click an order's row to open Edit Receiving. For each line, set the Received Quantity with − / + or by typing — it is the total received so far, not just today's delivery — add notes, then Save Receiving. Stock at the order's location goes up by the difference; lowering the number takes stock back out. What arrives is added to whatever the location holds, so a product sold or promised beyond its stock stays that many short until enough has come in, and a walk-in can't buy a unit an order is still waiting for. When every line is fully received, the order becomes Delivered automatically.
- If walk-in customers are waiting for a product, its line says so. Those who agreed to a text get one when it is received, as long as Text automatically when stock arrives is on in Settings → Lost sales (see Walk-ins).
Step by step: create a purchase order
- Open New Order; in Order Basics pick a Store Location and Vendor, and replace the auto-filled Vendor Invoice / PO Number with the vendor's number if you have it.
- (Optional) add a Shipping Note and/or Internal Note.
- Add Line for each item — search by name or SKU, click the product in the results, and set quantity and unit cost; adjust Tax % in the Order Summary.
- If the goods are already in hand, tick Received into inventory now; then Create Procurement Order (and Print PDF for the vendor if needed).
Step by step: receive goods
- Open Receive and click the order's row — or use the Receive → link on a Pending order in Orders, which opens that order's receiving window straight away.
- For each line, enter how many have arrived in total (type it, or use − / +) and add notes if needed.
- Save Receiving — stock increases immediately. A partial delivery shows Partial; come back and raise the numbers when the rest arrives. If someone is saving the same order in Edit Order at that moment, the receipt waits for their save and then goes through, and two receipts of the same line both count.
- Booked too many? Lower the number and save again. The difference comes back out, even if some of those units have been sold since: On Hand then goes below 0, and the Audit lists the product under Negative on-hand so you can count the shelf or receive what is missing.
Tips & best practices
- Replenish low items spotted on the Snapshot by creating a New Order.
- Use Requested, not stocked on New Order to buy what customers asked for — the customers who asked are linked to the new PO.
- Goods not arrived yet? Use New Order and leave Received into inventory now unticked — imports are always received immediately.
- Use Import for large or recurring orders; always start from the downloaded template rather than a spreadsheet of your own.
- Use the model number as the SKU, plus a short suffix for a color or size (
G5000-BLK-L), and put the box UPC in barcode with its leading zeros. The Excel template keeps them; a CSV saved from Excel may not. - Expenses import the same way — see Finance → Expenses.
- Receive against the PO so quantities and costs reconcile.
Troubleshooting
| Issue | Fix |
|---|---|
| Vendor not in the dropdown | Only active vendors are listed. Create it in Inventory → Vendors, or use New Vendor at the top of the Import tab's vendor list |
| Orders, New Order and Receive are locked | Your store has no procurement order yet — run your first import on Import |
| "Order not created" when pressing Create | Read the amber line above the buttons — usually a line where no product was clicked in the search results |
| Import button stays greyed out | Fix the rows listed in red under the preview, and make sure location, vendor and invoice number are filled in |
| Import failed | Start from the downloaded template. Preview problems name the column; rows that fail during the import are listed by SKU under "Failed rows" |
| "This file does not match the inventory type you selected" | A Bulk file under Trackable, or the reverse — switch the type in Step 2 or use the matching template |
| "This vendor invoice was already imported" | That invoice number is already on a procurement order (imported, or created on New Order) — use a different number, or open the existing order |
| "This Excel file can't be read" | The file is an old .xls or password-protected — save it as .xlsx with no password |
| Can't delete an order | Set its status to Cancelled first. Orders with payments or with sold serialized units stay blocked, and staff cannot delete |
| On Hand or Available went below 0 after deleting an order or lowering a receipt | Some of those goods had already been sold, written off or promised to an order. Everything the order received is taken back out, so the shortfall shows instead of being hidden. The Audit lists it for review under Negative on-hand or Over-reservation: receive the stock that really arrived, count the shelf, or free the units on the order holding them |
| "… is not one of your store's …" or "…: this product is not in your store." | The order or receipt named a location, vendor or product that belongs to another store — normally a program sending it in, or a page left open across a store switch. Nothing was saved and no stock moved. Reload the page and pick your own again |
| Set an order to Delivered but stock didn't change | Status changes never move stock — receive the items on Receive. An order with items not received can't be set to Delivered; one already marked Delivered with items missing shows … not received yet in Order Details |
| Delivered and Completed are greyed out in Edit Order, or the save says "Some items on this order are not received yet" | Receive what arrived on the Receive tab, or, for goods that will not come, lower the line's ordered quantity to what arrived — then choose Delivered |
| Received qty ≠ expected | Likely a partial shipment — save what arrived; the order shows Partial until the rest is received |
| Received an Itemized line but no new unit appeared | Your store already holds a unit with that serial number, so it was not created a second time — even if the first one is filed under a different product. The save says so in a red toast naming the serial and the SKU it is already on. The quantity and the stock still moved. Find the existing unit in Inventory and correct whichever record has the wrong serial |
| An order shows Overdue on Receive | Something gave that order a delivery date and it has gone by with nothing received. Receive the goods when they arrive, or chase the vendor. An order with no promised date is never Overdue — it stays Pending |
What's next
- Confirm new stock: Inventory → Snapshot
- Manage suppliers: Inventory → Vendors
- Label received goods: Inventory → Labels
Detailed reference
Every button, icon, field and message on this page, for when you need the exact detail. Each panel starts closed — open the one you need.
Page header and toolbar
| Control | Where | What it does | Notes |
|---|---|---|---|
| Title Procurement Orders, "Manage purchase orders, replenishment, and receiving for your inventory." | Header | Page heading | Always shown |
| Demo (Play icon, amber) | Header, right | From the Import tab, opens the import-only demo. From any other tab, opens the four-tab demo | Everyone. See the Demo mode panel below |
| Tab Orders (cart icon, blue) | Tab bar | Shows the list of procurement orders | Default tab. Locked (lock icon, greyed, not clickable) until the store has its first procurement order |
| Tab New Order (box-with-plus icon, purple) | Tab bar | Shows the manual purchase-order form | Locked until the first procurement order exists |
| Tab Import (upload icon, green) | Tab bar | Shows the Excel/CSV importer | Never locked. A brand-new store is moved here automatically |
| Tab Receive (package icon, orange) | Tab bar | Shows receiving status and the receiving editor | Locked until the first procurement order exists |
| Lock note "Orders, New Order and Receive unlock after your first import." | Under the tab bar | Explains the locked tabs. Opening a locked tab from a link or bookmark switches you to Import, and the note then names that tab and why it is not open yet instead of the general sentence | Only while the store has no procurement order. The tabs unlock as soon as the first import finishes, with no reload. If the check itself fails, nothing is locked |
| Spinner (no text) | Orders, New Order and Receive panels | Shown while the page checks whether the store has any procurement order | Brief, on first load |
| Page address | Browser | The open tab is kept in the page address, so a bookmarked or shared link reopens the same tab. A link that names an order opens that order's Order Details on the Orders tab | The order opens only if it is in the loaded list |
| "403 - Forbidden" / "You do not have permission to view this page. Contact your organization owner." | Replaces the whole page | Blocks the page | Only for a team member whose menu has Procurement hidden, in stores with more than one active member. It also blocks the separate Replenishment, Inventory Receiving and import pages, and the older purchase-order address, from a bookmark or a typed address as well. The demo still opens. Owners and a store's only active member are never blocked. See Team & menu visibility |
Tab: Orders
Every procurement order at your store's locations, newest first. There are no Refresh, Export, order-type or urgency controls on this tab.
| Control | Where | What it does | Notes |
|---|---|---|---|
| Card Total Orders (cart icon) | Summary strip, 1st | Number of orders matching the current search and filters | Not clickable |
| Card Total Value (dollar icon) | Summary strip, 2nd | Total amount of the filtered orders | Not clickable |
| Card Pending Orders (clock icon), hint "Click to filter" / "Filtering — click to clear" | Summary strip, 3rd | Click (or Enter / Space) filters the table to pending orders; click again to clear. Turns yellow while filtering | The count follows search, vendor, location and date, but not the Status filter |
| Card Delivered Orders (truck icon), same hint | Summary strip, 4th | Click filters the table to the orders it counted; click again to clear. Turns green while filtering | The count is Delivered and Completed orders — receiving sets Delivered, and a store that closes a finished order by hand sets Completed — and the filter shows exactly those, so the number always matches the rows. Status in the toolbar offers the same pair as "delivered or completed", alongside each status on its own |
| Search box, placeholder "Search by PO#, vendor, product..." | Toolbar, left | Live filter over the PO number, vendor name, vendor invoice number and product names | Not case-sensitive. Goes back to page 1 |
| Status: select | Toolbar | All, "delivered or completed", or one status | Lists the statuses your orders actually have, in lower case (for example "pending", "delivered"), plus delivered or completed whenever the store has either of those — that is the pair the Delivered Orders card counts and filters to. The Pending and Delivered cards set this same filter |
| Vendor: select | Toolbar | All, or one vendor from the loaded orders, in alphabetical order | Every vendor reads by name. A vendor you retired (Active off) reads plainly; one you deleted reads "Name (removed)". An order pointing at a vendor with no record left at all reads "Vendor no longer on file". Orders filed with no vendor at all get no entry of their own — there is nothing to filter by, so they show under All |
| Location: select | Toolbar | All Locations, or one location. Choosing one reloads the orders for that location only | Lists your store's current locations |
| Date-range button (calendar icon): "All time" or the chosen range | Toolbar, right | Opens a two-month calendar; filters by the day the order was created, using the store's time zone | Default "All time". A range longer than 365 days is shortened to 365 days from the start date. Clear it with the Date chip's × |
| Chip "Status: …" with × | Chip row | Clears the Status filter | Only while a Status filter is on |
| Chip "Vendor: …" with × | Chip row | Clears the Vendor filter | Only while a Vendor filter is on |
| Chip "Location: …" with × | Chip row | Clears the Location filter (all locations reload) | Shows "Unknown Location" if the location can't be found |
| Chip "Date: … – …" with × | Chip row | Clears the date range back to All time | Only while a range is set |
| Column Vendor Invoice / PO Number | Table, pinned left | Top line (blue): the vendor invoice number saved on the order, or grey "No vendor invoice". Second line: "PO: " and the full PO number, for example PO: ORD-20260918-0001 | The full PO number is always shown. A number written only in a note is not read out of it: save it in Edit Order |
| Column Vendor | Table | Vendor name, including a vendor you have retired with the Active switch and one you have deleted | A deleted vendor reads "Name (removed)", which is what the delete dialog promises: the order keeps its details. An order pointing at a vendor with no record left at all reads "Vendor no longer on file". An order that never named a vendor — the import allows that — reads "No vendor on this order" instead, because nothing was removed |
| Column Type: Itemized, Bulk or Mixed | Table | Itemized = every line is one unit with a serial number. Bulk = no line has a serial number. Mixed = anything else | Worked out from the order's lines |
| Column Status badge | Table | Draft or Saved (grey), Pending (yellow), Processing (blue), Shipped (purple), Delivered or Completed (green), Cancelled (red), Refunded (orange) | — |
| Receive → link (amber) | Under a Pending badge | Opens the Receive tab with that order's receiving window already open | Only on Pending rows. An order that is not on the Receive list — cancelled, or already received — opens the tab with nothing selected |
| Column Items | Table | One line: the product name. Several lines: "… items". Then "· … unit(s)", and for multi-line orders the first two product names | — |
| Column Amount (green) | Table | Order total in US dollars | — |
| Column Ordered ↓ | Table | Order date, with the time and "ETA …" or "no ETA" below | The arrow means newest first; the column cannot be re-sorted. For an imported load this is the order date the import was given, so a backdated load sits in date order rather than at the top. An import dated today shows the time you ran it; a backdated one has no time of its own and shows 12:00 PM. No screen sets an expected delivery date, so rows normally read "no ETA" |
| Row click | Table row | Opens Order Details for that order | Anywhere except the Receive → link |
| "No orders found. Try importing some orders first." + Go to Import | Table body | Button opens the Import tab | When there are no orders at the loaded locations |
| "No orders match your current filters." + Clear filters | Table body | Button clears search, Status, Vendor, Location and date together | When filters hide every order |
| "Showing … to … of … orders" | Under the table | Count of the filtered orders | Always shown |
| Previous / page numbers (up to 5) / Next | Under the table | Move between pages | 10 orders per page. Only when there is more than one page. Any filter change goes back to page 1 |
| "Loading User Data..." / "Loading Locations..." / "Loading Orders..." | Whole tab | Shown while data loads | — |
| "Failed to Load User Data" / "Failed to Load Locations" / "Failed to Load Orders" + message | Whole tab | Shown when a read fails | — |
| Retry User Data / Retry Locations / Retry Orders | Error state | Retries the read that failed | Each appears only for its own failure |
Tab: New Order
From top to bottom: an alert line, Requested, not stocked (next panel), Step 1 Order Basics, Step 2 Order Lines, the Order Summary, then Reset and Create Procurement Order.
Fields:
| Field | Required | Default | Rules and error text |
|---|---|---|---|
| Store Location * | Yes | Your own location when it is on the list, otherwise the first | The location the goods will be received into. Only active locations are offered: receiving into a switched-off one would put the goods where the Snapshot, the Audit, the Count and Transfer lists and Create Order's stock check all refuse to look. A store with none on shows "No active locations. Turn one on in Settings → Locations before importing stock." instead of an empty dropdown |
| Vendor * | Yes | First vendor | Active vendors only |
| Vendor Invoice / PO Number * | Yes | Vendor's first 3 letters or digits + date and time, for example LGA202609161430 | Clicking into the field clears it so you can type the real number. Left empty, a fresh auto value comes back. Changing vendor refreshes the auto value until you type your own. Glows blue when empty. If the vendor name has no letters or digits, nothing is filled in and you must type one. Step 2 stays greyed until this has a value |
| Shipping Note ("Shipping Note — delivery instructions, special handling...") | No | Empty | Printed under "Comments or Special Instructions" on the purchase order |
| Internal Note ("Internal Note — not printed on vendor copy") | No | Empty | Kept with the order for your team. Never printed — not by Print PDF here, nor by Print in Order Details |
| Product Name contains... (per line) | To bind a product | Empty | Type 2 or more characters to search names, keywords and descriptions (plus SKU if the SKU box also has 2 or more). Archived products are excluded; up to 20 matches for each thing searched |
| SKU contains... (per line) | To bind a product | Empty | Same, by SKU. Clearing both boxes unbinds the line and blanks its unit cost and note |
| Qty (per line) | Yes | 1 | Must be above 0 |
| Unit Cost (per line, $) | No | Product's cost price when you pick it | Editable. Blank is allowed (saved with no price) |
| Notes (per line) | No | Empty, or "Asked for by … customer(s)" on lines added from Requested, not stocked | Printed in the NOTES column of the purchase order |
| Received into inventory now (update stock levels) | No | Unticked | Ticked: creating the order also receives every line in full at the chosen location, records the cost, and sets the order to Delivered. Unticked again when the confirmation closes |
| Tax (%) box | No | 0 | Tax rate in percent: tax = subtotal × rate. Back to 0 when the confirmation closes |
Buttons and displays:
| Control | Where | What it does | Notes |
|---|---|---|---|
| Red alert with the error text | Top of tab | Shows why the last action failed | — |
| "Procurement order created successfully" | Top of tab | Confirms the create | Cleared when the confirmation dialog closes |
| Greyed overlay | Over Step 2 | Blocks clicks in Step 2 | While location, vendor or invoice number is empty |
| Order Lines (…) | Step 2 header | Number of lines on the form | Includes lines with no product |
| Add Line (plus icon) | Step 2 header, right | Adds an empty line (qty 1) | — |
| "Searching…" | Under a line's search boxes | A search is running | — |
| Search result "Name (SKU)" | List under the line | Clicking it binds the product to the line and fills Unit Cost | Typing alone does not add a product. Picking a different product on a line added from Requested, not stocked drops those customer asks from the line |
| "No product selected — click a search result to add one." (amber) | Under a line | The line will be left out of the order; the row is tinted amber | Any line with no picked product |
| Description | Each line | Product description, or "—" | Read-only |
| "… asked" (amber) | Under Qty | How many customers asked for this item | Only on lines added from Requested, not stocked |
| Line Total | Each line | Qty × Unit Cost | Read-only |
| Trash icon | Each line, far right | Removes the line (and any customer asks on it) | No tooltip |
| Order Summary + "Double check the key points and values before you click "Create Procurement Order" button." | Inside Step 2 | Summary panel | — |
| "Location:", "Vendor:", "Invoice / PO #:", "Received:" (Yes — stock updated on create / No) | Order Summary, left | Echo of your choices | Each shows once filled; "Received:" always shows |
| "Items (…)" + amount | Order Summary, right | Counts lines with a product picked | Turns red when some lines have no product |
| "… line(s) is/are not counted — no product selected. Click a product in the search results." | Order Summary, right | Names the problem | When any line has no product |
| Subtotal / Total | Order Summary | Sum of line totals; subtotal + tax | No shipping or discount on this form (you can add them later in Edit Order) |
| Amber reason line | Above the buttons | Says why Create cannot run yet (see Messages) | While something is missing |
| Reset | Footer | Clears the order lines only — back to one empty line. Location, vendor, invoice number, notes, tax and the Received box stay | Disabled while creating |
| Create Procurement Order → "Creating..." | Footer, right | Creates one order (status Pending) with every line that has a product. With Received now ticked it also receives everything and sets Delivered. Links any customer asks you added, then opens Procurement Order Created | Looks faded while something is missing but still clickable: clicking then shows the reason and a toast "Order not created". Truly disabled only while creating. Does not set an expected delivery date |
Tab: New Order — Requested, not stocked
The section above Step 1: "from the walk-in log · ranked by asks". It lists what customers asked for on Walk-ins that you did not have.
| Control | Where | What it does | Notes |
|---|---|---|---|
| Last 30 days / 90 days | Section controls | Date range of the asks, in the store's days | Default Last 30 days |
| Location select: All locations or one location | Section controls | Filters the asks to one location | Follows the Store Location picked in Step 1 automatically |
| Export CSV (download icon) | Section controls, right | Downloads a CSV named requested-not-stocked-(from)-(to).csv with Rank, Item, SKU, In catalog, Asks, Customers, Quantity asked, Waiting for a text, Available now, List price, Est. value (asks x list price, indicative), On PO | Disabled when the list is empty |
| Column Item | Table | Item name with SKU; free-text asks show in quotes with a "not in catalog" badge | — |
| Column Asks | Table | Number of asks | — |
| Column Waiting for a text | Table | Customers still waiting who agreed to a text | — |
| Column Available now | Table | Stock at the chosen location first, then at each other location that has some, for example "0 · 2 at (location name)". With All locations, the first number is the total | "—" for a free-text ask (not in the catalog) |
| Column Est. value (indicative) | Table | Asks × today's list price | A free-text ask has none |
| Column PO | Table | "On PO #…" badge (plus a count if on several), or "—" | — |
| Add to PO / Add remaining / On this order / On a PO (plus icon) | Row actions | Adds the item as a line on the New Order form (quantity = what is still wanted, note "Asked for by … customers"), scrolls to it and focuses its Qty. Nothing is ordered until you press Create Procurement Order | Add remaining when some asks are already on a PO. On this order when it is already a line here (toast "… is already on this order"). Disabled with a tooltip: "Add it to the catalog to order it" (free-text ask), "Every ask for this item is already on a purchase order" (On a PO), or "Nobody is still waiting for this one" |
| Special order | Row actions | Opens the Special order dialog | Disabled when nobody is still waiting |
| Show all … items | Under the table | Shows every row instead of the first 20 | Only when there are more than 20 |
| Caption "… items · … asks · … waiting for a text. Est. value is asks × today's list price — indicative, and a free-text ask has none." | Under the table | Explains the numbers. May add "the most-asked-for ones only — pick a shorter range for the rest" | When the list has rows. The "waiting for a text" part shows only when someone is waiting |
| "This is the want book that counts itself: what customers asked for that you did not have, next to what you are about to buy." | Section bottom | Explainer | Always |
| "Nothing asked for and missing in this range — log what customers ask for on Walk-ins." | Section body | Empty state, with a link to Walk-ins | No asks in the range |
| "Reading the walk-in log…" | Section body | Loading | — |
| "Could not load what customers asked for." / "Could not work out the date range for this store." | Section body | Load failure | — |
Tab: Import
Header Import Procurement Order: "Import inventory into your store by uploading an Excel or CSV file. Choose the format that matches your data." Steps 2 and 3 are greyed out and unclickable while the vendor or invoice number is empty.
Fields:
| Field | Required | Default | Rules and error text |
|---|---|---|---|
| Order date (calendar icon, pencil icon; tooltip Edit order date) | Yes | Today where your store is | Click to change. You pick a day; there is no time to set. Today is worked out from your store's time zone, not from the computer you are sitting at, so a load is filed on your store's day even when you import from another country. The date you pick becomes the order's date everywhere — the Ordered column, Order Details, the Receive tab and the month the goods are booked into your accounts. Leave it on today and the order also keeps the time you ran the import; change it to an earlier day and the order reads 12:00 PM, because a day you type has no time of its own. The picker offers today back to ten years ago and nothing else. Empty the box and the label reads Set order date; the import then asks for a date instead of running |
| Location for Inventory * | Yes | Your Default Location (set for you in Settings → Team), else the first location | Options read "Name (City, State)". Red frame when empty. "Loading locations..." or a red "Error loading locations:" box |
| Vendor * | Yes | First vendor | Active vendors only. Reads "Loading vendors..." while loading; a load error shows in red under the list. With no vendors yet it pre-selects Default Vendor, hint: "No vendors yet, so "Default Vendor" is created when you import. Open the list to add your own." That vendor is created only when the import runs |
| Vendor Invoice # or PO # * | Yes | Vendor's initials + date and time | Click to clear it and type the vendor's real number; left blank, it refills. Also the duplicate guard: an invoice number already on any procurement order (imported, or created on New Order) cannot be imported again |
| Already Received (under Other Settings) | — | Ticked | Always ticked and greyed out: every import is received at once and marked Delivered |
| Other Expenses & Fees ($, under Other Settings) | No | Empty | 0 or more. Added on top of the goods cost to the order total (freight, handling and so on), which is the Amount on the Orders tab. Order Details shows it in the Cost Breakdown and keeps it in Total Amount, the printed purchase order lists it as OTHER EXPENSES & FEES, and Edit Order can change it. It is not part of the stock's cost: once the order is delivered it is booked as an expense, on Freight & Fees on Purchases in the Profit & Loss. A negative or unreadable amount counts as 0 |
| Notes (Vendor Name, Description, etc.) (under Other Settings) | No | Empty | Saved in the order's internal note after "Imported …/… rows from (file name)." Cleared after a clean import |
| Update existing product name/description from your file | No | Unticked | Shown once a card is picked in Step 2. "Use when your file should overwrite catalog metadata." Ticked: rows whose SKU already exists overwrite that product's name and description |
Buttons and displays:
| Control | Where | What it does | Notes |
|---|---|---|---|
| Language switch (globe icon): English / Español / 中文 | Header, right | Translates this import screen only; remembered in this browser | Template column names stay in English. The rest of the app does not change |
| Choose Store & Vendor | Step 1 header | — | — |
| New Vendor (plus icon) | Top of the vendor list | Opens Create New Vendor | — |
| Other Settings (chevron) | Step 1, right end | Shows or hides Already Received, Other Expenses & Fees and Notes | Closed by default |
| Choose Inventory Type + "Choose the format that matches your data type." | Step 2 header | — | — |
| Card A - Trackable Items (Non-Bulk Items), "One row = one physical unit" | Step 2, left | Selects the Trackable format: each row becomes its own inventory item with its own serial number, condition and grade; no quantity column ("5 laptops means 5 rows") | If a file is already loaded, it is re-checked against this format; a file that doesn't match is removed and the mismatch message shows. Both cards glow until one is picked |
| Card B - Bulk Items, "One row = many units" | Step 2, right | Selects the Bulk format: each row adds its quantity to the stock pool, no per-unit serial or condition ("50 batteries is one row with quantity 50") | Same re-check: a loaded file that doesn't match is removed |
| No card picked | Step 2 | You can still upload in Step 3. The file's columns then decide: per-unit columns (serialNumber, condition, grade) and no quantity column import as Trackable, anything else as Bulk | The template preview, the two folds and the Update existing product box stay hidden until a card is picked |
| Download Template A / Download Template B (download icon, chevron) | Inside the chosen card | Menu: Excel (.xlsx) "Recommended. Dropdowns, a how-to sheet, and barcodes and serials kept exactly as typed." or CSV (.csv) "Plain text, for other software or your own exports." File name like (industry)-trackable-import-template.xlsx or (industry)-bulk-import-template.csv, pre-filled with sample products from your industry | Pick a card first. Glows until a file is loaded. The Excel workbook has an "Items" sheet and a "How to fill" sheet |
| "Fill in your file in this exact layout — same columns, same names — then upload it in Step 3." | Under the download button | Hint | — |
| Template preview "Template A (Trackable Items) columns" / "Template B (Bulk Items) columns" | Step 2, below the cards | Spreadsheet-style preview with one sample row and one description row per column | After a card is picked |
| Chip "Sample data: …" (for example "Appliance retail"), tooltip "The sample rows and the downloadable template use real products from your industry." | Template preview | Which industry's samples you see | "General merchandise" when the store has no matching industry |
| Legend: red Required, amber Recommended, grey Optional | Template preview | Colour key | Red: sku, name, category, costPrice, retailPrice (and quantity for Bulk). Amber: model, brand, msrp (and serialNumber, condition for Trackable). Grey includes barcode in both templates. The import itself only insists on name and category for SKUs not yet in your catalog, accepts a blank sku when the row has a model, and only warns about model, brand and msrp |
| "If a product's SKU isn't in your catalog yet, include the recommended columns so it can be created." | Under the preview | Footnote | — |
| Fold SKU, model, serial number, barcode: which is which? | Step 2, above the two folds below | Five points: the SKU names one product and is saved as typed (up to 15 characters prints as bars, 20 at most); the model becomes the SKU when sku is blank; the serial number names one unit and is assigned when blank (for example U-2610050042); the barcode is the box UPC/EAN, saved on the product; they can overlap | Shown once a card is picked; open by default |
| Fold Why fill in as many columns as you can? | Step 2 | Six tips: every column is a search key, SKU matches existing products, a row with no SKU is saved under its model, only the serial number pins a single unit (one is given when blank), richer data creates better products, print labels later | Shown once a card is picked; closed by default. The last tip points to Inventory → Labels |
| Fold How is inventory computed for each row? | Step 2 | Explains: match by SKU; reuse the product or create it; update this location's stock or start it; Trackable also creates one inventory item per row | Shown once a card is picked; closed by default |
| Upload Procurement File + "Upload your Excel (.xlsx) or CSV (.csv) file. Required columns depend on the format selected above." | Step 3 header | — | — |
| Drop area "Upload your file" / "Drag and drop your Excel or CSV file here, or click to browse" | Step 3 | Drop a file to load it | Only when no file is loaded. Accepts .xlsx and .csv |
| Choose File | Drop area | Opens the file picker | The picker also offers .xls, which is then refused |
| Upload banner (warning icon; red = rejected, amber = warning) | Top of Step 3 | Explains why a file was rejected (nothing loaded) or accepted with a caveat | See Messages. A type-mismatch rejection also shows a red toast |
| Dismiss | Upload banner, right | Hides the banner | — |
| Loaded-file card: file name, size, "CSV file" or "Excel workbook", sheet "…" | Step 3 | Shows what was read | The first sheet with a recognisable header row is used. A CSV may open with title lines: the header is the first line within the top 20 naming at least two known columns |
| Trash icon (red) | Loaded-file card, right | Removes the file, the preview and any banner | No tooltip |
| Data Preview (… rows shown) + chips "📍 Location: …" and "📦 Individual Items" / "📊 Bulk Products" | Preview header | Every data row of the file; blank rows and the template's "Required: …" legend row are dropped | Both chips follow the format the file will actually import as: the one you chose in Step 2, or, if you chose neither, the one guessed from its columns — in which case the format chip adds "(guessed from your file's columns)". The Location chip shows for a Trackable import once a location is selected |
| Box "Trackable Import Details:" (includes "Items will be assigned to: …") | Preview | Explains what Trackable does | Only when the file will import as Trackable, chosen or guessed |
| "Existing products: … • New products: …" | Preview | Rows whose SKU is already in your catalog vs new | Worked out as soon as the preview loads, before a location is chosen |
| Red box "… of … rows cannot be imported yet. Fix these in your file and re-upload:" + one bullet per column | Preview | Blocking problems, by column and by SKU (or row number) | Import stays disabled until fixed |
| Amber box "These import as they are — filling them in just makes the catalog more complete:" + bullets | Preview | Non-blocking warnings (model, brand or msrp missing or unreadable for new products) | — |
| Preview table + Plan column | Preview | Plan per row: catalog (existing or new product; "new product (a deleted product has this SKU; it stays deleted)" when only a product you deleted has it), location (update or create a stock level, or "pending stock check" until a location is chosen), item (create an inventory item and order line for Trackable, or an order line for Bulk — whichever the file will actually import as), plus any issue. Also "SKU: … (made from the model)" for a row with no SKU; for Trackable, "Serial: from your file" or "Serial: none in file — one is assigned"; and, when the row has a barcode, "Barcode: saved on the product" (new product) or "Barcode: added to the product if it has none" (existing product) | Flagged cells are tinted red (blocking) or amber (warning); hover for "… is required" etc. A row with neither SKU nor model shows red "Missing SKU and model" |
| "⚠️ Location Required" / "Please select a location above before importing items." | Preview, bottom | — | When no location is selected |
| Order Summary "Complete breakdown of your procurement order": Total Items, Total Quantity, Cost Price, Retail Value; Financial Breakdown (Subtotal (Cost Price), Other Expenses, Total Purchase Price); Profit Analysis (Potential Profit, Margin = profit ÷ retail, Markup = profit ÷ cost, all on the goods alone; then Profit after Other Expenses & Fees and Margin after Other Expenses & Fees; "*Based on retail prices in your import file…") | Below Step 3 | Live totals from the file | Once a file is loaded. Trackable counts each row as 1 unit. Other Expenses, and the two after-fees lines, show only when Other Expenses & Fees is above 0. The goods-only figures match how each sale's profit is counted later; the after-fees lines show what the load earns once freight and handling are paid. With fees entered, the footnote adds that once the order is delivered, the Profit & Loss books them as an expense, under Freight & Fees on Purchases. Before a file is loaded: "Upload and preview your file to see order summary" / "Detailed calculations will appear after file upload and processing" |
| Import … Trackable Items / Import … Bulk Products → "Creating Inventory Items..." / "Creating Products..." | Bottom right | Runs the import (see below) | Disabled until a file is loaded, the invoice number is filled, a location is chosen and no row has a blocking problem; also while running |
| Progress toast "Import in progress" → "Importing…" "…/… processed · … ok · … failed" → "Creating order…" → "Receiving stock…" | Toast | Live progress | — |
| Final toast "Import completed" / "Import completed with issues" — "…/… succeeded · … failed" + Go to Receive / Go to List | Toast | Buttons open the Receive or Orders tab | Red when there were issues; adds "· stock-in failed (order left Pending)" if receiving failed, and "· the order could not be finished" if its last step failed |
| Green panel "Trackable Items Imported Successfully!" / "Bulk Products Imported Successfully!", with Order ID, Order Number, Rows imported, Imported value, Location | Under the Import button | Confirms the import. The form resets for the next file (file cleared, new auto invoice number, notes cleared) | Clean import only. When the import created Default Vendor (your store had no vendors), a blue note under the order number says so: "This import created a vendor called "Default Vendor" (Supplier, Active), because your store had none. Rename it and fill in its details in Inventory → Vendors, or pick your own vendor next time." The amber panel of an import with issues shows it too |
| Amber panel "Import completed with issues — …/… rows imported", with up to two tables (SKU, Error): "Rows on this order but not received (…)" and "Rows not added to the order (…)" | Under the Import button | Lists rows that failed. A row that failed after the order was made (a serial number already in stock, say) keeps its line, which counts in the order total: receive it on this order from the Receive tab with a corrected serial number, or set its quantity to 0 in Edit Order if it never came — importing it again would put its cost on a second order. A row that never reached the order (its product could not be found or made) is fixed in your file and imported on its own, under a new invoice number, since the same invoice number is refused a second time. When no row imported, the order is cancelled and one "Failed rows (…)" table sends every row back to your file, to import again under a new invoice number. The file and invoice number are kept so you can review | When any row failed, or the stock-in step failed |
| Red box "Stock-in failed — no stock was applied and the order was left as Pending (not Delivered). You can receive it from the receiving tab. Reason: …" | Result panel | — | When the receiving step failed |
| Red box "The purchase order was made and its rows went in, but it could not be finished: …", with the reason and a Finish the order button ("Finishing…") | Result panel | Says what was left unfinished and runs what is left of the last step again: saving the order's total and the import's details (its load date, whether the goods were already in your store), then marking it Delivered, or Cancelled when no row imported. Once the total and details have saved, pressing it again only sets the status. Toast "Order finished", or "The order is still not finished" with the reason | When that last step failed. Until it is finished the order shows a $0.00 total, stays Pending, and what it received may be booked on the day you imported rather than the load date. If only the status could not be set, the box says the order "could not be marked Delivered" (or "could not be cancelled") instead, and when no row imported it says the order "still reads Pending instead of Cancelled". Pressing it again is safe. The amber panel's title counts it as an issue |
| Box "Error:" + message | Under the Import button | Shows an import that was halted or failed | See Messages |
What happens when you press Import
- It first checks that the invoice number is not already on another procurement order. "Default Vendor" (if used) is created only after that check passes.
- Each row is matched to a product by SKU — upper and lower case count as the same, and spaces at the ends are ignored — or a new product is created (with its category and brand). A row with no SKU uses one made from its model. A new product is saved under the SKU exactly as the file typed it, never lowercased. The file's barcode goes on the product: a new product takes it, and an existing product is given it only if it has none (a barcode it already has is never replaced). Only a live product is matched: a product you deleted keeps its history but never receives stock from an import, so a SKU only a deleted product has makes a new product. Creating one follows your store's SKU rule, the same as Add Product: if someone else gives a product that SKU a moment before, the import uses theirs instead of making a second.
- One procurement order is created with the rows that resolved.
- Trackable rows each become one inventory item. Its SKU is its product's SKU. Its serial number is the file's, or, if blank, one the store assigns:
U-, the order date as YYMMDD and that day's number from 0001, such asU-2610050042. Each store counts its own, so two stores can both haveU-2610050001. Its barcode is its serial number, so the unit's label scans to that unit. The store checks the serial number and the barcode and creates the unit in one step, so a serial number or barcode you already have fails that row — "A unit with serial … already exists (id=…). Skipped so the same unit is not counted twice." — however the import was run, and two people importing the same file at the same moment cannot both create the unit: the second one is told it already exists. A serial the store assigns is never refused this way: if another import takes that number at the same moment, the next one is used. The rest of the file still imports. - Everything is received in one step: stock goes up at the chosen location.
- The order is set to Delivered when every row succeeded, delivered on its order date, so its Other Expenses & Fees are booked on the day the load arrived. If some rows failed it stays Pending: what the import received is still booked on the order date, a failed row you receive later on the Receive tab is booked on the day you receive it, and the fees on the day the order is finally Delivered (receive the rest, or lower the failed row's quantity to what arrived, then choose Delivered). If no row imported it is set to Cancelled.
- The order's subtotal is what its lines come to, and the total adds Other Expenses & Fees. A row that failed at the very last step still has a line on the order, so its cost is counted — the total and the Items tab always agree.
- The order is dated with the order date at the top of Step 1. Backdate a load that arrived earlier and it is filed on that day — in the Ordered column (so it sits in date order, not at the top, and reads 12:00 PM), on the Receive tab, and in the month the goods are booked into your accounts. Left on today, the order is stamped with the moment you ran the import.
- The date is checked before anything is created. A date that is empty, unreadable, in the future or more than ten years old stops the import there, so no products are added and no order exists.
Tab: Receive
Heading Procurements Receiving, "Track and manage incoming procurement orders and shipments". Lists the store's procurement orders (all locations) except the cancelled and refunded ones, which are finished and can take no more stock.
| Control | Where | What it does | Notes |
|---|---|---|---|
| Refresh (circular arrows) | Header, right | Reloads the whole browser page | You land back on the Receive tab |
| Received (30 Days) "Items successfully received" | Metrics row | Units received on orders updated in the last 30 days that have received something or are marked Delivered | — |
| Missing (30 Days) "Items not received as expected" | Metrics row | Units still outstanding on those same orders | Orders with nothing received yet are not counted, unless they are marked Delivered |
| Receiving Accuracy "Average accuracy rate" | Metrics row | Received ÷ ordered on those orders, as a percentage | 100% when there is nothing to measure |
| Pending Orders "Orders awaiting delivery" | Metrics row | Number of procurement orders with status Pending | — |
| Receiving Status of Procurement Orders | List card title | — | — |
| "💡 Quick Tip: Click on any order row to record what arrived — received and missing quantities, serial numbers and a note. Use the search and filters below to find specific orders." | List card | Static tip | Names the four things the editor actually holds |
| Search, placeholder "Search by order number, supplier, or product..." | List card | Searches procurement orders by PO number, vendor invoice number, vendor name and product names | Not case-sensitive. Only procurement orders are ever listed — sales orders never appear, even when they contain a matching product, and neither do cancelled or refunded orders. Up to 25 matches of each kind |
| Status: select — All Status, Pending, Partial, Received, Overdue | List card | Filters the list | The filter and the row badge ask the same question, so what you pick is what you get |
| Column Vendor Invoice / PO Number | List | Top line (blue): the vendor invoice number, or the PO number if there is none. Second line: "PO: " and the PO number | — |
| Column Vendor | List | Vendor name, including a vendor you have retired with the Active switch and one you have deleted | A deleted vendor reads "Name (removed)". An order pointing at a vendor with no record left at all reads "Vendor no longer on file", and one that never named a vendor reads "No vendor on this order" |
| Column Type: Itemized / Bulk / Mixed | List | Itemized = every line has enough serial numbers for its quantity; Bulk = no serials | — |
| Column Order Date | List | The order's date — for an imported load, the order date the import was given | — |
| Column Expected | List | The ordered quantity (not a date) | — |
| Columns Received / Missing | List | Units received so far / still outstanding | Received in green when above 0; Missing in yellow |
| Column Receiving Status: Received (green) / Partial (yellow) / Overdue (red) / Pending (blue), plus "Received: …" date | List | Received = everything in. Partial = some in. Overdue = nothing in and a promised delivery date has passed. Pending = otherwise | Nothing in UpChannels sets a delivery date on a purchase order yet, so in practice no order is Overdue: an order with nothing received stays Pending however long ago it was raised. An order brought in from another system with a delivery date on it can be Overdue. Cancelled and refunded orders are not in this list at all |
| Row click | List | Opens Edit Receiving for that order | There is no separate Receive button. Arriving from Go to Receiving in Order Details opens that order's Edit Receiving by itself, as soon as the list has loaded |
| "No orders found" / "No procurement orders match your search criteria." | List | Empty state: there really is nothing matching | A failed load says so separately and never borrows this message |
| Red banner with Try again, and "Purchase orders couldn't be loaded" in the list | Above and inside the list | Shown when the tab can't read your purchase orders. Try again reads them again | The banner names what went wrong in plain words. A failed search keeps the list on screen under a banner saying it may be out of date |
| Loading placeholders | Whole tab / list | While loading or searching | — |
| "Showing …-… of … orders" + Previous / page numbers / Next | Under the list | Pagination | 5 orders per page; only when there is more than one page |
Dialog: Order Details
Opened by clicking a row on the Orders tab. Title "Order Details - PO …" with the full PO number; description "Complete details for procurement order PO …".
| Control | Where | What it does | Notes |
|---|---|---|---|
| Print (printer icon) | Header, right | Opens a printable PURCHASE ORDER in a new browser tab and starts printing: your logo (or "YOUR LOGO HERE"), company, location address and phone, DATE, PO# (full number), VENDOR INFORMATION, SHIP TO, items (ITEM #, DESCRIPTION with SKU, QTY, PRICE, TOTAL, NOTES with S/N and Lot), "Comments or Special Instructions", SUB TOTAL, DISCOUNT, TAX, SHIPPING, OTHER EXPENSES & FEES, GRAND TOTAL | DISCOUNT, TAX, SHIPPING and OTHER EXPENSES & FEES print only when above zero. OTHER EXPENSES & FEES is also left off when an earlier edit took it out of the order total (see Cost Breakdown), so the lines always add up to the GRAND TOTAL. GRAND TOTAL is the order total — the same as Total Amount here and the Amount on the Orders tab. Comments show the shipping note and the vendor invoice number saved on the order only (the one in Edit Order); the internal note is never printed. If pop-ups are blocked nothing happens. Nothing is saved |
| Edit Order (pencil icon) | Header | Switches to edit mode (next panel) | — |
| Delete Order (trash icon, red) → "Deleting..." | Header | Opens Delete this order? | Always clickable; the confirmation decides whether deletion is allowed |
| X (close) | Top-right corner | Closes the dialog | Esc and clicking outside also close it |
| Card Order Info: PO Number, Vendor Invoice (or "—"), Status badge | Body | Read-only | The saved vendor invoice number, the same one the list, search and the print use. A number written only in a note (for example "Invoice #INV-2031") is not read out of it; add it with Edit Order |
| Card Vendor: Vendor, Source (for example MANUAL), Category | Body | Read-only | Source reads "Import" when none is recorded |
| Card Dates: Created, Expected (or "—"), Delivered | Body | Read-only | "Delivered:" appears on orders recorded as received — by an import, Received into inventory now, the Receive tab, or by setting the status to Delivered or Completed in Edit Order. It shows the day the order was first marked Delivered or Completed, stored once, so a later save does not move it — for a whole import, the day the load arrived. An order with no stored day shows the day its goods were last received (for an import, the day the load arrived), or, with no receipt, when it was last updated. Moving the status back afterwards does not take the line away: the goods may really have arrived, and the Receive tab is what records that |
| Card Location: name, code, type, address, phone | Body | Read-only | Only when the order has a location. "Loading location..." or "Location information not available" |
| Financial Summary: Items, Total Qty, Subtotal, Total Amount | Body | Totals. Total Amount is the order total, the same as the Amount on the Orders tab: subtotal + tax + shipping − discount + other expenses & fees | — |
| Cost Breakdown: Subtotal, Tax, Shipping, Discount (red, minus), Other Expenses & Fees, Total | Inside Financial Summary | Read-only | Shown only when tax, shipping, discount or other expenses & fees is above zero; each line only when above zero. If an earlier edit took Other Expenses & Fees out of the order total, the line is left off and an amber note reads "Other Expenses & Fees of $… are recorded on this order but are not in its total — an earlier edit took them out. Click Edit Order, then Save Changes, to add them back." Saving puts them back in the total |
| Order Items table: SKU, Product/Description, Quantity, Unit Price, Total Price, Serial/Lot (S/N, Lot), Notes | Body | Line list | Hover a cut-off name, description or note for the full text |
| Internal Note | Body | The internal note, or "No internal note" | For your team. Never printed on the purchase order |
| Shipping Note | Body, bottom | The shipping note | Only when there is one |
| Banner Deletion Error | Top of body | Why a delete failed ("Failed to delete order: …") | After a failed delete. See Messages |
Dialog: Edit Order
Title "Edit Order - PO …", description "Edit the details for procurement order PO …". Print, Edit Order and Delete Order are hidden while editing. Nothing here adds or removes stock.
Fields:
| Field | Required | Default | Rules and error text |
|---|---|---|---|
| Vendor Invoice: ("Vendor invoice number") | No | The number saved on the order (empty if none is saved) | Can be cleared. This is the number the purchase order prints |
| Status: ("Select status") — Draft, Saved, Pending, Processing, Shipped, Delivered, Completed, Cancelled, Refunded | — | Current status | Changing the status never moves stock. Delivered and Completed are greyed out until every item with a product is received, with the note "Delivered and Completed open once every item is received…" under the list; lowering a line's quantity to what arrived opens them in the same edit. Cancelled, Completed and Refunded are final: changing one back to an open status is refused |
| Vendor: ("Select vendor") | — | Current vendor | Active vendors, plus this order's own vendor marked "(inactive)" when it has been retired — so saving the order cannot quietly move it to someone else. A deleted vendor is not offered: the order shows its name while you read it, and editing the order means picking a vendor you still buy from. If none load, a plain text box "Vendor ID" appears instead |
| Subtotal | — | Current value | Read-only — "Adds up from the items below." It follows the lines as you edit them, and the store works it out again from the saved lines when you click Save Changes, so it cannot be typed over |
| Tax Total | — | Current value | An amount in dollars, not a percentage |
| Shipping Total | — | Current value | — |
| Discount Total | — | Current value | Subtracted |
| Other Expenses & Fees | — | Current value (0 if none) | 0 or more. Freight, handling and other costs on top of the goods. An import fills it in from its Other Expenses & Fees. A negative amount counts as 0. Like Tax and Shipping (less Discount), it is booked as an expense, Freight & Fees on Purchases, once the order is delivered, never added to Inventory |
| "Calculated Total: $…" | — | — | Read-only: Subtotal + Tax + Shipping − Discount + Other Expenses & Fees. The store works the same sum out again from the saved lines and stores that as the order total, so the figure on screen and the figure saved always agree |
| Line Quantity | — | Current value | Cannot go below what has already been received (tooltip "… already received — can't order fewer"). Going lower is refused on save, by the store, naming the item |
| Line Unit Price | — | Current value | 0 or more. The line total recalculates |
| Line Notes ("Notes...") | No | Current value | Can be cleared |
| Internal Note ("Enter internal note...") | No | Current value | For your team; never printed on the purchase order. Can be cleared |
| Shipping Note ("Enter shipping note...") | No | Current value | Can be cleared |
Buttons:
| Control | Where | What it does | Notes |
|---|---|---|---|
| Cancel | Footer | Discards edits and returns to view mode | Disabled while saving |
| Save Changes (save icon) → "Saving..." | Footer | Saves status, vendor, invoice number, tax, shipping, discount, Other Expenses & Fees, both notes and every line's quantity, price and note — all in one go. The store works the subtotal and the total out from the lines the save is about to write, checks the typed tax and discount against that, and only then saves anything, so the two can never disagree. The lines and the order are saved in one step: all of it lands, or none of it does. A changed Other Expenses & Fees is saved on its own, so the details an import keeps with the order (its load date, and whether its goods were already in your store) stay exactly as they are. The window stays open and returns to view mode with the saved values; the list refreshes behind it without the "Loading Orders..." screen | Disabled while saving. A discount larger than the items are worth, or tax larger than what is taxed, is refused before anything is written — nothing is saved at all, not the lines and not the order. If the store then cannot save a line, nothing is saved at all — not the lines before it and not the order — and the message says so. If someone else saved the same order, or received goods on it, at the same moment, the store works the save out again once on its own; if it still clashes, it asks you to click Save Changes again, with nothing saved. A cancelled order's quantities and prices can no longer be changed; its notes still save. A figure the save is leaving alone is never questioned, so an order imported with an odd tax or discount can still have its notes or shipping edited |
| Banner Save Successful — "Order saved successfully." | Top of body | Confirms the save | Stays until you start editing again or close the window |
| Dialog Receive these items first — "Some items on this order are not received yet. Receive them on the Receive tab, or, if they will not come, lower their ordered quantity to what arrived. Nothing was saved." | Over the window, instead of saving | Appears when a save would set Delivered or Completed while a line with a product is not fully received (for example a quantity raised after Delivered was picked). The same sentence stays in Save Error | Go to Receiving opens the Receive tab with that order's Edit Receiving window already open — once: close it and move between tabs and it stays closed; Not now closes the prompt, and the edit stays open to change |
| Amber note … not received yet — the same sentence, then "Either one updates this order's books by itself.", and Go to Receiving | Body, under the save banners | Shows on an order already Delivered or Completed with a line not fully received | Saving such an order is never refused. Receiving the rest, or lowering the quantity in Edit Order, puts it right |
| Banner Save Error | Top of body | Why a save was refused or failed | See Messages |
Dialog: Delete this order?
| Control | Where | What it does | Notes |
|---|---|---|---|
| "This permanently deletes the order and its line items. Any received bulk stock is reversed out automatically. If a received serialized item has already been sold or reserved, deletion is blocked and you'll be told which sales order to undo first. Orders with payments cannot be deleted." | Body | Explains the effect | Orders that are Draft, Saved, Pending or Cancelled |
| "This order is … and cannot be deleted directly. Set its status to Cancelled first (this preserves the financial and inventory history), then delete it." | Body | Explains the block | Orders that are Processing, Shipped, Delivered, Completed or Refunded |
| Cancel | Footer | Closes the confirmation | Disabled while deleting |
| Delete (red) → "Deleting..." | Footer | Permanently deletes the order, its lines and its receiving records. Everything it received in bulk is subtracted back out in full (logged as a stock adjustment "Procurement order deleted - receipt reversed" for the whole quantity); unsold serialized units from the order are removed. If the location now holds fewer than that, because some of those units have already been sold or written off, On Hand goes below 0 by the difference. Available drops by the same amount as On Hand, so an order those units were promised to shows as short. Both are listed in the Audit for review, never hidden at 0. The dialog closes and the list refreshes | Greyed out unless the status is Draft, Saved, Pending or Cancelled. Refused if the order has payments or its received serialized units were sold or reserved. Owner or manager only |
Dialog: Procurement Order Created
| Control | Where | What it does | Notes |
|---|---|---|---|
| Title Procurement Order Created, "PO #…" | Header | Confirms the create and names the order | The same PO number the Orders tab, Order Details and the printed purchase order show. If the number has not come back yet it reads "Internal reference: …" with a 6-character short code, labelled so nobody quotes it to a vendor |
| "… customer(s) who asked for these is/are linked to PO #…" | Body (amber) | Confirms customer asks were linked to the new PO | Only when asks were added from Requested, not stocked. Reads "linked to this purchase order" when the PO number has not come back yet. Ends "— they're on the list to be texted when it's received." when Text automatically when stock arrives is on in Settings → Lost sales |
| "… ask(s) was/were left as it was / they were — already on another purchase order, or no longer waiting." | Body | Asks that were not moved | Only when some were skipped |
| Close | Footer | Closes and resets the whole form: one empty line, a fresh invoice number, notes cleared, tax 0%, Received unticked. Location and vendor stay | Closing with X or Esc does the same |
| Print PDF | Footer | Opens a new tab ("Generating printable order…") with the printable PURCHASE ORDER and starts printing | The same purchase order as Print in Order Details: the full PO#, and under Comments the shipping note and vendor invoice number only — never the internal note. If pop-ups are blocked: "Please enable pop-ups to print the order." |
Dialog: Special order
Opened from Special order in Requested, not stocked. Title Special order, with the item name and how many people asked.
| Control | Where | What it does | Notes |
|---|---|---|---|
| "A special order is a customer order for an item you don't stock yet. The customer and the item are filled in for you." | Body | Explains the dialog | — |
| One row per waiting customer: name, phone, "asked …" date, status, consent, quantity; or "Anonymous visit — start a blank special order" | Body list | — | — |
| Start special order | Each row | Opens Sales → New with that customer and item filled in | — |
| No customer yet (person-plus icon) | Footer, left | Starts a special order for the item with no customer | — |
| Close | Footer, right | Closes | — |
| "Loading who asked…" / "Nobody is on this item's list any more. Start a blank order below." / "Showing … of the … people who asked." | Body | Loading, empty and cut-off notes | — |
| The reason, or "Something went wrong." | Body | The list of who asked could not load | Close and try again. No customer yet still works |
Dialog: Create New Vendor
Opened from New Vendor at the top of the Import tab's vendor list.
Fields:
| Field | Required | Default | Rules and error text |
|---|---|---|---|
| Vendor Name * | Yes | Empty | Red frame while empty |
| Tags (e.g., electronics, supplier) | No | Empty | Left blank, the vendor is tagged "import" |
Buttons:
| Control | Where | What it does | Notes |
|---|---|---|---|
| Cancel | Footer | Closes; nothing is created | What you typed stays for next time |
| Create → "Creating..." | Footer | Creates an active supplier vendor, adds it to the list and selects it | Disabled while the name is empty or while creating. On failure a browser alert shows the error (or "Failed to create vendor") |
| X (close) | Corner | Closes | — |
Dialog: Edit Receiving
Opened by clicking a row on the Receive tab. Title "Edit Receiving - …" (vendor invoice or PO number); sub-line "(vendor) • Expected: (date)" — the date is the order's created date.
| Control | Where | What it does | Notes |
|---|---|---|---|
| Guide "📋 How to Update Receiving Information" (Adjust quantities, Add notes, Save receiving, Tip) | Header | Static help | — |
| Expected / Received / Missing | Top of body | Totals across all lines | Received and Missing update as you type |
| Product name, "Code: (SKU) • $… each" | Each line | — | — |
| "… waiting — the ones who agreed to a text get one when this is received" (bell icon, amber) | Each line | Warns that receiving this product texts walk-in customers waiting for it | Only when someone is waiting for that product. The texts go out only while Text automatically when stock arrives is on in Settings → Lost sales |
| Chip "Itemized (creates Inventory Items)" / "Bulk (quantity only)" / "Mixed" | Each line | Order type | — |
| Total Value | Each line, right | Unit price × the quantity entered | — |
| Expected Quantity | Each line | The ordered quantity | Read-only |
| Received Quantity − (minus) | Each line | Lowers the count by 1 | Disabled at 0 |
| Received Quantity number box | Each line | Type the total received so far for this line (not just today's delivery). Saving applies the difference from what was already recorded | Starts at what has actually been received (0 for a new order). Limited to between 0 and expected + 5; anything higher is brought down to expected + 5 |
| Received Quantity + (plus) | Each line | Raises the count by 1 | Disabled at expected + 5 |
| Missing Quantity (yellow) | Each line | Expected − received, never below 0 | Read-only |
| Notes (optional) ("Add notes about this item...") | Each line | Line note, saved with the receipt — or on its own if only the note changed (no stock change) | — |
| "You have unsaved changes" / "No changes made" | Footer, left | — | — |
| Cancel | Footer | Closes without saving | Disabled while saving |
| Save Receiving (save icon) → "Saving..." | Footer | For each changed line, a higher number adds stock at the order's location at the unit cost; a lower number takes stock back out. A line for one of a product's variants goes onto that variant's own stock record there. On Hand and Available each move by exactly the difference, from whatever they were — a product already below 0 (an Allow Oversell backorder, or a count that found less than was promised) comes up by what arrived and no more, and a lowered line whose units were already sold takes On Hand below 0. The stock movement records the same difference. Where the product (or the variant received) has no stock record at that location yet, the receipt makes one; a delivery, a transfer or another receipt making the same record at the same moment waits for it, so the same record is never made twice. If every line is now fully received, the order becomes Delivered. Toast "Order received" / "Updates saved for …". The dialog closes and the list and metrics refresh | Disabled until something changed, and while saving. A double click or retry of the same save is only applied once. On an Itemized order, a serial number your store already holds does not become a second unit — whichever product it was first recorded against, including when two people save the same receipt at the same moment, and when one of them is receiving while the other imports the same serial on the Import tab. The quantity is still received and the stock still moves; the unit that already carries that serial is left exactly as it is, and no new one is created for it. A second, red toast names the serials that were skipped and the SKU each one is already on — up to three, then "and n more" |
| X (close) / Esc / click outside | Corner | Closes without saving | — |
There is no barcode scanning, condition field, "Mark as Received" or "Mark Order Complete" in this dialog.
Sub-pages and other ways in
| Page | What you see | How you reach it | Notes |
|---|---|---|---|
| /inventory/replenish | Heading "Replenishment" (chip "Live Backend"), then the New Order form with Requested, not stocked | A product's details, walk-in requests card → Order it (cart icon). Shown when walk-in customers asked for the product while it was out of stock | Not locked before the first procurement order |
| /inventory/receiving | Breadcrumb "Inventory › Receiving", title "Inventory Receiving" (chip "Receiving System"), then the Receive tab's screen | Only by typing the address — nothing in the app links here | Not locked before the first procurement order |
| /inventory/import | Heading "Import Data" (chip "Import System"), then the Import screen | Only by typing the address | Go to Receive / Go to List in the completion toast open the Receive or Orders tab of Procurement Orders |
| /procurement/import | Breadcrumb "Procurement › Import", title "Import Procurement Orders" (chip "Import System"), then the Import screen | Only by typing the address | Same importer; the completion toast's buttons also go to Procurement Orders |
| /procurement/orders | Nothing — forwards to this page | Old links only | — |
None of these pages has a menu item of its own, so for menu visibility they all belong to Procurement. Hiding Procurement from a team member shows them "403 - Forbidden" on every one of them, typed address or bookmark included.
Other ways into this page:
| From | Link or button | Opens |
|---|---|---|
| Sidebar | Inventory → Procurement (truck icon) | Orders tab (or Import for a new store) |
| Shortcuts page | Procurement Orders List / New Procurement Order / Import Procurement Order / Receive Procurement Order | The matching tab |
| Get Started | Card Inventory Setup | Import tab |
| Setup banner | Step "Add your first product or service" → Add a product | Import tab |
| Sales → New | Product search footer "Can't find it? Add Inventory" | New Order tab |
| Sales → New | Reminder under the item search: "…go Procurement or …" | Orders tab (or Import for a new store) |
| Dashboard | Card Open POs (truck icon), and the Procurement link on the Organized level | Orders tab (or Import for a new store) |
| Lost Sales Report, Requested items tab | Open Replenish | New Order tab |
| Snapshot stock-reset notes | Inventory Receiving | Receive tab |
Messages you may see
Page and Orders tab
| Message | When it appears | What to do |
|---|---|---|
| "Orders, New Order and Receive unlock after your first import." | The store has no procurement order yet | Run an import on the Import tab; the tabs unlock as soon as it finishes |
| "Orders / New Order / Receive needs a purchase order to work on, and this store has none yet — so this is Import, where the first one is created. Orders, New Order and Receive unlock after it." | Same, but a link or bookmark asked for that tab by name | The same: run the import |
| "403 - Forbidden" / "You do not have permission to view this page. Contact your organization owner." | The owner hid Procurement in this person's menu. It shows on this page and on the separate Replenishment, Inventory Receiving and import pages and the older purchase-order address | The owner turns the item back on for them in Team & menu visibility |
| "No orders found. Try importing some orders first." | No orders at the loaded locations | Use Go to Import, or check the Location filter |
| "No orders match your current filters." | Filters hide every order | Clear filters |
| "Failed to Load Orders" (with "Failed to load procurement orders: …") / "Failed to Load Locations" / "Failed to Load User Data" | A read failed | Use the matching Retry button; reload if it keeps happening |
Order Details and Edit Order
| Message | When it appears | What to do |
|---|---|---|
| ""…" is a final status and cannot be changed back to "…"." | Tried to reopen a Cancelled, Completed or Refunded order | Not allowed. Create a new order if needed |
| ""…" already has … received — its ordered quantity can't be set below that. Use the Receive tab to correct received amounts." | A line quantity was set below what has been received | Lower the received quantity on the Receive tab first, then edit |
| "Failed to save order: Order update failed: This purchase order was cancelled, so what it ordered and what it cost can't be changed. Create a new purchase order instead." | A quantity, price or cost was edited on a Cancelled or Refunded order | Create a new purchase order. Notes on a cancelled order still save |
| "Failed to save order: Order update failed: A discount of … is more than the order's items are worth (…). Lower the discount, or add to the order." / "Failed to save order: Order update failed: Tax of … is more than the … the order is taxed on. Check the tax rate." | A typed discount or tax is larger than the items | Lower it. Nothing was saved — neither the lines nor the order |
| "Failed to save order: Order update failed: The vendor on this order is not one of your store's vendors. Pick the vendor again and save." | The save gave the order a vendor that belongs to another store — normally only a program sending the save in. A vendor the order already had is not judged, so its notes still save | Pick one of your own vendors. Nothing was saved — neither the lines nor the order |
| "Failed to save order: Order update failed: Someone saved this order or received goods on it at the same moment. Press Save again." | Someone else saved this order, or goods were received on it, while your save was being made. The store already tried once more on its own. Nothing was saved | Click Save Changes again. Your edits are still in the window, and the save is judged on the order as it now is — a quantity now below what has been received is refused with the sentence above |
| "Failed to save order: Order update failed: Nothing was saved: …" / "Failed to save order: Order update failed: …" / "Failed to save order: Order update failed: Item … could not be saved — it is no longer on this order." | The store could not write the save, or refused it. The lines and the order are saved together, so neither the lines nor the order changed | Retry; reopen the order if a line is named as no longer on it; if it keeps failing, contact support with the message |
| "Failed to save order: Order update failed: The order was saved, but it could not be read back. Reopen it to see the saved figures." | The save landed, but the window could not load the saved order afterwards | Close and reopen the order; do not save the same change again |
| "Failed to delete order: Only Draft, Saved, Pending, or Cancelled procurement orders can be deleted. This order is …. Set its status to Cancelled first (this preserves the financial and inventory history), then delete it." | Status does not allow deletion | Edit Order → Status Cancelled → Save → Delete |
| "Failed to delete order: This order has … payment(s) recorded against it and cannot be deleted. Void or remove those payments first, or keep the order as Cancelled to preserve the financial history." | The order has payments | Remove the payments, or keep the order as Cancelled |
| "Failed to delete order: This procurement order can't be deleted yet — some received items have already been sold or reserved: …" (names each product and the sales orders involved) | Serialized units from this PO were sold or reserved | Delete, cancel or return the listed sales orders first, then delete again. Bulk items never block |
| "Failed to delete order: Deleting a purchase order needs manager access. Ask the owner or a manager to delete this one." | The person is staff | Ask the owner or a manager to delete it |
| "Failed to delete order: Delete affected no rows — the order may already be removed or is outside your organization." | Already deleted | Refresh the list |
| "Failed to delete order: Order … was not found in your organization (it may already be deleted)." | The order no longer exists | Refresh the list |
New Order
| Message | When it appears | What to do |
|---|---|---|
| "Pick a store location in Order Basics." | No location | Pick one |
| "Pick a vendor in Order Basics." | No vendor | Pick one, or add a vendor first |
| "Add an order line before creating the order." | No lines | Add Line |
| "1 order line has no product selected — click a product in the search results (typing in the boxes does not add one), or remove the line." (or "… order lines have …") | A line has no picked product | Click a search result, or remove the line |
| "Every order line needs a quantity above zero." | A quantity is 0 or empty | Enter a quantity |
| Toast "Order not created" | Create pressed while one of the above applies | Fix what the reason names |
| "No order line has a product selected — nothing was created." | Final check: no line has a product | Click a product in the search results for each line |
| "No product selected — click a search result to add one." | Under a line with no product | Click a result, or remove the line |
| "… line(s) is/are not counted — no product selected. Click a product in the search results." | Order Summary, same case | Same |
| "Failed to load locations" / "Failed to load vendors" / "Product search failed" / "Failed to create order" / "Order creation failed" | Loading, searching or creating failed | Retry. Make sure the store has a location and a vendor |
| "The location this order is filed at is not one of your store's. Pick one of your own locations and save again." / "The vendor on this order is not one of your store's vendors. Pick the vendor again and save." / "…: this product is not in your store." (the line's SKU, or "Line 2") | The order named a location, a vendor or a product that belongs to another store — normally only a program sending the order in. The first such line is named. Nothing was saved | Reload the page and pick your own location, vendor and products |
| "Please enable pop-ups to print the order." | Print PDF with pop-ups blocked | Allow pop-ups for the site |
| "The order's status could not be updated because the purchase order was not found. Anything already received stays received. Refresh the page and check the order." | Received into inventory now was ticked and the order could not be set to Delivered afterwards — for example it was deleted in another tab meanwhile | Refresh and check the Orders tab. The stock that was received is kept |
| Toast "Order created, but the customers who asked for these items were not linked to it." (with a reason, or "Try "Add to PO" again from Requested, not stocked.") | The order was made but linking the asks failed | Use Add to PO again from Requested, not stocked |
Requested, not stocked
| Message | When it appears | What to do |
|---|---|---|
| Toast "… added to the order" + "Fill in Order Basics, then Create Procurement Order." or "… × …. Create Procurement Order when the list is right." | Add to PO clicked | Finish the order and press Create Procurement Order |
| Toast "… is already on this order" | The item is already a line | Nothing to do |
| Tooltip "Add it to the catalog to order it" | Free-text ask | Add the product to your catalog first |
| Tooltip "Every ask for this item is already on a purchase order" | All asks are on a PO | Nothing to do |
| Tooltip "Nobody is still waiting for this one" | No open asks | Nothing to do |
| "Could not load what customers asked for." / "Could not work out the date range for this store." | The section failed to load | Reload. Check the store's time zone in settings |
Import — uploading a file
| Message | When it appears | What to do |
|---|---|---|
| "This file does not match the inventory type you selected" + "You selected Trackable Items, but this file has a … column and none of the per-unit columns (serialNumber, condition, grade) — that is the Bulk Items template." | A Bulk file under Trackable | Switch to B - Bulk Items, or use Template A |
| Same title + "You selected Bulk Items, but this file has per-unit columns (…) and no quantity column — that is the Trackable Items template." | A Trackable file under Bulk | Switch to A - Trackable Items, or use Template B |
| Same title + "You selected Bulk Items, but this file has no quantity column, so every row would come in as a single unit." | Bulk chosen and no quantity column (quantity, qty, quantity received or qty received are accepted) | Add a quantity column |
| All three end "Check both sides before you retry: is this the wrong file, or is the wrong inventory type selected? Switch the type in Step 2, or download the matching template above and re-export your data." | — | — |
| "The quantity column will be ignored" / "Trackable imports create one inventory item per row, so every row counts as 1 unit no matter what quantity says. …" (amber) | A Trackable file that also has a quantity column — accepted | Give each unit its own row, or switch to Bulk |
| "This Excel file can't be read" / "It is in the old .xls format or password-protected. In Excel, remove any password, choose File → Save As → Excel Workbook (.xlsx), and upload the new file." | .xls or password-protected workbook | Re-save as .xlsx with no password |
| "This Excel file could not be opened" / "It may be damaged, or not really an Excel workbook. Open it in Excel, save a fresh copy as .xlsx, and try again." | Damaged or not really an Excel file | Save a fresh .xlsx |
| "This file is too large" / "Excel files can be up to 10 MB. Split the rows into smaller files, or save the sheet as CSV." | .xlsx over 10 MB | Split the file, or save as CSV |
| "Only Excel or CSV files can be uploaded" / "Choose a file ending in .xlsx or .csv." | Any other file type | Use .xlsx or .csv |
| "This file could not be read" / "Reading the file failed: …" | Any other read error | Re-export the file |
| Toast "Could not create the Excel template" / "Try again, or download the CSV version instead." | The Excel template could not be built | Retry, or pick CSV |
Import — preview checks
| Message | When it appears | What to do |
|---|---|---|
| "… is empty in … rows — every row needs one: …" (lists SKUs) | A required column is blank (costPrice, retailPrice, and quantity for Bulk) | Fill it in and re-upload — Import stays disabled until then |
| "sku is empty in … rows, and so is model — every row needs a SKU, or a model to make one from: …" (or, with no sku column, "— your file has no such column, so each row's model is used as its SKU, and … rows have no model either.") | Rows with neither a SKU nor a model | Add a SKU or a model and re-upload |
| "… is empty in … rows — required to create a new product: …" | name or category is blank for a SKU not in your catalog. A SKU your catalog already holds keeps the product's own name and category, so it is never asked for them — with or without a location chosen | Fill it in and re-upload |
| "… is not a number in … rows: "…" (…)" | A price or quantity cell can't be read as a number | Type plain numbers and re-upload |
| "… — your file has no such column, and every row needs one (… rows)." / "… — your file has no such column, and it is required to create a product that is not in your catalog yet (… rows)." | A required column is missing | Start from the downloaded template |
| Amber: "… is empty in … rows — the product will be created without it:" / "… is not a number in … rows, so it will be left blank:" / "… — your file has no such column, so … rows will be imported without it." | model, brand or msrp missing or unreadable for new products | Optional — the import still runs |
| "Missing SKU and model" (Plan column) | A row with neither a SKU nor a model | Add a SKU, or a model to make one from |
Import — running the import
| Message | When it appears | What to do |
|---|---|---|
| "Location selection is required for inventory tracking. Please select a location where inventory will be stored." (toast "Import halted" / "Location is required.") | No location | Pick a location |
| "Vendor invoice number is required." (toast "Import halted" / "Vendor invoice is required.") | Blank invoice number | Enter an invoice number |
| "No data to import. Please upload and preview an Excel or CSV file." (toast "Import halted" / "No rows to import.") | No rows | Upload a file with data rows |
| "Vendor ID is required. Please enter a vendor ID for the procurement order." (toast "Import halted" / "Vendor is required.") | No vendor | Pick a vendor |
| "Organization data is still loading. Please wait a moment and try again." / "Invalid organization context. Please re-authenticate or refresh." (toast "Waiting for organization") | Your session isn't ready | Wait, or refresh / sign in again |
| "Invoice "…" was already imported as …. Skipping to avoid duplicating the order and doubling stock. Use a different invoice number or open the existing order." (toast "Import halted" / "This vendor invoice was already imported.") | The invoice number is already on a procurement order (imported, or created on New Order) | Use a different number, or open the existing order |
| "Could not verify whether this invoice was already imported: …" (toast "Import halted" / "Duplicate check failed.") | The duplicate check failed | Retry |
| "No rows could be imported: every product failed to resolve." | Every row's product failed | Check the failed-row reasons and the file |
| "Pick the date this load arrived." (toast "Import halted") | The order date box was emptied | Click the label and pick the day the load arrived |
| "An order date cannot be in the future." (toast "Import halted") | The order date is ahead of today where your store is | Pick the day the load arrived. Nothing was imported |
| "An order date more than ten years ago looks like a typing mistake — check the year." (toast "Import halted") | The order date is more than ten years back | Check the year and import again. Nothing was imported |
| "The order date is not a date the system understands." (toast "Import halted") | The order date could not be read | Click the label and pick the day again |
| "Failed to create order: …" / "No order data returned from server" | The order could not be created; nothing imported | Retry; contact support if it repeats |
| "Failed to create order: The location this order is filed at is not one of your store's. …" (or "… The vendor on this order is not one of your store's vendors. …", or "…: this product is not in your store.") | The location, the vendor or a row's product belongs to another store — normally a page left open across a store switch. Nothing was imported | Reload the page, then pick the location and vendor again |
| Failed-row errors, for example "Failed to create product: …", "Unable to resolve product for SKU …", "A unit with serial … / barcode … already exists (id=…). Skipped so the same unit is not counted twice." (the "(id=…)" part is missing when the clash was with a unit created in the same moment), "Inventory item already exists (id=…). Skipped stock update to avoid double counting." | Individual rows failed | A serial number or barcode clash fails the row after the order was made, so its line is on the order: receive it on this order from the Receive tab with a corrected serial number, or set its quantity to 0 in Edit Order if it never came. A product that could not be found or created never reached the order: fix it in your file and import just those rows under a new invoice number. When no row imported at all, the order is cancelled, so every row goes back to your file the same way |
| "Stock-in failed — no stock was applied and the order was left as Pending (not Delivered). You can receive it from the receiving tab. Reason: …" | Receiving failed after the order was created | Receive the order on the Receive tab |
| "The purchase order was made and its rows went in, but it could not be finished: … Press Finish the order to try again. If it keeps failing, note the reason below and contact support." (or "… could not be marked Delivered, so it still reads Pending …", or "No row imported, and the purchase order could not be cancelled …" / "… could not be finished, so it still reads Pending instead of Cancelled") | The order was made and received, but saving its total and the import's details, or its final status, failed | Press Finish the order. The file does not need importing again (the same invoice number would be refused) |
| Toast "Import completed" / "Import completed with issues" | End of an import | Use Go to Receive or Go to List |
| Browser alert "A vendor named "…" is already on your Vendors list, so it has been picked for this import. Give a new vendor a different name." | Create New Vendor with the name of a vendor on the list (capitals and spacing aside) | Nothing was added: that vendor is now picked for the import. Carry on, or type a different name for a new vendor |
| Browser alert "A vendor named "…" is already on your Vendors list, switched off. Ask a manager to switch it back on in Inventory → Vendors instead of adding it again, or give this vendor a different name." | Create New Vendor, or an import with no vendor picked (which adds a "Default Vendor"), when that name belongs to a switched-off vendor | A manager turns the vendor's Active switch back on in Inventory → Vendors; then pick it |
| Browser alert with the error, or "Failed to create vendor" | Create New Vendor failed for another reason | Retry |
Receive
| Message | When it appears | What to do |
|---|---|---|
| "Purchase orders couldn't be loaded" (red banner with Try again) | The tab could not read your purchase orders | Press Try again. This is not the same as having nothing to receive — that reads "No orders found" |
| "Couldn't reach your purchase orders just now. Please try again." | The tab could not reach your store's records at all | Press Try again; reload the page if it keeps happening |
| "Couldn't search your purchase orders. The list below may be out of date." | A search failed. The list you can see answered the previous search | Search again, or clear the box to reload the full list |
| Toast "Order received" / "Updates saved for …." | Receiving saved | — |
| Red toast "One serial number was already in stock" (or "n serial numbers were already in stock") / "SN-12 (already on WASH-9). No new unit was created for it. Check the serial numbers on this receipt." | The receipt saved, and one or more of its serials are ones your store already holds | The receipt itself succeeded and the stock moved. Up to three serials are named, then "and n more" |
| Toast "No changes to save" / "Nothing was modified in this order." | Save with nothing changed | — |
| Toast "Save failed" with the reason, or "Unable to save receiving changes." | Receiving could not be saved | Retry. An order with no location cannot be received |
| Toast "Save failed" — "Only purchase orders can be received here. This order is not a purchase order." | The order being received is not a purchase order | Nothing was saved and no stock moved. Only purchase orders can be received |
| Toast "Save failed" — "The location these goods are received at is not one of your store's. Pick one of your own locations and receive them again." (or "Line 1: this product is not in your store.", or "Line 1: this variant is not one of this product's variants.") | The receipt named a location or a product that belongs to another store, or a variant that is not one of the line's product's — normally only a program sending the receipt in | Nothing was saved and no stock moved: no stock record is made at another store's location, or under another product's variant. Reload and receive again |
| Toast "Save failed" — "This purchase order was cancelled, so nothing can be received against it. Delete the order to reverse anything already received, or create a new purchase order." | The order was cancelled or refunded while the dialog was open | Nothing was saved and no stock moved. Refresh the tab — the order is no longer listed |
| Toast "Save failed" — "Purchase order … was cancelled, so nothing can be received against it. Delete the order to reverse anything already received, or create a new purchase order." | Same, but the order was cancelled in the moment between opening the dialog and saving | Nothing was saved and no stock moved |
| Toast "Save failed" — ""…" has … received, so it cannot be recorded as …. Use the Receive tab to receive more, which moves the stock with it." | A note-only line was saved with a received total higher than the one on the order — for example the dialog was left open while somebody else received against it | Close and reopen the order so it shows what has really arrived, then use Receive to record anything new; that moves the stock with it |
| "… waiting — the ones who agreed to a text get one when this is received" | Walk-in customers are waiting for that product | Informational — saving the receipt sends the texts when automatic texting is on (see Walk-ins) |
Who can use what
| Who | What they can do | Notes |
|---|---|---|
| Every plan | The whole page, all four tabs, the templates and the demo | No plan or add-on gate |
| Any team member who can open the page | View, create, edit, import and receive | No role check on these actions, except the staff rule in the next row |
| Staff, while Hide cost info from all staff accounts is on in Settings → Team (the default) | View and receive orders, with prices and totals hidden on screen and left off the printed order. They can't create or import one, or create one from Replenish: "Your store owner hides costs from staff, so an owner or manager creates purchase orders." | New Order and Import are left off their tab bar. Owners and managers are never affected |
| Owner or manager | Delete Order | Staff can press Delete, but it stops with "Deleting a purchase order needs manager access. Ask the owner or a manager to delete this one." Roles are set in Settings → Team |
| Team member with Procurement hidden in their menu | Nothing — the page shows "403 - Forbidden", and so do the separate Replenishment, Inventory Receiving and import pages and the older purchase-order address | Only in stores with more than one active member; owners are never blocked. The demo still opens. See Team & menu visibility |
| Everyone, including the owner | Orders, New Order and Receive are locked until the first procurement order exists | The separate Replenishment and Inventory Receiving pages are not locked (the lock is about your first order, not your menu) |
| Everyone | The demo | No gate |
Demo mode (/inventory/procurement-orders/demo)
- Open it: the Demo button (Play icon, amber) at the top right. From the Import tab it opens the import-only demo; from any other tab, the four-tab demo. See Demo mode.
- Header: four-tab demo "Procurement Orders — Demo" / "Sample procurement orders populated with demo data. All actions are disabled." Import-only demo "Import Inventory — Demo" / "The import screen with a sample file loaded. All actions are disabled."
- Banner: "Demo mode — procurement orders are populated with sample data. All actions are disabled." (import-only: "Demo mode — this is the Import screen with sample data. All actions are disabled.") with Take a Tour, which restarts the tour from step 1.
- Tour: starts by itself the first time you open the demo. Each card shows progress dots, title, text, "… of …", Back (from step 2), Skip and Next (last step Got it!). → or Enter = next, ← = back, Esc or clicking the dark backdrop = close. In the four-tab demo each step switches to its tab first; a step whose target never appears is skipped after a few seconds.
- Sample data: about 5–6 orders for your industry (pending, processing, shipped, delivered and completed), industry vendors, and two locations, "Main Store" and "Warehouse".
- Disabled: search, Status / Vendor / Location selects, the date button, chips, Clear filters, pagination, every New Order field and button, every Import control (Download Template A looks active but does nothing), and Receive's search, filter, Refresh and pagination. Order rows and Receive rows do not open a dialog.
- Still works: the tab bar (no tabs are locked in the demo), the Pending Orders and Delivered Orders cards (they filter the sample table), Exit Demo Mode, Take a Tour and the tour controls. The Receive → links on pending rows move the demo to its own Receive tab, without leaving demo mode.
- Leave: Exit Demo Mode (arrow-left icon) at the top right returns to Procurement Orders (to the Import tab from the import-only demo).
Four-tab demo tour (12 steps):
| # | Tab | Tour step | What it points at |
|---|---|---|---|
| 1 | Orders | Procurement Tabs | The tab bar — what each of the four tabs is for (Import uploads an Excel or CSV file) |
| 2 | Orders | Order KPIs | The summary cards — totals, and that Pending and Delivered are click-to-filter |
| 3 | Orders | Search & Filters | The toolbar — search by PO number, vendor or product; filter by status, vendor, location and date; removable chips |
| 4 | Orders | Orders Table | The table — the seven columns, the "Receive →" shortcut, click a row for details |
| 5 | New Order | New Order — Header | The Order Basics card — location, vendor, invoice or PO number, shipping and internal notes |
| 6 | New Order | Order Lines | The lines card — search by name or SKU, quantity and unit cost, optional receive-now |
| 7 | New Order | Order Summary | The summary card — tax rate, subtotal, tax and grand total |
| 8 | Import | Import — Store & Vendor | Step 1 — location, vendor, auto-filled invoice number, Other Settings |
| 9 | Import | Choose Inventory Type | Step 2 — Trackable vs Bulk, and the Excel or CSV template |
| 10 | Import | Upload Your File | Step 3 — upload up to 10 MB, every row previewed; suggests the import-only demo |
| 11 | Receive | Receiving Metrics | The metrics row — received, missing, accuracy and pending over 30 days |
| 12 | Receive | Receiving Status | The receiving list — received and missing counts, Pending / Partial / Received, and what a row opens: received and missing quantities, serial numbers and a note |
Import-only demo tour (11 steps, all on the Import screen):
| # | Tab | Tour step | What it points at |
|---|---|---|---|
| 1 | Import | Read it in your language | The language switch, which works here as it does on the real screen — it translates this screen only; template column names stay English |
| 2 | Import | Step 1 — Store & Vendor | Step 1 — location, vendor, New Vendor at the top of the list, the order date pencil |
| 3 | Import | Invoice / PO number, filled in for you | The invoice field — initials plus date and time; click to type your own; the duplicate guard |
| 4 | Import | Other Settings | Other Settings — stock counts as already received; expenses, fees and a note |
| 5 | Import | Step 2 — Trackable or Bulk | Step 2 — one row per unit vs one row with a quantity |
| 6 | Import | Download the template first | The Download Template A button — Excel (recommended) or CSV, filled with sample products |
| 7 | Import | Fill in your file exactly like the template | The template preview — same columns, same names, same order; red, amber, grey |
| 8 | Import | Step 3 — Upload the file | Step 3 — drag and drop or Choose File, up to 10 MB, checked against the chosen type |
| 9 | Import | Check the preview | The Data Preview — the plan per row; red blocks, amber still imports |
| 10 | Import | Order summary | The Order Summary — items, units, cost and retail value |
| 11 | Import | Import | The Import button — creates the order and products and puts stock in; the other tabs unlock after the first import |
Differences from the live page:
- Orders: no Order Details dialog; the Status list is fixed (All, Pending, Processing, Shipped, Delivered, Completed, Cancelled); only the Status chip can appear.
- New Order: a different layout — card "Create a new Procurement Order" with Location, Vendor and Vendor Invoice ("INV-2024-DEMO"), "Lines (3)", a "Summary" card with Tax Rate (%) 8.25, and Reset / Create. No Requested, not stocked section, no step greying, no reason line and no Order Summary echo.
- Import: English only, with a sample file "(industry)-trackable.xlsx" already loaded, Trackable chosen and Other Settings open. The Plan column says only "New product + 1 item"; the Order Summary has only the four tiles; the order date can't be edited.
- Receive: received and missing counts are made up from each sample status (shipped = Partial, delivered or completed = Received, others = Pending); no row is ever Overdue.
Common questions
Why are Orders, New Order and Receive greyed out with a lock? Your store has no procurement order yet. Import your first vendor invoice on the Import tab — the other three tabs unlock as soon as it finishes, without a reload.
I set an order to Delivered but my stock didn't change. Why? Changing the status never adds or removes stock. Stock only goes up when goods are received: open the Receive tab, click the order's row, enter the received quantities and press Save Receiving. The order becomes Delivered by itself once every line is fully received. An order with items not received can't be set to Delivered or Completed by hand; if some of the goods will never come, lower their ordered quantity to what arrived in Edit Order, and Delivered opens in the same edit.
Can I import an invoice for goods that haven't arrived yet? No. Every import is received into stock straight away and marked Delivered — the Already Received box is always ticked. For goods still on the way, use New Order and leave Received into inventory now unticked, then receive them on the Receive tab when they arrive.
Why can't I delete this purchase order? Only Draft, Saved, Pending or Cancelled orders can be deleted — set any other order to Cancelled in Edit Order first. Orders with payments recorded against them, or whose received serialized units have been sold or reserved, stay blocked (the message names the sales orders to undo). Only the owner or a manager can delete; a staff member is told "Deleting a purchase order needs manager access."
Does my internal note print on the purchase order? No. The Internal Note is for your team and never prints — not from Print PDF after creating a New Order, nor from Print in Order Details. The vendor copy's "Comments or Special Instructions" shows only the Shipping Note and the vendor invoice number saved on the order.
The "Order ID" in the confirmation doesn't match the Orders list. Why? The "Order ID" in the confirmation after creating a New Order is a separate 6-character short code. The printed purchase order — from Print PDF there or Print in Order Details — carries the full PO number shown on the Orders tab.
My imported order's total includes Other Expenses & Fees. Will editing the order lose them? No. Edit Order shows them as Other Expenses & Fees and keeps them in the total when you save; change the amount there if it was wrong. Total Amount in Order Details, the Amount on the Orders tab and the printed GRAND TOTAL all include them. If an earlier edit took them out of an order's total, Order Details shows an amber note under Cost Breakdown. Open Edit Order and click Save Changes once to add them back.
Where do Other Expenses & Fees, shipping and tax end up in my books? On the Profit & Loss, under Freight & Fees on Purchases, on the day the order was marked Delivered. Your stock is valued at what the goods cost, and each sale's cost of goods is that price alone, so the rest of the order total (Other Expenses & Fees, Shipping and Tax, less any Discount) is an expense rather than stock. Inventory holds the goods, from the day each delivery was received; Accounts Payable holds the whole total you owe the vendor. Nothing goes to the expense while the order is still being received. If you also enter an order's freight in Expenses, it is counted twice. Keep it in one place: on the order when the vendor bills it, or as the expense, and off the order, when you pay someone else for it.
Why is nothing ever Overdue on the Receive tab? Overdue means a promised delivery date has gone by with nothing received, and nothing in UpChannels sets one: neither New Order nor Import asks for a delivery date. Until one does, every unreceived order stays Pending, which is the honest answer — an order cannot be late against a date nobody gave.
I received too many — how do I correct it? Open the order on the Receive tab and lower the Received Quantity to the right total, then Save Receiving. Stock at that location goes down by the difference. The box can't go below 0 or above the ordered quantity + 5.
Why does the import say "This vendor invoice was already imported"? An invoice number can be on only one procurement order, so the same delivery isn't counted twice. The check also catches a number you already used on a New Order. If it really is a new delivery, change the Vendor Invoice # or PO # in Step 1; otherwise open the existing order on the Orders tab.