Labels
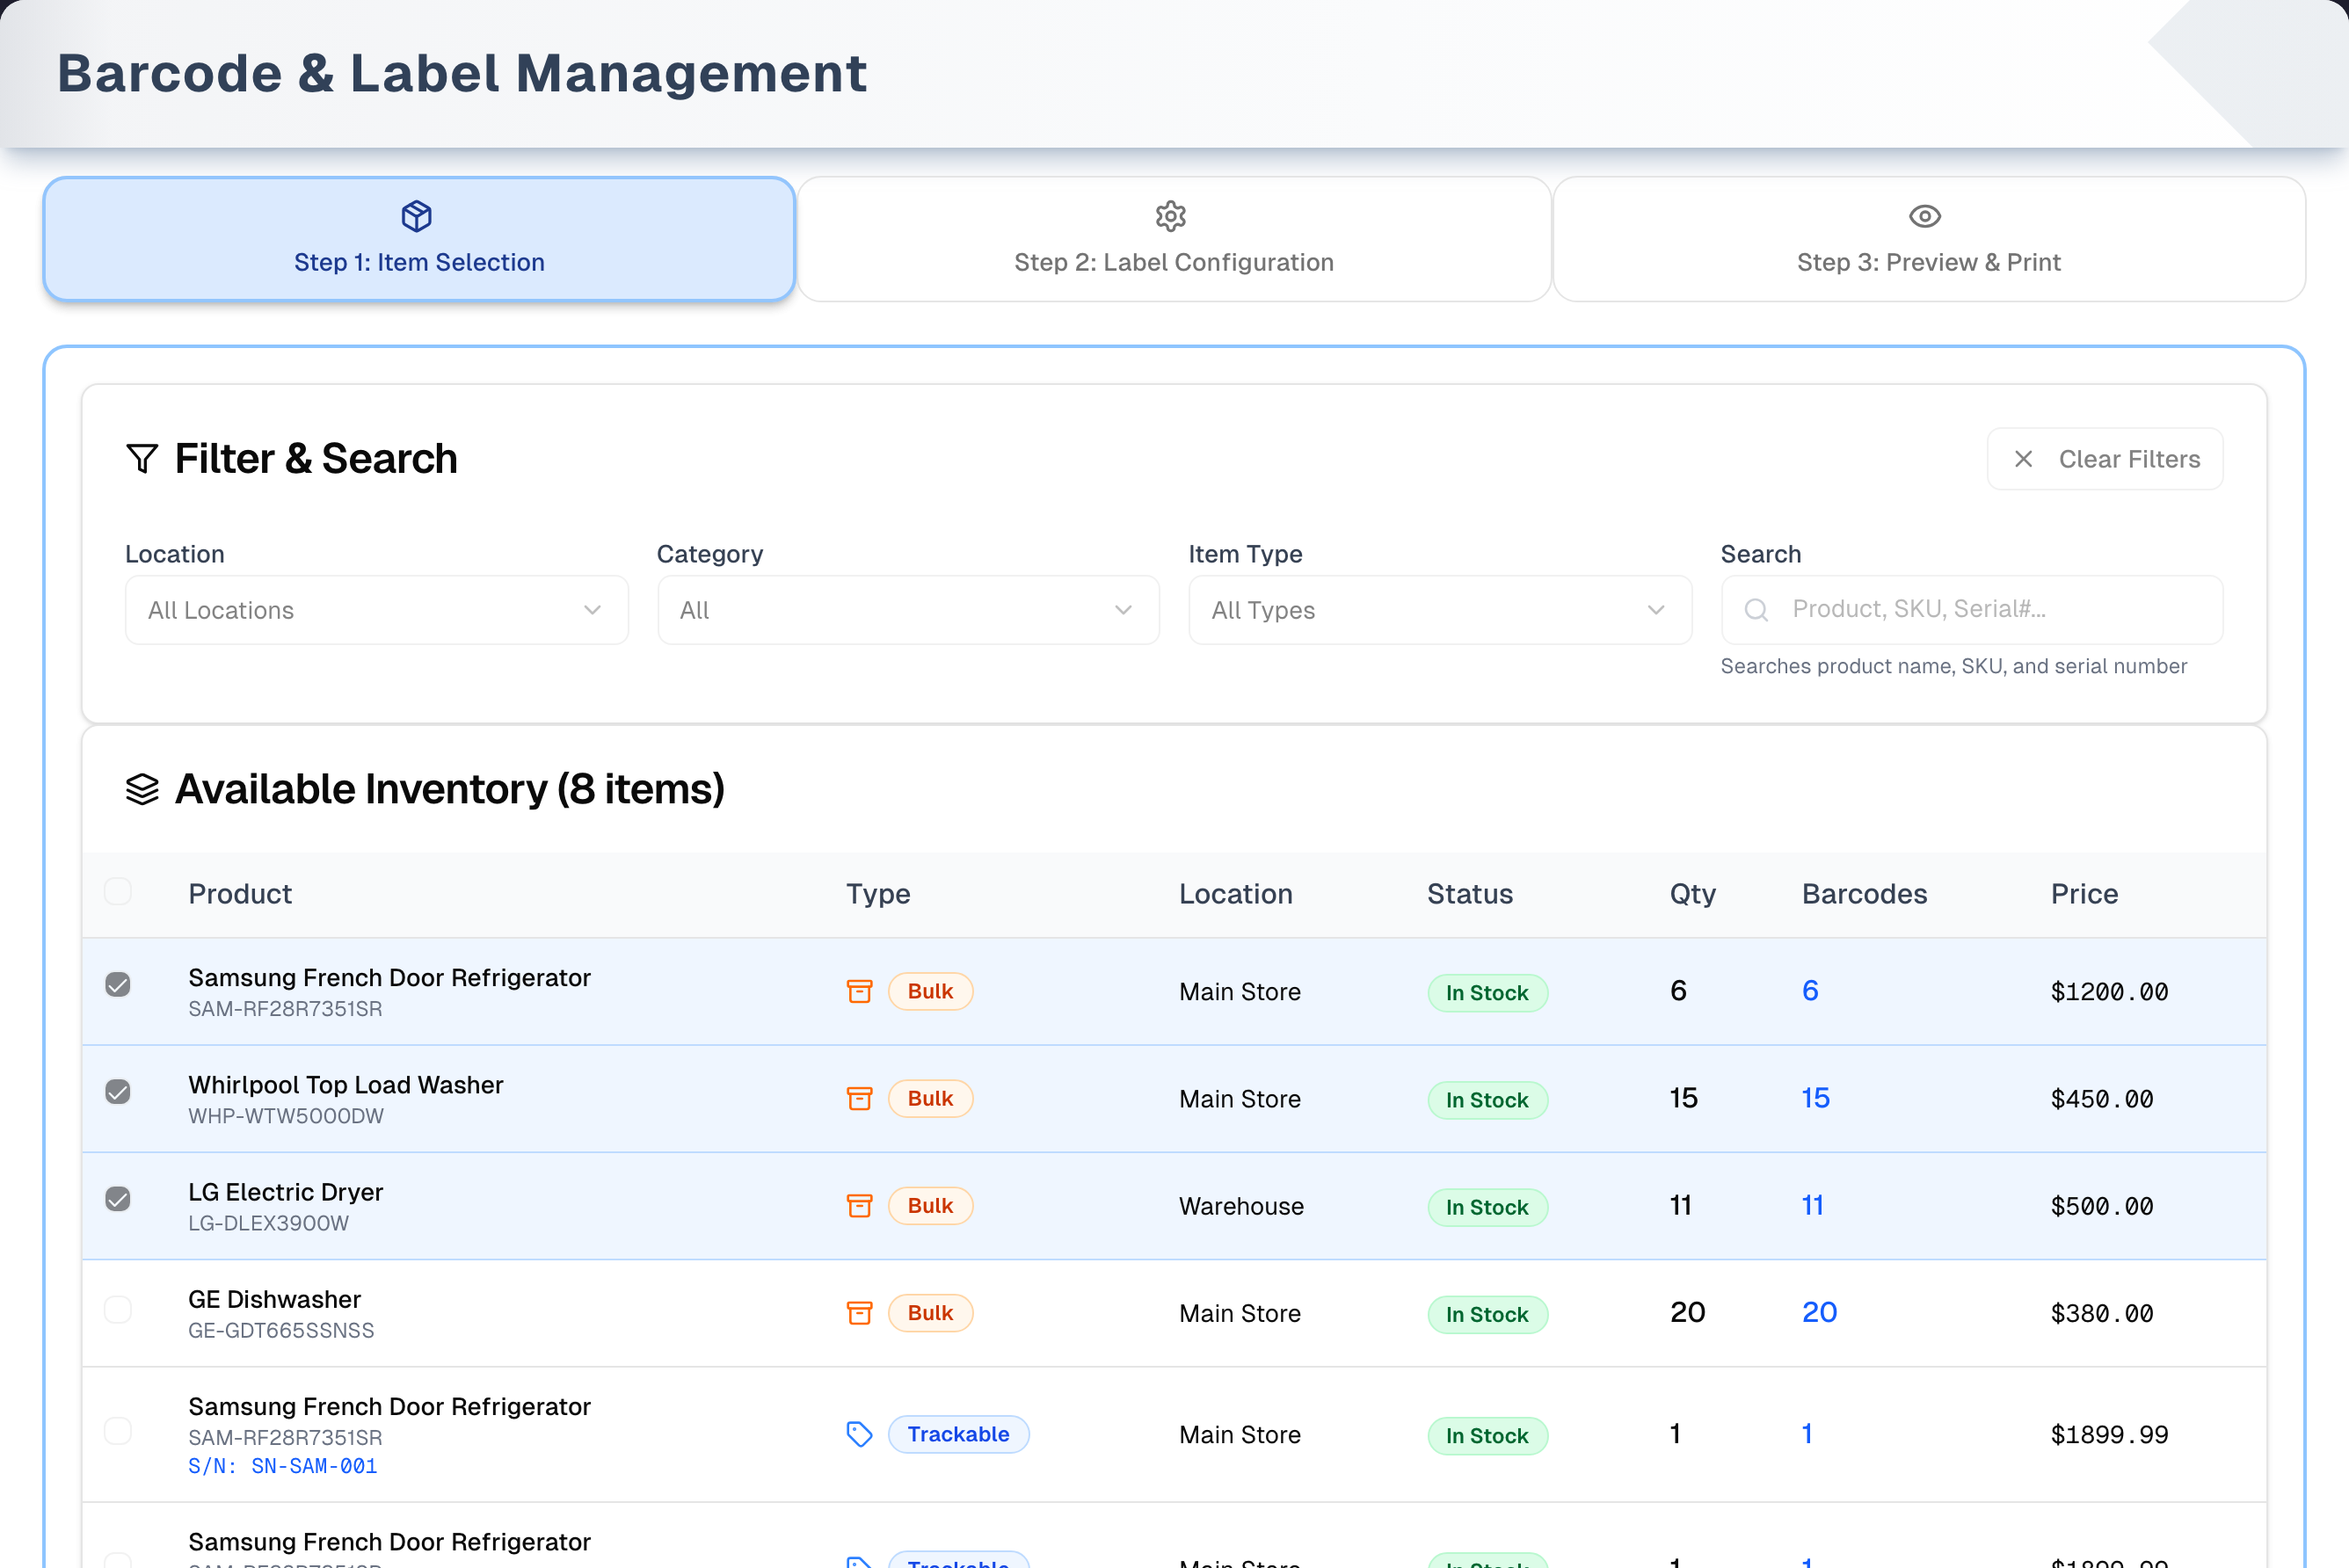
Inventory → Labels opens Barcode & Label Management, where you print shelf and product labels in three steps: Step 1: Item Selection, Step 2: Label Configuration and Step 3: Preview & Print.
Overview
Pick the items to label, choose the label sheet and which fields print, then preview the first sheet and print through your browser.
- One label per unit. A bulk row with 40 units in stock prints 40 labels. A serialized unit prints one. There is no way to change how many labels a row prints: the Barcodes column tells you the count before you select it.
- The barcode comes from your data. Each barcode is a standard CODE128 barcode of the unit's own barcode, otherwise the product's Barcode, otherwise its SKU. This page never creates barcode numbers. Set them on the product in Catalog → Products.
- Nothing is saved. Your selections, filters, format and field choices reset when you leave the page or click Refresh. Printing isn't recorded, and items are not marked as labelled. The page never changes your stock, so it is safe to experiment.
- Print only. There is no Export or Download button. To get a PDF, choose Save as PDF as the destination in the print dialog.
- Who can use it: everyone in your store on every plan, unless the owner has hidden Labels from their menu. Demo in the header opens a read-only copy with sample items and a guided tour.
Steps in detail
The step tabs at the top can be clicked at any time. Only the Next Step buttons check that you're ready.
Step 1 — Item Selection
- What's listed: one Bulk row per product per location for the stock that isn't covered by serialized units, and one Trackable row per serialized unit that is Available. Only active locations count. Sold, reserved and scrapped units never appear.
- Filters: Location, Category, Item Type (All Types / Bulk Items / Trackable Items) and Search (product name, SKU or serial number). Clear Filters resets them.
- Table (10 rows a page): click a row, or its checkbox, to select it. The header checkbox ticks every row that matches the filters, on every page; unticking it removes just those. The Barcodes column shows how many labels each row will print.
- Next Step unlocks once at least one item is selected. Beside it, "N selected" is exactly what will print, and Clear selection (N) drops the lot.
- A selected item stays selected when a filter hides it or you switch location, and it still prints. The line beside Next Step says how many are hidden.
Step 2 — Label Configuration
- Label Format: Avery 5160 (the default), 5163, 5267, 8163, 5162, 5164, Jewelry Tags, Clothing Tags or Custom Size. Each card shows its size, labels per sheet and a recommended use. Every format is a US Letter sheet. Custom Size gives you a Width (in) and a Height (in) box, from 0.5" up to the page: the card then says how many of that label fit, and the sheet preview and the print follow.
- Label Information: tick what prints — Barcode, Brand, Category, Description, Dimensions, Location, Model Number, Retail Price, MSRP, Product Name, Serial Number, Serial Number's Barcode, SKU Code and SKU's Barcode. Barcode, Model Number, Product Name and Serial Number are on by default. Click the box or the words beside it. A short note under each box says what it prints: the SKU names the product and is shared by all its units, the Serial Number names one unit (the maker's serial, or the number your store gave it on import, such as
U-2610050042), and the main Barcode is the unit's own barcode, else the product's UPC/EAN, else the SKU. - Retail Price prints the product's retail price (a serialized unit's own retail price when it has one). It never prints what you paid, and it is left off a label with no retail price. There is no discount or sale-price field.
- MSRP prints "MSRP: $…" from the product's MSRP in the catalog, under the retail price when both are ticked. A serialized unit prints its product's MSRP. It is left off a label whose product has no MSRP.
- Description and Dimensions print what the product carries in the catalog, and nothing at all when it has none. Set them on the product in Catalog → Products (Description on Basic Info, Dimensions on Physical). There is no Notes field: nothing on a stock record holds notes.
- Fit check: if the ticked fields won't fit the label, an orange Content Won't Fit in Safe Print Area card suggests fields to drop, Remove suggested fields to fit unticks them in one click, and Next Step is greyed out until it fits. The check measures every field the label draws — Product Name and the two extra barcodes included — at the size it is printed, and compares the total with the height inside the 5% margin. A barcode is about 0.44" tall whatever the label, which is why the two smallest formats hold very little. Only Avery 5164 fits every field at once.
- Long codes on narrow labels: a barcode wider than the label is shrunk to fit, bars and code together, down to 75% of its size. A code that would need to shrink further prints as text instead of bars, so nothing that looks like a barcode but won't scan is printed. An amber Some barcodes are too wide for this label panel lists those labels. It is a warning, not a block: the other labels print as usual.
- Live Preview: the first selected item at actual size. The dashed blue box is the safe print area (5% in from each edge). It doesn't print.
Step 3 — Preview & Print
- A summary of items, labels and sheets needed, and a preview of sheet 1 on a Letter page with a faint grid. Every sheet prints.
- Print Now builds all the sheets and opens your browser's print dialog straight from this page, so a blocked pop-up doesn't stop it. The button reads Preparing… while the sheets are built and can't be pressed twice. If your browser refuses to open a print view at all, an amber note says so, with a Try again that prints again.
- If the content doesn't fit, a red Cannot Print: Content Exceeds Safe Print Zone panel shows, Print Now is greyed out, and Go to Step 2 to Remove Fields takes you back.
- If some codes are too long for the label, the amber Some barcodes are too wide for this label panel shows here too, and Print Now asks Print anyway? before printing them as text.
Step by step: print labels
- Open Inventory → Labels.
- Step 1 — filter the list, then tick the items to label. Check the Barcodes column: bulk rows print one label per unit. Click Next Step.
- Step 2 — click the format that matches the sheets in your printer and tick the fields to print. If the orange warning appears, click Remove suggested fields to fit or pick a larger format. Click Next Step.
- Step 3 — check the sheet preview, then click Print Now and print from the browser's print dialog (or save as PDF).
Tips & best practices
- Pick the format that matches your label stock. On screen, Avery 5160 (30 per sheet, 2⅝" × 1") is "Recommended for Tracking Labels" and Avery 5163 (10 per sheet, 4" × 2") is "Recommended for Product Labels & Price Tags".
- Print one sheet on plain paper first and hold it against a label sheet. Keep the print dialog at US Letter and 100% scale.
- Printing always starts at the first position on the sheet, so load a fresh sheet.
- The six Avery formats use Avery's own gaps between columns, so the labels line up with the die-cuts. Jewelry Tags, Clothing Tags and Custom Size aren't manufacturer sheets: those three are simply centred on the page with no gap, and their cards say so.
- To avoid printing hundreds of labels for a big bulk row, filter by location or search for just the products you need.
Troubleshooting
| Issue | Fix |
|---|---|
| An item is missing from Step 1 | Only stock at active locations shows, and only serialized units that are Available. A bulk row whose stock is entirely made up of serialized units is hidden, because those units have their own rows. Check the Location and Item Type filters, then Clear Filters |
| A label shows "No barcode/SKU", or prints without a barcode | The product has no barcode and no SKU. Add one in Catalog → Products |
| Barcodes won't scan | Check the product's barcode or SKU, and print one test sheet first. A barcode shrunk to fit a narrow label has thinner bars; if your scanner struggles with those, pick a wider label |
| "Content Won't Fit in Safe Print Area" (Step 2) or "Cannot Print: Content Exceeds Safe Print Zone" (Step 3) | In Step 2, click Remove suggested fields to fit, untick fields, or pick a larger format |
| Text is cut off although the fit check passed | The check measures one line per field, so text long enough to wrap onto a second line takes more room than it allowed for. Check the Live Preview, then untick fields or pick a larger format |
| A label prints its code as text instead of bars, and Step 2 says "Some barcodes are too wide for this label" | The code is too long for the label's width even with the barcode shrunk to 75%, so it is printed as text rather than as bars that won't scan. Pick a wider label — Avery 5160 takes about 24 letters — or untick that barcode |
| Print Now does nothing | While it reads Preparing… the sheets are still being built, which takes a moment for a few hundred labels. If an amber note appears about the print view, allow pop-ups for UpChannels and click Try again |
| The labels print the code as text instead of bars | The barcode drawing tool is part of UpChannels, but it loads the first time you need it, and that load did not finish — usually a dropped connection, or UpChannels was updated while the page was open. An amber note in Step 3 says so, with Try again. If that does not help, reload the page |
| Misaligned print | Print at 100% scale on US Letter, with no printer scaling or "fit to page". Make sure the chosen format matches the sheets in the tray. Jewelry Tags, Clothing Tags and Custom Size are centred on the page rather than matched to a manufacturer's sheet |
| Far more labels than expected | Bulk rows print one label per unit. Untick the row, or narrow the list first |
| A bulk row's quantity looks too high | A bulk row counts only the stock not covered by Available serialized units, under every Item Type setting. Click Refresh if the number still looks wrong |
| Description or Dimensions prints nothing | The product has no description or dimensions. Add them in Catalog → Products: Description on the Basic Info tab, Dimensions on the Physical tab |
| No price on a label | The product has no retail price. Add one in Catalog → Products |
| No MSRP on a label | The product has no MSRP. Add one in Catalog → Products, on the Pricing step |
| 403 - Forbidden | The owner has hidden Labels from your menu. Ask them to switch it back on in Settings → Team |
| My selections disappeared | Refresh or leaving the page resets everything. Nothing on this page is saved. A filter, a search or a change of location does not clear them |
| Fewer labels printed than I selected | The count beside Next Step is exactly what prints, hidden items included. Check that the print dialog prints every page, and check the Barcodes column, since a bulk row prints one label per unit |
What's next
- Keep stock accurate: Inventory → Snapshot
- Add barcodes and SKUs to products: Catalog → Products
- Receive and label new stock: Inventory → Procurement
- Try it on sample data: Demo mode
Detailed reference
Every button, icon, field and message on this page, for when you need the exact detail. Each panel starts closed — open the one you need.
Page header and toolbar
| Control | Where | What it does | Notes |
|---|---|---|---|
| Sidebar Inventory → Labels (barcode icon) | Sidebar | Opens this page | Part of the standard menu. Also on the Shortcuts page with a barcode icon |
| Title Barcode & Label Management, subtitle "Filter items and generate custom barcode labels for inventory tracking." | Header, left | Heading only | |
| Demo (Play icon, amber) | Header, right, 1st | Opens the demo copy of this page with sample items and a guided tour | Everyone. See the Demo mode panel below and Demo mode |
| Refresh (circular-arrows icon) | Header, right, 2nd | Reloads the whole browser page, which reads your stock again | Clears every selection, filter, format and field choice. None of them is saved |
| Loading card (spinning arrows) "Loading inventory data from API..." | Page body, in place of the steps | Shown while your stock loads. The step tabs are hidden meanwhile | Appears on first load and every time you change Location or Item Type. Your selections and current step are kept |
| Red error card Failed to Load Inventory Data | Page body, in place of the steps | Shown when loading fails, with the reason. The step tabs stay hidden | See Messages you may see. Click Refresh to try again |
| Step 1: Item Selection tab (box icon, blue) | Tab bar under the header | Shows Step 1 | Always clickable. The page opens on this step |
| Step 2: Label Configuration tab (gear icon, green) | Tab bar | Shows Step 2 | Always clickable, even with nothing selected |
| Step 3: Preview & Print tab (eye icon, purple) | Tab bar | Shows Step 3 | Always clickable, even when the content won't fit. That is the only way to reach Step 3 while the fit check fails, and it then shows the red Cannot Print panel |
There are no keyboard shortcuts and no tooltips on this page.
Step 1: Item Selection
Which items are listed
- Bulk rows: one per product per location, for stock that is available and not covered by serialized units. The quantity is the available stock minus the product's Available serialized units at that location, whatever the Item Type filter is set to. Rows where that comes to zero or less are hidden.
- Trackable rows: one per serialized unit whose status is Available, at an active location. Sold, reserved and scrapped units never appear.
- Only active locations count. With no active location, the list is empty.
- Every stock row and every Available serialized unit at those locations is read, a page at a time. The reading only stops at a very high ceiling (tens of thousands of either), and an amber note above the steps says so when it does.
Card: Filter & Search
| Control | Where | What it does | Notes |
|---|---|---|---|
| Clear Filters (X icon) | Card header, right | Sets Location to All Locations, Category to All and Item Type to All Types, empties Search, and returns to page 1 | Greyed out only while all four — Location, Category, Item Type and Search — are at their defaults. Selections are not cleared; use Clear selection for that |
| Location dropdown: "All Locations" plus each active location | Card, 1st column | Shows one location's items | Default All Locations. Reloads the list (the loading card flashes) |
| Category dropdown: "All" plus every category in the loaded items | Card, 2nd column | Shows one category's items | Default All. Items with no category are listed as "Uncategorized". The options change when Location or Item Type changes. Filters instantly and returns to page 1 |
| Item Type dropdown: "All Types", "Bulk Items" (box icon), "Trackable Items" (tag icon) | Card, 3rd column | Shows bulk rows, serialized units, or both | Default All Types. Reloads the list. A bulk row's quantity is always the available stock minus that location's Available serialized units, under every Item Type setting, so Bulk Items shows and prints the same number as All Types |
| Search box, placeholder "Product, SKU, Serial#...", helper "Searches product name, SKU, and serial number" | Card, 4th column | Filters as you type. Matches any part of the product name, SKU or serial number, ignoring upper and lower case | Returns to page 1 |
Card: Available Inventory
| Control | Where | What it does | Notes |
|---|---|---|---|
| Title "Available Inventory (… items, filtered from …)" (layers icon) | Card header | First number: rows matching the filters. Second: all loaded rows | ", filtered from …" appears only when Category or Search hides rows |
| Header checkbox | Table header, 1st column | Ticking it adds every row matching the filters, on every page, to the selection. Unticking it removes only those rows, and leaves selected items the filters hide | Ticked only when every row matching the filters is selected. With some of them selected it stays unticked, and clicking it selects the rest |
| Row checkbox | Each row, 1st column | Shows whether the row is selected. Clicking it toggles the row | |
| Row click | Anywhere on a row | Selects or unselects the row. Selected rows turn light blue | |
| Product column | Each row | Product name in bold, SKU below, and for serialized units a blue "S/N: …" line | "Unknown Product" if the product is missing |
| Type column | Each row | Orange box icon and Bulk badge, or blue tag icon and Trackable badge | |
| Location column | Each row | Location name | "Unknown Location" if missing |
| Status column | Each row | Bulk rows: green In Stock, or yellow Low Stock when available stock is at or below the product's minimum level at that location. Serialized units: green In Stock (only available units are listed) | |
| Qty column | Each row | Bulk rows: units not covered by serialized units. Serialized units: always 1 | |
| Barcodes column (blue number) | Each row | How many labels the row will print: one per unit for bulk rows, 1 for a serialized unit | Can't be changed. Selecting a bulk row with 40 units prints 40 labels |
| Price column | Each row | The retail price: the product's retail price on bulk rows; on serialized units, the unit's own retail price, otherwise its product's | Blank when there is no retail price (never a cost). This is the value the Retail Price field prints |
| Empty state (box icon) "No inventory items found" / "Try adjusting your filters or search criteria" | Table body | Shown when no row matches | Also shown when the store has no active location or nothing available to label |
Pagination and navigation
| Control | Where | What it does | Notes |
|---|---|---|---|
| "Showing … to … of … results" | Pagination bar, left | Which rows you are seeing | Bar shows only when at least one row matches. Always 10 rows a page |
| Previous (left chevron) | Pagination bar, right | Previous page | Greyed out on page 1 |
| Page number buttons (up to 5) | Between Previous and Next | Jumps to that page. The current page is filled in | Shows up to 5 page numbers around the current page |
| Next (right chevron) | Pagination bar, right | Next page | Greyed out on the last page |
| "N selected" and "(M not shown by the current filters, and still printed)" | Bottom left of Step 1 | How many items are selected, and how many of them the filters hide | Reads "Nothing selected yet" with none. The first number is exactly what Steps 2 and 3 use |
| Clear selection (N) (X icon) | Bottom of Step 1, left of Next Step | Empties the whole selection, hidden items included | Only shown once something is selected |
| Next Step (right arrow) | Bottom right of Step 1 | Opens Step 2 | Greyed out until at least one item is selected |
Steps 2 and 3 use every selected item, whether or not the filters still show it. Selecting items and then filtering them out, or switching Location or Item Type, does not drop them: they stay selected and they print. Steps 2 and 3 show them in the order of the list, with the hidden ones after. Step 2 shows "Select items in Step 1 to preview" and Step 3 shows "Select items to preview labels" only when nothing at all is selected.
A row you tick is remembered even when the list reloads, so an item that is sold between ticking it and printing still gets its label. Labels never change your stock. A row the list still shows always prints what the list shows: if the quantity or price changed since you ticked it, the Barcodes column and what prints stay in step with each other.
Step 2: Label Configuration
The left column is the Label Format card. The right column holds the fit warning (when needed), Label Information, Live Preview and the step buttons. The formats and fields have their own panels below.
Card: Label Format
| Control | Where | What it does | Notes |
|---|---|---|---|
| Format card (click anywhere on it), 9 in all | Label Format card, stacked list | Chooses that sheet layout. The chosen card turns blue | Default Avery 5160. One format at a time. Each card shows its name, description, a blue recommendation line, "… labels per sheet (…×…)", and the label size on the right. The three that are not manufacturer sheets add "Not a manufacturer sheet: the labels are centred on the page with no gap between them" |
| Capacity line "Safe print area: … tall (the label less a 5% margin) • ticked fields need …" | Chosen format card only | Shows the height inside the margin and the height your ticked fields are drawn at. The "ticked fields need" part is green when it fits and red when it doesn't | The "• ticked fields need …" part is left out when no field is ticked |
Warning card: Content Won't Fit in Safe Print Area (only when the fields don't fit)
| Control | Where | What it does | Notes |
|---|---|---|---|
| Orange card (warning icon) Content Won't Fit in Safe Print Area | Right column, top | Warns that the ticked fields won't fit the chosen label | Appears when the ticked fields are taller than the height inside the label's 5% margin. Next Step is greyed out while it shows. Never appears on Avery 5164, which fits every field at once |
| Message "Too much content for …" | Warning card | Names the format and size, the height the ticked fields need, the height the safe print area has, and a suggestion | Exact text in Messages you may see |
| "Ticked fields: … tall • Safe print area: … tall" | Warning card | The two heights side by side | |
| Note "The 5% margin on all sides ensures content stays within the printable area, accounting for printer alignment variations." | Warning card | Explainer | |
| "Suggested to remove:" and chips | Warning card | The lowest-priority ticked fields to drop, enough of them to cover the height the label is over by | Order of removal: Description, MSRP, Retail Price, Location, Category, Dimensions, Brand, Serial Number’s Barcode, SKU’s Barcode, Serial Number, SKU Code, then Barcode, Model Number and Product Name. Each chip is the tick box's own name in capitals: DESCRIPTION, MSRP, RETAIL PRICE, LOCATION, CATEGORY, DIMENSIONS, BRAND, SERIAL NUMBER'S BARCODE, SKU'S BARCODE, SERIAL NUMBER, SKU CODE, BARCODE, MODEL NUMBER, PRODUCT NAME — so the chip always names a box you can find in the Label Information card. The last three are a last resort, offered only on the smallest labels, where no layout keeps all of them: on a half-inch sheet the suggestion can include Barcode itself, which leaves a label with no scannable code on it |
| Remove suggested fields to fit | Warning card, under the chips | Unticks exactly the suggested fields in one click. That is always enough to make the label fit, so the warning goes and Next Step is available again | Shown with the chips. Enough fields are suggested to cover the height the label is over by, so a barcode counts for the 0.44" it takes. You can instead untick other fields yourself or pick a larger format |
Panel: Some barcodes are too wide for this label (only when a code is too long)
| Control | Where | What it does | Notes |
|---|---|---|---|
| Amber panel (warning icon) Some barcodes are too wide for this label | Right column, under the orange card when that shows | Says how many labels will print the code as text instead of bars, and why: "… labels will print the code as text instead of bars: the barcode would have to shrink below 75% to fit … (…" wide), and bars that thin may not scan. To print them as bars, pick a wider label or untick that barcode." | Checks every selected label, not only the one in the preview, for each ticked barcode (Barcode, SKU's Barcode, Serial Number's Barcode). A warning only: Next Step and Print Now stay available. The same panel shows in Step 3. It appears once the barcode tool has loaded; if the tool is blocked, every code prints as text anyway and the amber note in Step 3 says so |
| List "…: … (BARCODE, … labels)" | Amber panel | Up to five of the codes, each with the first product that carries it, which barcode it is, and how many labels carry it. "…and … more codes" when there are more |
Card: Live Preview
| Control | Where | What it does | Notes |
|---|---|---|---|
| Empty state (tag icon) "Select items in Step 1 to preview" | Live Preview | Shown when nothing is selected | |
| "… (… × …)" and "… fields selected" | Live Preview, top | The format and size, and the number of ticked boxes | "fields selected" counts ticked boxes. The fit check measures height, not boxes, so the two numbers are not comparable |
| Actual-size label with a dashed blue inner box | Live Preview, centre | Shows the first selected item with the chosen fields. The dashed box is the safe print area, 5% in from each edge | Updates as you change fields or format. The border and dashed box are on screen only. A barcode too wide for the label is shown shrunk to fit, as it prints, and a code too long even for that is shown as text |
| Caption "Preview of first selected item • Updates in real-time" | Under the label | Caption | |
| Info box "Safe Print Area: The dashed blue line shows the recommended safe area (5% margin on all sides) to account for printer alignment variations." | Live Preview, bottom | Explainer |
Step buttons
| Control | Where | What it does | Notes |
|---|---|---|---|
| Last Step (left arrow) | Bottom of the right column, left | Back to Step 1. Nothing is lost | Always available |
| Next Step (right arrow) | Bottom of the right column, right | Opens Step 3 | Greyed out while the Content Won't Fit warning shows. Doesn't require selected items |
Step 2: Label formats
Every format prints on a US Letter page (8.5" × 11"). "Room for content" is what the fit check compares against: the label height less a 5% margin top and bottom.
| Format | Description shown | Label size (W × H) | Per sheet (columns × rows) | Recommendation shown | Room for content |
|---|---|---|---|---|---|
| Avery 5160 (default) | 1" x 2⅝" Address Labels | 2.625" × 1" | 30 (3 × 10) | Recommended for Tracking Labels | 0.90" |
| Avery 5163 | 2" x 4" Shipping Labels | 4" × 2" | 10 (2 × 5) | Recommended for Product Labels & Price Tags | 1.80" |
| Avery 5267 | ½" x 1¾" Return Address Labels | 1.75" × 0.5" | 80 (4 × 20) | Recommended for Small Item Tags | 0.45" |
| Avery 8163 | 2" x 4" Full Sheet Labels | 4" × 2" | 10 (2 × 5) | Recommended for Detailed Price Tags | 1.80" |
| Avery 5162 | 1⅓" x 4" Address Labels | 4" × 1.333" | 14 (2 × 7) | Recommended for Large Address Labels | 1.20" |
| Avery 5164 | 3⅓" x 4" Shipping Labels | 4" × 3.333" | 6 (2 × 3) | Recommended for Large Shipping Labels | 3.00" |
| Jewelry Tags | ½" x ¾" Small Jewelry Labels | 0.75" × 0.5" | 120 (8 × 15) | Recommended for Jewelry & Small Items | 0.45" |
| Clothing Tags | 1" x 3" Hang Tags | 3" × 1" | 20 (2 × 10) | Recommended for Clothing Price Tags | 0.90" |
| Custom Size | Whatever you type, from 0.5" up to the page | 3" × 1.5" to start | As many as fit, e.g. 44 (4 × 11) at 2" × 1" | Recommended for Special Requirements | the label less a 5% margin |
- Custom Size takes your own measurements. Pick the card and two boxes appear, Width (in) and Height (in), stepping in eighths of an inch. Anything under 0.5" or over the page is pulled back to the nearest size that can be printed. The card's description and its labels-per-sheet count follow what you type, and so does everything downstream: the safe-print-area check, the sheet preview and the printed page.
- When the fit check can fail. Ticking every field needs about 2.79" of height (2.58" on labels under 1.5" tall, where the text is smaller), because each of the three barcodes is 0.44" on its own. Only Avery 5164 holds all of them. The four fields that are on to begin with — Barcode, Model Number, Product Name and Serial Number — need about 0.81" (0.83" on labels 1.5" and taller) and fit every format except Avery 5267 and Jewelry Tags, whose ½" labels have 0.45" of room: on those two, pick two or three fields, and expect to give up either the barcode or the text around it.
- How long a code fits. A barcode (CODE128) is about 0.11" wide per letter, plus about 0.36" for its start and end; pairs of digits share one character, so an all-digit code can be about twice as long. A barcode wider than the space inside the label's 5% side margins is shrunk to fit, bars and code together, down to 75% of its size, and a code that would need more prints as text. On Avery 5267 (1.75" wide) that is about 10 letters at full size and up to 15 shrunk; on Jewelry Tags (0.75") about 2 at full size and 4 shrunk; on Avery 5160 about 17 and 24. The formats 3" and wider take 20 letters or more before anything shrinks. The labels past the limit are listed in an amber panel in Step 2 and Step 3, and Print Now asks first. The height check does not change: a shrunk barcode is shorter than the 0.44" it is counted at.
- Each Avery format uses Avery's own gap between columns, and the page margins follow from it, because the block of labels is centred: Avery 5160 0.125" between columns and 0.1875" at the sides; Avery 5163, 8163, 5162 and 5164 0.1875" between columns and 0.15625" at the sides; Avery 5267 0.3125" between columns and 0.28125" at the sides. No format has a gap between rows. The top and bottom margins are what is left over, shared equally: 0.5" on Avery 5160, 5163, 8163, 5267 and 5164, and 0.833" on Avery 5162. Avery 5162 and 5164 are exactly a third of an inch over 1" and 3", as Avery makes them, and their size shows rounded to 1.333" and 3.333".
- Jewelry Tags, Clothing Tags and Custom Size are not manufacturer sheets. Their cards say "Not a manufacturer sheet: the labels are centred on the page with no gap between them". Use them on blank stock, or print one on plain paper first.
- No roll or thermal formats. Every format is a full sheet.
- Printing always starts at the first position on the sheet. You can't skip positions already used on a partly used sheet.
Step 2: Label Information fields
Each field is a checkbox with a one-line note under it, quoted in the last column. Clicking the box or the words beside it toggles it. The boxes sit in a two-column grid (one column on a phone), in this order reading left to right. Every field prints real data from your catalog: a field with nothing behind it leaves no line on the label.
| Checkbox | Default | What prints | Height in the fit check | Note under the box |
|---|---|---|---|---|
| Barcode | On | A CODE128 barcode with its value written underneath. The value is the unit's own barcode (serialized units), otherwise the product's Barcode, otherwise the SKU. With none of them, the preview shows "No barcode/SKU" and nothing prints there | Yes: 0.44", on every format | "Encodes the unit's barcode, else the product's UPC/EAN, else the SKU." |
| Brand | Off | The product's brand name. Blank if none | Yes: 0.11", or 0.14" on labels 1.5" and taller | "The manufacturer's brand name, such as Whirlpool." |
| Category | Off | The category name, or "Uncategorized" | Yes: 0.11", or 0.14" on labels 1.5" and taller | "The product's category, such as Refrigerators." |
| Description | Off | The product's description from the catalog. Nothing prints when it has none | Yes: 0.11", or 0.14" on labels 1.5" and taller | "The product's description, as entered on the product." |
| Location | Off | "LOC: …" with the location name | Yes: 0.11", or 0.14" on labels 1.5" and taller | "Where the item is stocked, such as Main Showroom." |
| Model Number | On | "Model: …". Bulk rows with no model print the product name. Serialized units with no model print "N/A" | Yes: 0.12", on every format | "The manufacturer's model number; colors or sizes may share one." |
| Retail Price | Off | Green "$…", the same value as the Price column: the retail price, never a cost | Yes: 0.11", or 0.14" on labels 1.5" and taller. Not printed when there is no retail price | "Your selling price for this item." |
| MSRP | Off | "MSRP: $…", the product's MSRP from the catalog. Serialized units print their product's | Yes: 0.11", or 0.14" on labels 1.5" and taller. Not printed when the product has no MSRP | "The manufacturer's suggested retail price, for comparison." |
| Product Name | On | The product name, bold, on the top line | Yes: 0.14", on every format (it is always set a little larger) | "The product's name, in bold at the top." |
| Serial Number | On | "S/N: …". Serialized units only. Bulk rows print nothing here | Yes: 0.11", or 0.14" on labels 1.5" and taller, even on bulk rows | "Identifies one tracked unit: the maker's serial or your store's number." |
| Serial Number's Barcode | Off | A CODE128 barcode of the serial number. Serialized units only | Yes: 0.44", on every format | "The serial as bars: scan to sell, count or trace that unit." |
| Dimensions | Off | The product's Dimensions from the catalog's Physical tab, printed as typed. Nothing prints when it has none | Yes: 0.11", or 0.14" on labels 1.5" and taller | "The product's size, as entered on the product." |
| SKU Code | Off | "SKU: …" | Yes: 0.11", or 0.14" on labels 1.5" and taller | "Your store's code for the product, shared by all its units." |
| SKU's Barcode | Off | A CODE128 barcode of the SKU, when the item has one | Yes: 0.44", on every format | "The SKU as bars: scans as the product, not one unit." |
Top-to-bottom order on the label: Product Name, Model, Brand, Description, Category, Dimensions, SKU, SKU barcode, S/N, serial barcode, LOC, Barcode, price, MSRP.
Every field on this list is measured by the fit check, at the size the printed label draws it. It measures height, and allows one line per field: text long enough to wrap onto a second line can still run over. Width is handled for barcodes: one wider than the label is shrunk to fit, down to 75% of its size, and past that the code prints as text, which wraps rather than running off the label (see How long a code fits above). Other content that overflows is clipped, not carried onto the next label, so check the Live Preview before printing a sheet.
Step 3: Preview & Print
| Control | Where | What it does | Notes |
|---|---|---|---|
| Card title Label Preview (eye icon) | Step 3 card header, left | Heading | |
| Print Now (printer icon, large) | Step 3 card header, right | Builds every sheet and opens your browser's print dialog, from this page. See Dialog: Print window | Hidden when nothing is selected. Greyed out when the content doesn't fit, and while it is working, when it reads Preparing…. Prints every selected item, filters included or not. Nothing is saved or recorded. When some codes will print as text, it first opens Print anyway? (below); it is never greyed out for that. Pressed while the barcode tool is still loading, it waits for the load (up to 10 seconds), reading Preparing…, and measures the codes before deciding, so it asks then too. A second press while it waits or prints does nothing, so a double click prints once |
| Dialog Print anyway? with the amber panel's message, Go back and Print anyway | Over the page, after Print Now | Print anyway prints every label, the too-long codes as text; Go back closes it and prints nothing | Only when the amber Some barcodes are too wide for this label panel is showing |
| Amber panel Some barcodes are too wide for this label | Step 3, above the sheet preview | The same panel as Step 2 | Only when a code is too long for the label |
| Amber note with Try again | Step 3, above the sheet preview | Appears when the barcodes can't be drawn, or when the browser refused to open the print view. Try again does whichever is needed: it prints again after a refused print view, and fetches the barcode tool again (redrawing the previews) when that was blocked | Exact wording in Messages you may see. Greyed out while the sheets are being built |
| Empty state (tag icon) "Select items to preview labels" and Go to Selection (left arrow) | Card body | Go to Selection opens Step 1 | Shown when nothing is selected, for example after jumping here by the tab |
| "Preview: …" (format name) | Card, top | The chosen format | |
| "… item(s) selected • … labels total • … sheet(s) needed" | Card, top | Selected items, total labels (bulk rows count one per unit) and sheets needed, rounded up | |
| "✓ Print layout: … labels per sheet" (green) | Card, top | Labels per sheet of the chosen format | |
| Red panel (warning icon) "Cannot Print: Content Exceeds Safe Print Zone" (with a warning-sign emoji in front) | Card, under the summary | Explains why printing is blocked and repeats the Step 2 message | Only when the fit check fails, which you reach only by clicking the Step 3 tab |
| "Why is this happening?" and "The ticked fields are drawn about … tall, but a … label has only … inside its 5% margin. A barcode on its own is about 0.44" tall." | Red panel | Explainer | The two heights are the same ones Step 2 shows |
| "Action Required: Please remove some fields" (clipboard emoji in front), "To proceed with printing, go back to Step 2: Label Configuration and:", bullets "Uncheck some fields in the "Label Information" card, OR" and "Select a larger label format (e.g., …)" | Red panel | Instructions | The example follows the label's height: "Avery 5163 or Avery 5164" under 2" tall, "Avery 5164 or a taller Custom Size" at 2" (Avery 5163 and 8163, or a Custom Size that tall), and "a taller Custom Size" from Avery 5164's height up |
| Go to Step 2 to Remove Fields (gear icon, red, full width) | Red panel, bottom | Opens Step 2 | Only with the red panel |
| Info box "Safe Print Area: The dashed blue line shows the 5% margin on all sides. Your content will stay within this area to account for printer alignment variations." | Card | Explainer | |
| "Sheet 1 Preview" and "(Total: … sheets)" | Above the sheet | Heading | The total shows only with more than one sheet. Only the first sheet is previewed, but every sheet prints |
| Sheet preview | Card, centre | A Letter page at 98% scale with every label position on sheet 1. Filled positions show the label with a dashed blue safe area. Unused positions are grey dashed boxes. A faint grid marks the label cells | Scrolls sideways on narrow screens. Nothing in it is clickable |
| Green box Print Layout Optimized: "Each sheet will contain exactly … label positions (… × … grid) matching the … specifications. Empty positions maintain proper alignment." and "Safe Print Margin: All labels include a 5% margin on all sides to ensure content stays within the printable area, accounting for printer alignment variations." | Card, bottom | Explainer | |
| Last Step (left arrow) | Bottom left of Step 3 | Opens Step 2 | Always available |
There is no Export, Download or PDF button. To get a PDF, choose Save as PDF as the destination in the print dialog.
Dialog: Print window
Print Now doesn't open a dialog inside UpChannels. It lays the sheets out inside the page itself, in a frame you never see, and opens your system's print dialog. A browser that blocks pop-ups doesn't stop it.
| What | Detail | Notes |
|---|---|---|
| Title | "Barcode Labels - …" with the format name | Only visible if your browser prints headers |
| Page setup | US Letter (8.5" × 11"), no page margin, one sheet per printed page. The labels sit where the chosen format puts them, which is the same layout the Step 3 preview shows | Every sheet keeps all its positions: empty ones stay blank so the grid lines up. Labels print without borders. The borders and dashed boxes are on screen only |
| Text | Arial. 8 px on labels under 1.5 inches tall, 10 px on taller labels | |
| Barcodes | CODE128, value printed under the bars. A barcode wider than the space inside the label's side margins is scaled down to fit, bars and value together, down to 75%; a code that would need more prints as plain text, which wraps onto a second line if it has to | Drawn in the page before printing, so the sheets need nothing from the internet once they are built. Each distinct code is drawn once however many labels carry it, so a bulk row of hundreds of units is no slower than a handful. The barcode tool is part of UpChannels and loads the first time it is needed; if that load does not finish, the label prints the code as plain text instead and Step 3 says so |
| Closing | The print view closes itself when you finish or cancel in the print dialog | |
| Print view blocked | An amber note appears in Step 3, with Try again | Allow pop-ups for UpChannels, or use another browser, then click Try again |
| "No items selected for printing." | Printed page text when no labels are sent | In practice you don't see it, because Print Now is hidden when nothing is selected |
| Choosing pages | Each sheet is one page, so the print dialog's page options can print fewer sheets | Browser print dialog, not an UpChannels setting |
Messages you may see
| Message | When it appears | What to do |
|---|---|---|
| "Loading inventory data from API..." | First load, and each time you change Location or Item Type | Wait a moment |
| Amber note "Showing the first batch of stock records — this sheet may be missing labels for a very large catalog." | Above the steps, when your store has more stock records or serialized units than the page will read in one go (tens of thousands) | Narrow the sheet with Location, then print in batches |
| "Failed to Load Inventory Data", the reason, then "Please ensure you are logged in and have access to inventory data. Try refreshing the page or contact UpChannels support." | Your stock couldn't be loaded | Click Refresh. Sign out and back in if it keeps happening |
| "Could not determine organization. Please sign in again." (as the reason above) | The page couldn't tell which store you belong to. Rare | Sign out and back in |
| "Locations query failed: …" | Your store's locations couldn't be read | Click Refresh. Contact support if it repeats |
| "Stock levels query failed: …" | Your bulk stock couldn't be read | Click Refresh. Contact support if it repeats |
| "Inventory items query failed: …" | Your serialized units couldn't be read | Click Refresh. Contact support if it repeats |
| "Unknown error occurred" | An unexpected failure without a reason | Click Refresh. Contact support if it repeats |
| Page not found | Opening the page when your sign-in isn't linked to a store | Sign out and back in |
| "No inventory items found" / "Try adjusting your filters or search criteria" | No row matches, or there is nothing available to label | Clear the filters. Make sure stock is received and the location is active. Sold, reserved and scrapped units never show |
| "Safe print area: … tall (the label less a 5% margin) • ticked fields need …" | Step 2, on the chosen format card | Green fits, red doesn't |
| "Content Won't Fit in Safe Print Area" with "Too much content for … (… × …): the ticked fields are drawn about … tall, and the safe print area is only … tall (the label less a 5% margin top and bottom)." | Step 2, when the ticked fields are taller than the label's safe print area | Click Remove suggested fields to fit, untick fields, or pick a larger format |
| Suggestion at the end of that message: "Consider using Avery 5160 (2.625" × 1") or larger for more content." | Avery 5267 and Jewelry Tags | Pick a larger format or untick fields |
| Suggestion: "Consider using Avery 5163 (2" × 4") or Avery 5164 (3⅓" × 4") for more content." | Avery 5160 and Clothing Tags | Pick a larger format or untick fields |
| Suggestion: "Try reducing the number of selected fields." | Avery 5162, Custom Size, Avery 5163 and Avery 8163 (Avery 5164 always fits) | Untick fields |
| "Ticked fields: … tall • Safe print area: … tall" | With the warning above | Informational |
| "The 5% margin on all sides ensures content stays within the printable area, accounting for printer alignment variations." | With the warning above | Informational |
| "Suggested to remove:" and field chips | With the warning above | See the Step 2 panel for the order |
| "Select items in Step 1 to preview" | Step 2 Live Preview, when nothing is selected | Go to Step 1 and tick items |
| "Preview of first selected item • Updates in real-time" | Step 2 Live Preview | Informational |
| "Safe Print Area: The dashed blue line shows the recommended safe area (5% margin on all sides) to account for printer alignment variations." | Step 2 Live Preview | Informational. The dashed line doesn't print |
| "Select items to preview labels" | Step 3, when nothing is selected | Click Go to Selection |
| "Cannot Print: Content Exceeds Safe Print Zone", "Why is this happening?", "Action Required: Please remove some fields" | Step 3, when the fit check fails | Click Go to Step 2 to Remove Fields |
| "Safe Print Area: The dashed blue line shows the 5% margin on all sides. Your content will stay within this area to account for printer alignment variations." | Step 3 | Informational |
| "✓ Print layout: … labels per sheet" and "Print Layout Optimized" | Step 3, with items selected | Informational |
| "No barcode/SKU" (grey, inside a label) | The Barcode field is ticked but the item has no barcode and no SKU | Add a barcode or SKU in Catalog → Products. Until then the label prints without a barcode |
| "Barcode can't be drawn" with the code underneath, inside a preview label | The barcode tool did not load | Use Try again in Step 3, or reload the page |
| "Barcodes can't be drawn: the barcode drawing tool did not load. The labels will print the code as text instead of bars." (amber, Step 3) | The barcode tool did not load — usually a dropped connection, or UpChannels was updated while the page was open | Click Try again, or print anyway: the code prints as text |
| "The barcode drawing tool did not load, so the labels printed the code as text instead of bars. Press Try again, or reload the page if UpChannels was just updated." (amber, Step 3) | After printing without the barcode tool | Nothing, unless you need real bars |
| "This browser wouldn't let UpChannels open a print view, either inside the page or in a new window. Allow pop-ups for this site, or try another browser, then print again." (amber, Step 3) | The browser refused both the in-page print view and a pop-up. Rare | Allow pop-ups for UpChannels, or use another browser, then click Try again |
| "No items selected for printing." | Print window with no labels | Select items first |
| "403 - Forbidden" / "You do not have permission to view this page. Contact your organization owner." | You open the page while Labels is hidden from your menu (stores with more than one active user) | Ask the owner to switch Labels back on for you in Settings → Team |
Who can use what
| Who or what | Effect |
|---|---|
| Everyone in the store | Full use of all three steps and printing. No owner, manager or staff rule, no plan tier, no add-on and no switch |
| A person the owner has hidden Labels from (stores with more than one active user) | The menu item is hidden, and opening the page directly shows 403 - Forbidden. A store's only active member is never blocked. See Settings → Team |
| Signed in without a store | The page shows Page not found |
| What data shows | Your own store only: active locations, bulk stock that is available, and serialized units that are Available |
Demo mode (/inventory/barcodes/demo)
- Open it: click Demo (Play icon, amber) in the page header.
- Header: title Barcode & Label Management — Demo, subtitle "Sample barcode labels populated with demo data. All actions are disabled."
- Banner: "Demo mode — barcode labels are populated with sample data. All actions are disabled." with a Take a Tour button (question-mark icon) that restarts the tour from step 1.
- Sample data: matches your store's industry (appliance, furniture, electronics, liquidation or apparel retail, or HVAC, plumbing or appliance services). Any other industry, or none, shows the electronics set. Two sample locations: Main Store and Warehouse. The first three rows are pre-selected, so Steps 2 and 3 are filled in. Format and fields start at the same defaults as the live page.
- Still works: the three step tabs, Take a Tour, Exit Demo Mode and the tour controls.
- Disabled: everything inside each step — filters, Clear Filters, search, checkboxes, pagination, format cards, field boxes, Next Step, Last Step and Print Now. Clicking a row does nothing.
- Leave: Exit Demo Mode (left arrow) in the header, which replaces Demo and Refresh, returns to the live page.
The tour starts on its own the first time the demo opens, and switches to each step's tab before pointing at it.
| # | Tab | Tour step | What it points at |
|---|---|---|---|
| 1 | Step 1: Item Selection | 3-Step Workflow | The step tab bar |
| 2 | Step 1: Item Selection | Filter & Search | The Filter & Search card |
| 3 | Step 1: Item Selection | Item Selection | The Available Inventory table |
| 4 | Step 2: Label Configuration | Label Format | The Label Format card |
| 5 | Step 2: Label Configuration | Label Information | The Label Information card |
| 6 | Step 2: Label Configuration | Live Preview | The Live Preview card |
| 7 | Step 3: Preview & Print | Preview & Print | The Label Preview title and Print Now |
| 8 | Step 3: Preview & Print | Full Sheet Layout | The whole Step 3 panel |
What each tour step says:
- "Barcode label printing follows three steps: select inventory items, configure label format and content, then preview and print. This tour walks through each step."
- "Narrow down your inventory by location, category, item type (bulk vs trackable), or search by product name, SKU, and serial number."
- "Select the items you want to generate barcode labels for. Each row shows product details, type (Bulk or Trackable), location, stock status, quantity, and how many barcodes will be generated."
- "Choose from popular label formats including Avery 5160, 5163, Jewelry Tags, Clothing Tags, and more. Each format shows dimensions, labels per sheet, and a recommendation for its best use."
- "Pick which fields to include on each label: barcode, product name, model number, serial number, SKU, price, category, location, and more. The system validates that content fits the selected label size."
- "See a real-time preview of your label with the selected format and fields. The dashed blue line shows the safe print area (5% margin on all sides)."
- "The final step shows your labels laid out exactly as they will print. When everything looks right, click "Print Now" to send the sheet to your printer."
- "View the complete sheet preview showing how every label is positioned on the page, with a running count of items, total labels, and sheets needed for the selected format."
Tour controls: dots show progress and "… of 8" counts the steps. Back (hidden on step 1), Skip, and Next (Got it! on the last step). Clicking the dark backdrop closes the tour. Keys: Esc closes, → or Enter goes forward, ← goes back. If a step's target doesn't appear within a few seconds, the tour moves on by itself.
Differences from the live page: no Refresh, loading, error or "No inventory items found" states. The table title shows only "(… items)". The Item Type options have no icons. The capacity line is the same, and so is the fit check behind it. The Step 2 warning is a shorter one-line message without the chips or Remove suggested fields to fit, and never shows because the fields can't be changed. The Live Preview caption is "Preview of first selected item", and the Safe Print Area notes in Steps 2 and 3 are shorter. Step 3 has no Go to Selection, no red Cannot Print panel, no grid on the sheet preview and a shorter Print Layout Optimized box. Sample barcodes use the unit's sample barcode, otherwise the SKU. There is no "N selected" line and no Clear selection, because the rows can't be changed.
Common questions
Can I print just one label for a bulk product that has 40 in stock? Not from this page. A bulk row always prints one label per unit, and there is no quantity setting. Each sheet is one printed page, so you can print fewer sheets using the page options in your browser's print dialog.
Does UpChannels create barcode numbers for my products? No. The label encodes the unit's own barcode, otherwise the product's Barcode, otherwise its SKU, as a CODE128 barcode. Add or change them in Catalog → Products. If there is neither, the preview shows "No barcode/SKU" and no barcode prints.
Which price does the label print? Retail Price prints the product's retail price, the same number as the Price column in Step 1. A serialized unit with its own retail price prints that instead. It never prints your cost, and a product with no retail price gets no price on the label — add one in Catalog → Products.
Can a label show a sale price or a discount? No. The page has no sale-price data, so it has no discount field — it never prints a discount the product doesn't have.
Can I export the labels or download a PDF? There is no Export or Download button. Click Print Now and choose Save as PDF as the destination in the print dialog.
Why is Next Step greyed out? In Step 1, nothing is selected yet. In Step 2, the ticked fields don't fit the chosen label: use Remove suggested fields to fit, untick fields, or pick a larger format.
Can I print on a DYMO, Zebra or other roll printer? No. Every format is a US Letter sheet, and there are no roll or thermal formats. The Labels card on Inventory → Guide & Tips says the same: 9 sheet formats, Avery and your own, and CODE128 barcodes.
Why isn't my serialized unit in the list? Only units that are Available, at an active location, are listed. Sold, reserved and scrapped units never show. Also check the Location and Item Type filters.
Can I use a partly used label sheet or set my own label size? No. Printing always starts at the first position on the sheet. Custom Size lets you change the label's size, but not where on the page the first one lands.