Vendors
The Vendors page is your supplier directory across two tabs — Overview and Vendor List. The vendors you keep here are the ones you pick when you create purchase orders in Procurement.
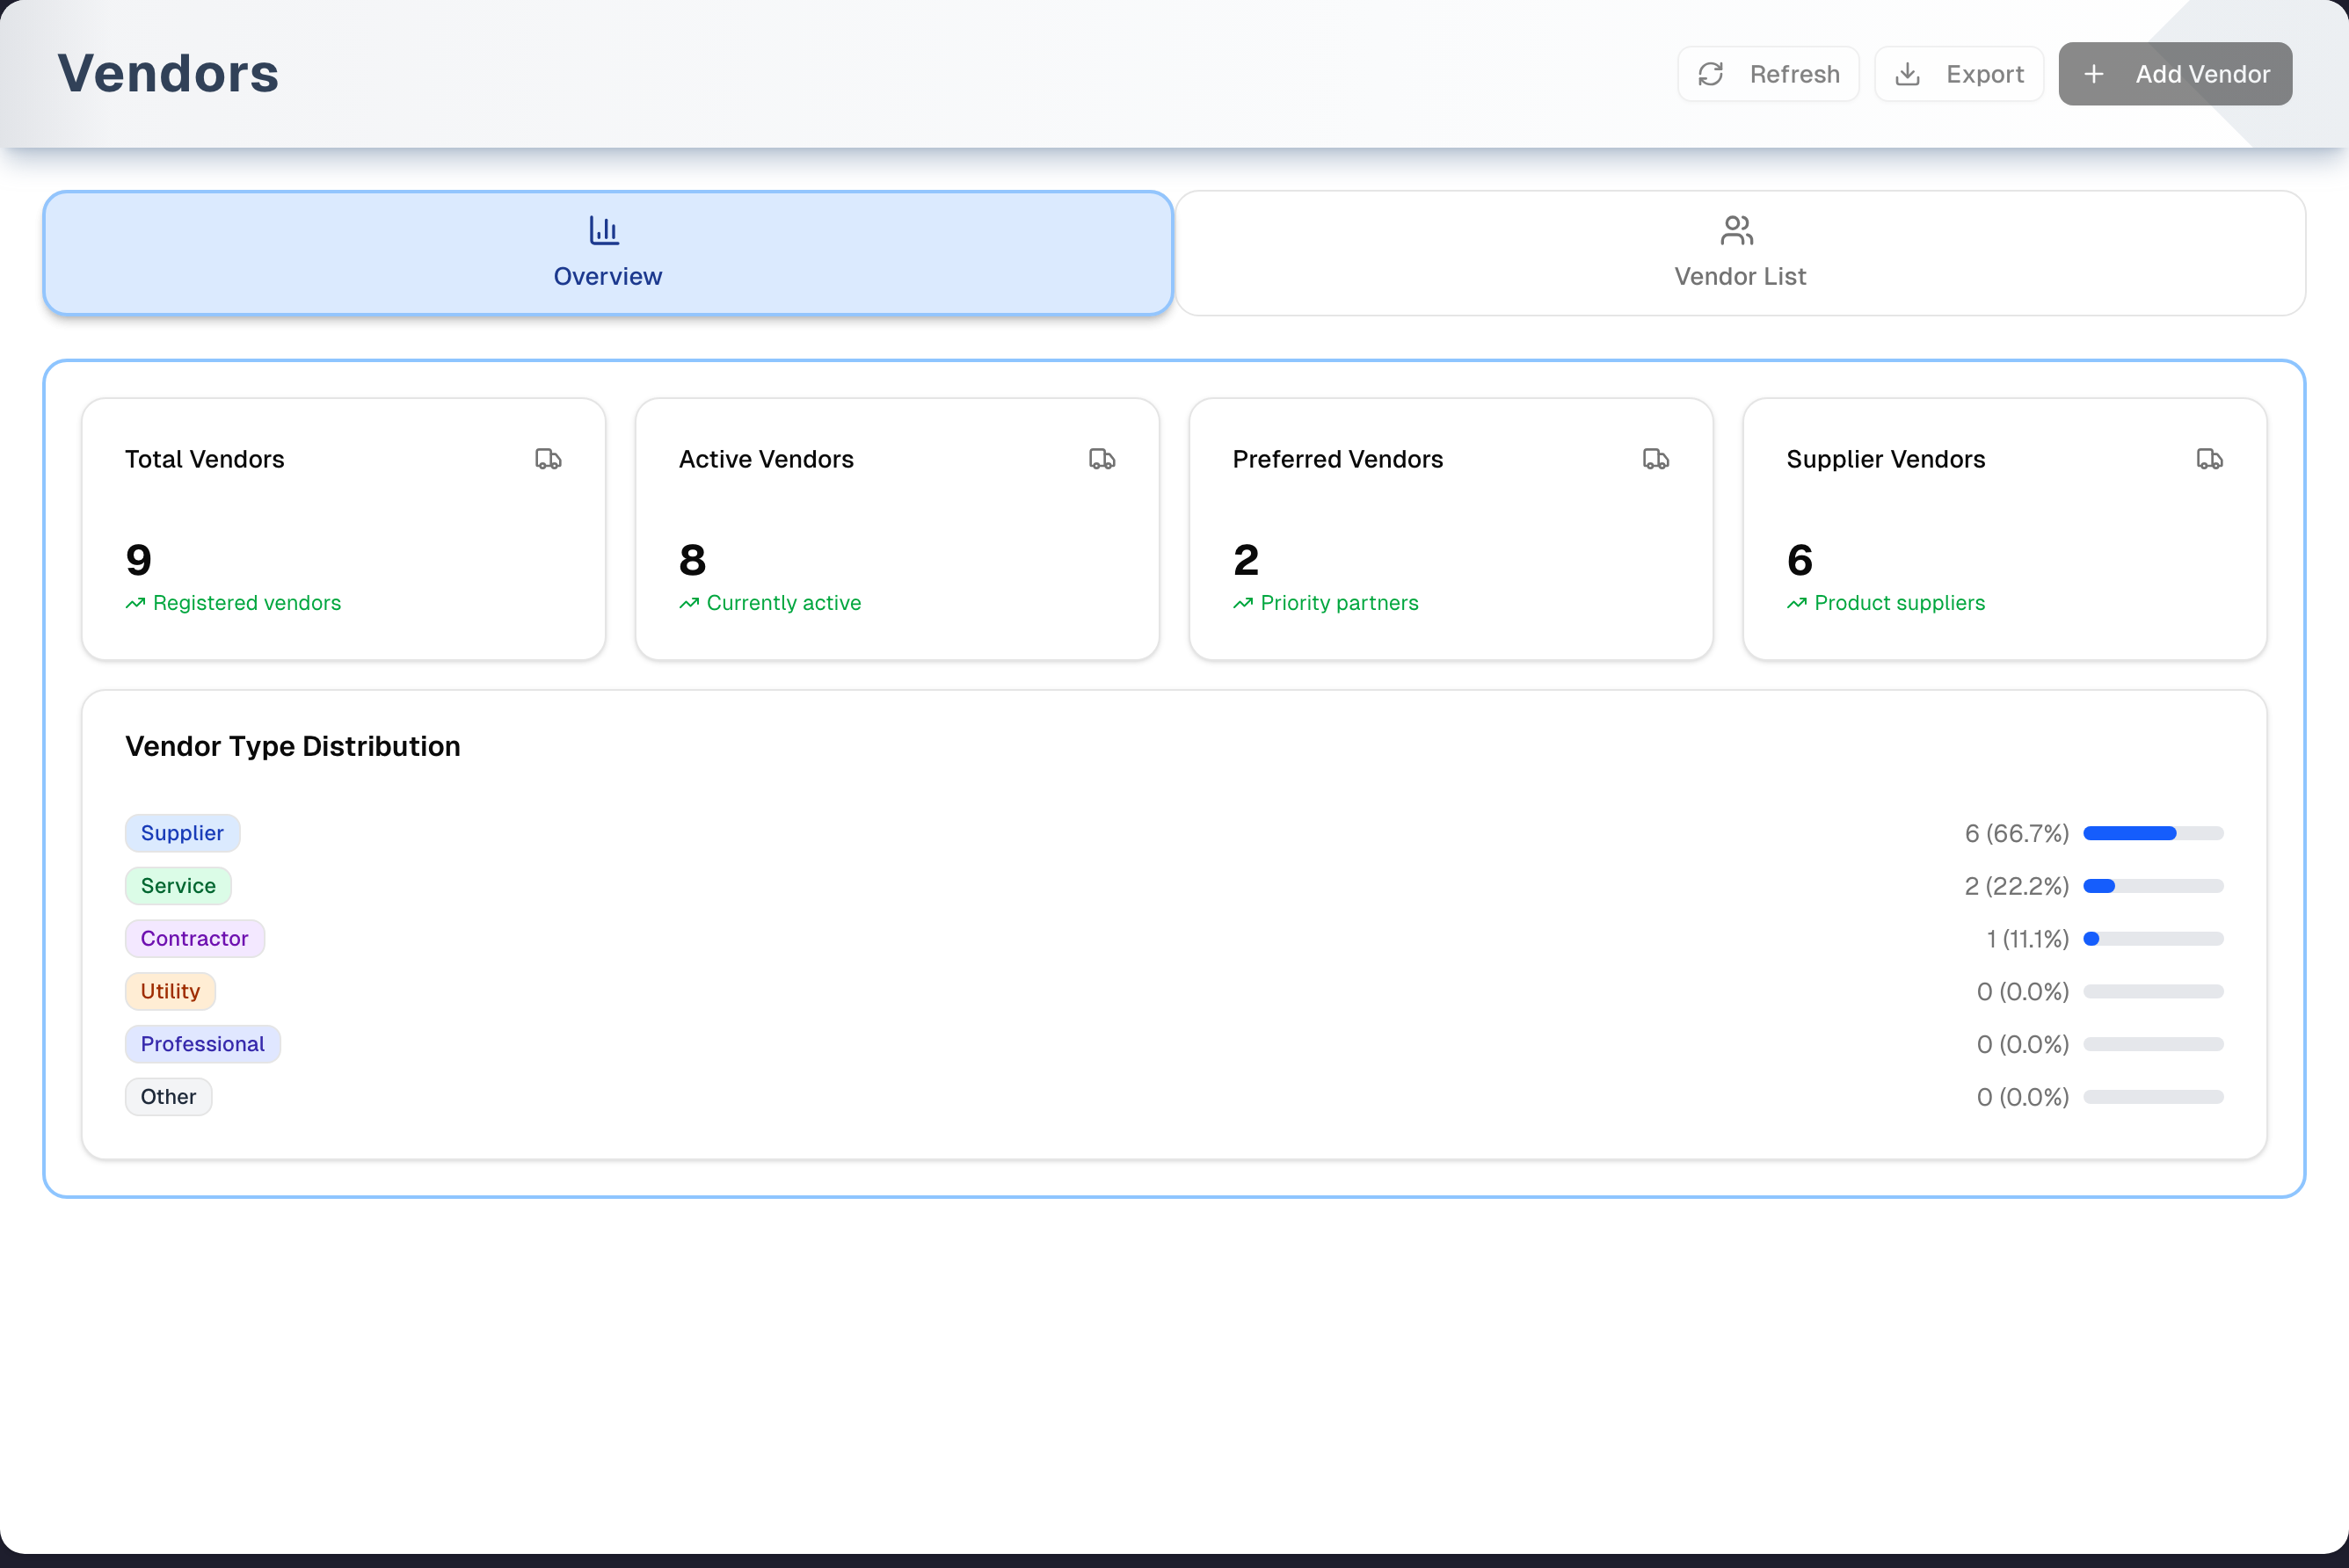
Overview
See vendor counts and the mix of vendor types at a glance, then find, add, edit or delete vendors in a searchable list. Refresh, Export and Add Vendor sit in the page header and work from either tab. Demo opens a read-only copy with sample vendors and a guided tour.
Anyone in your store who can open the page can add, edit and export vendors. Retiring or reactivating a vendor (the Active switch) and deleting one need the owner or a manager. No plan or add-on is needed.
Tabs in detail
Overview
- Stat cards: Total Vendors, Active Vendors, Preferred Vendors, Supplier Vendors. They count every vendor you haven't deleted and ignore the Vendor List search and filters.
- Vendor Type Distribution: count and percentage for each type (Supplier, Service, Contractor, Utility, Professional, Other), each with a coloured type badge and a small bar.
Vendor List
- Search (name, code or description) and filters for Type and Status. Reset appears once a search or filter is on.
- Columns: Name (with the description under it), Code, Type badge, Category, Status (Active or Inactive, plus Preferred), Contact (email, with the phone under it — the phone only shows when an email is saved too), Created date, Actions.
- Newest vendors first. Columns can't be sorted and there are no pages — every vendor loads at once.
- Row actions are two icons: the pencil icon (Edit vendor on hover) opens Edit Vendor and the trash-can icon (Delete vendor on hover) opens Delete Vendor. Staff see only the pencil — deleting a vendor needs a manager. Clicking the row itself does nothing.
- Export (page header) downloads a CSV of the vendors currently shown in this list, after search and filters. It is greyed out when the list is empty.
Add / Edit Vendor form
- Fields: Name (the only required field), Vendor Code, Description, Vendor Type (starts on Supplier), Category (No category, OFFICE SUPPLIES, EQUIPMENT, SERVICES, RAW MATERIALS, MAINTENANCE, TECHNOLOGY, CONSULTING, UTILITIES), Tags, Contact Email, Contact Phone, Website, Primary Contact, and two switches: Active (on) and Preferred (off).
- Turn Active off to retire a vendor you no longer buy from: it stays on file and on its old purchase orders, but it is left out of the vendor lists when you order. Turn Preferred on for the suppliers you favour — they get a Preferred badge and count on the Preferred Vendors card.
- Anyone in your store can correct a vendor — its name, code, contact details, category or Preferred. Retiring or reactivating one (the Active switch) and deleting one need the owner or a manager: for staff the Active switch is greyed out, with "Only a manager can retire or reactivate a vendor.", and a new vendor always starts active.
- Each vendor name is used once in your store: upper and lower case, spaces at the ends and extra spaces between words count as the same, so "acme parts" is "Acme Parts". A vendor you deleted frees its name; one you switched off keeps it, so switch it back on rather than adding it again. Another store can use the same name.
- Saving closes the dialog with no confirmation message. If a save is refused, the dialog stays open and the reason appears inside it, just above the buttons.
- In Edit Vendor, clearing Vendor Code, Description or the contact boxes removes them, and picking No category takes the category off. The form has no address or payment-terms fields.
Deleting a vendor
- Deleting needs the owner or a manager; staff don't see the trash-can icon.
- Delete deactivates the vendor and removes it from this list, the Overview counts and the vendor dropdowns in Procurement. There is no undo in the app. To stop ordering from a vendor but keep it on file, turn Active off in Edit Vendor instead.
- Purchase orders don't block it. Existing purchase orders keep the vendor's details: the Procurement order list, Order Details and the Receive tab show its name marked "(removed)", and printed POs still show the plain name.
Vendors also appear here when someone creates one while adding or editing a product, or with New Vendor on the Procurement Import tab. If your store has no vendors yet, an import creates one called "Default Vendor". All of these are saved as Supplier and Active.
Step by step: add a vendor
- Click Add Vendor in the page header, top right.
- Enter a Name. Vendor Type starts on Supplier — change it if needed — and add a code, category and contact details if you like.
- Click Create Vendor. The dialog closes and the vendor appears at the top of Vendor List.
Step by step: edit or delete a vendor
- Open Vendor List and find the vendor (search by name, code or description).
- To edit, click the pencil icon on its row, change the fields and click Update Vendor.
- To remove it, click the trash icon and confirm with Delete. Only the owner or a manager sees the trash icon, and only they can turn Active off or back on.
Tips & best practices
- Use vendor codes consistently — you can search by code and it is in the CSV export. Codes are not printed on purchase orders.
- Fill in Primary Contact, Contact Phone, Contact Email and Website — they are printed on the purchase orders you send the vendor.
- Export the list for your accountant. Click Reset first if you want every vendor in the file.
- Deleting can't be undone in the app. Finish open purchase orders first: once its vendor is deleted, an order shows the name marked "(removed)", and editing that order means picking another vendor.
Troubleshooting
| Issue | Fix |
|---|---|
| Create Vendor or Update Vendor is greyed out | Type a Name — it is the only required field. The button is also greyed out while a save is running |
| The dialog stays open after Create, Update or Delete | The save failed. The reason is in the dialog, just above the buttons |
| "Vendor name is required" | The Name contains only spaces. Type a real name |
| "A vendor named "…" is already on your Vendors list. …" | Your store already has a vendor of that name (capitals and spacing aside). Use that vendor, or give the new one a different name. If it says "switched off", ask a manager to turn its Active switch back on instead |
| New vendor not visible | The list reloads by itself after Create. Click Reset to clear the search and filters. If the dialog is still open, the save failed |
| Cleared a field but it came back | Clearing a field in Edit Vendor removes it when you press Update Vendor. Category is a list rather than a box, so choose No category at the top of it |
| Phone number missing from the Contact column | The phone only shows under an email. Add a Contact Email, or open Edit to see the phone |
| Want to stop using a vendor without deleting it | Open Edit Vendor and turn Active off. The vendor stays on file and on its old orders but is left out of the vendor lists when you order. Set it back to Active to use it again |
| Vendor missing from the Procurement vendor list | Only active vendors you haven't deleted are offered as a choice. A deleted vendor can't be restored from the app — add it again. Its name still shows on the purchase orders it already has |
| The Procurement order list shows "Vendor no longer on file" | No vendor record is left for that order at all. A vendor you deleted still shows its name, marked "(removed)" |
| The Procurement order list shows "No vendor on this order" | The order was filed without a vendor, which the stock import allows. Nothing was removed. Open the order and pick a vendor if it should have one |
| "Your sign-in isn't linked to a store, so your vendors can't be loaded. …" | Sign out and back in. If it keeps happening, contact UpChannels support |
What's next
- Order from a vendor: Inventory → Procurement
- Link vendors to products: Catalog → Products
- Record what you pay suppliers: Finance → Expenses (an expense's Vendor is typed in, not picked from this list)
Detailed reference
Every button, icon, field and message on this page, for when you need the exact detail. Each panel starts closed — open the one you need.
Page header and toolbar
| Control | Where | What it does | Notes |
|---|---|---|---|
| Sidebar Inventory → Vendors (building icon) | Sidebar | Opens this page | Part of the standard menu |
| Vendors card on the Dashboard's Organized level (shows a number) | Dashboard | Opens this page | The number counts active vendors you haven't deleted. The Organized level's link list also has a Vendors link |
| Title "Vendors", subtitle "Manage your external suppliers and service providers." | Header, left | Heading only | |
| Demo (Play icon, amber) | Header, right, 1st | Opens the read-only demo with sample vendors and a guided tour | Everyone. See the Demo mode panel below and Demo mode |
| Refresh (circular-arrows icon) | Header, right, 2nd | Reloads the vendor list. Vendor List shows a spinner and "Loading vendors..." while it loads. Search and filters are kept | Always available. Clears the red error banner first. No message on success |
| Export (download icon) | Header, right, 3rd | Downloads a CSV of the vendors shown in Vendor List after search and filters — even when you are on the Overview tab. File name vendors-YYYY-MM-DD.csv | Greyed out when the filtered list is empty, including while the page first loads. The date in the file name is your store's date, in its time zone. Columns: Name, Code, Type, Category, Status (Active/Inactive), Preferred (Yes/No), Email, Phone, Created. Category is written as the page shows it (for example RAW MATERIALS). Created is the day the vendor was added, on your store's calendar, as YYYY-MM-DD. Description, Tags, Website and Primary Contact are not exported. The phone is exported even when there is no email |
| Add Vendor (Plus icon, primary button) | Header, right, last | Opens Add New Vendor | Never greyed out. If you typed into the form and then closed it, your typing is still there next time — the form clears only after a successful create |
| Red error banner (alert icon + message) | Top of the page body, above the tabs | Shows why the vendor list could not be loaded — see Messages you may see | Only ever about loading the list. Anything a dialog refuses is shown inside that dialog. It stays until the next load |
| Retry | Right end of the red banner | Reloads the vendor list, same as Refresh | The banner only ever reports a failed load, so Retry repeats exactly what failed. If the page never worked out your store, Retry only swaps the message for "Organization not set." — reload the browser page instead |
| Overview tab (bar-chart icon, blue) | Tab bar under the header | Shows the stat cards and type distribution | Opens on this tab every visit. The chosen tab isn't remembered |
| Vendor List tab (people icon, green) | Tab bar | Shows the searchable vendor table |
Tab: Overview
Nothing on this tab is clickable. The numbers cover every vendor in your store that hasn't been deleted, ignore the Vendor List search and filters, and show 0 while the page first loads. After Refresh they keep the old numbers until the new list arrives.
| Control | Where | What it does | Notes |
|---|---|---|---|
| Card Total Vendors (truck icon), caption "Registered vendors" | Stats row, 1st | Number of vendors | Deleted vendors are not counted |
| Card Active Vendors (truck icon), caption "Currently active" | Stats row, 2nd | Number of vendors marked Active | Lower than Total Vendors once you have retired a vendor with the Active switch. Deleted vendors aren't counted at all |
| Card Preferred Vendors (truck icon), caption "Priority partners" | Stats row, 3rd | Number of vendors flagged Preferred | Turn Preferred on in Add New Vendor or Edit Vendor to count here |
| Card Supplier Vendors (truck icon), caption "Product suppliers" | Stats row, 4th | Number of vendors whose type is Supplier | Counts active and inactive |
| Card Vendor Type Distribution | Below the stats row | One row per type, always in this order: Supplier, Service, Contractor, Utility, Professional, Other. Each row shows a coloured type badge, "count (percent%)" with one decimal (for example "3 (37.5%)") and a small bar | All six types show, even at 0. Percent = that type's count ÷ total vendors. Badge colours: Supplier blue, Service green, Contractor purple, Utility orange, Professional indigo, Other grey. Every bar is blue |
Tab: Vendor List
| Control | Where | What it does | Notes |
|---|---|---|---|
| Card title "Vendor List (X of Y)" | Top of tab | X = vendors matching the search and filters, Y = all vendors | |
| Search box, placeholder "Search vendors..." (magnifier icon) | Filter row, left | Filters as you type (no Enter needed). Matches any part of the Name, Vendor Code or Description, ignoring capitals | Doesn't search email, phone, tags, category or contact name |
| Type filter (shows "All Types") | Filter row | All Types, Supplier, Service, Contractor, Utility, Professional, Other | |
| Status filter (shows "All Status") | Filter row | All Status, Active, Inactive | Deleted vendors never appear under any option. Inactive finds the vendors you have retired with the Active switch |
| Reset | Filter row, after the filters | Clears the search and sets both filters back to All | Only shown while there is search text or a filter other than All |
| Spinner + "Loading vendors..." | Table area | Shown while the list loads | On first load, after Refresh or Retry, and after a create or edit |
| Truck icon, "No vendors found", "Get started by creating your first vendor." + Add Vendor (Plus icon) | Table area | The button opens Add New Vendor | Shown when your store has no vendors — also shown when the list couldn't load as the page opened (check the red banner). If a later Refresh fails, the previous list stays on screen |
| "No vendors found", "Try adjusting your search or filter criteria." | Table area | No button | Vendors exist but the search or filters hide them all. Click Reset |
| Column Name | Table | Vendor name in bold, with the Description in grey under it when there is one | Rows are always newest first. Column headers can't be clicked to sort. No pages — all vendors load at once |
| Column Code | Table | Vendor Code in an outlined badge | Blank when there's no code |
| Column Type | Table | Coloured type badge (same colours as Overview) | |
| Column Category | Table | Grey badge in capitals, for example "RAW MATERIALS" | Blank when there's no category |
| Column Status | Table | Active (green) or Inactive (red), plus a yellow Preferred badge when flagged | Both are set in Add New Vendor and Edit Vendor |
| Column Contact | Table | Contact email, with the phone in grey under it | The phone only shows when an email is saved too — a vendor with a phone but no email shows an empty cell. Website and Primary Contact are never shown in the table |
| Column Created | Table | Date the vendor was added, for example "Sep 18, 2026" | Shown in your store's time zone |
| Clicking a row | Table row | Nothing happens | There's no vendor details view on the live page. (In the demo, clicking a row opens Vendor Details) |
| Pencil-and-square icon, tooltip Edit vendor | Each row, Actions column, 1st | Opens Edit Vendor, filled in with this vendor | Always available. A screen reader reads it as "Edit" and the vendor's name |
| Trash-can icon, tooltip Delete vendor | Each row, Actions column, 2nd | Opens Delete Vendor for this vendor | Only for the owner or a manager; hidden for staff, and while the page is still checking who you are. A screen reader reads it as "Delete" and the vendor's name |
Dialog: Add New Vendor
Opened by Add Vendor in the header or in the empty list. Two columns (one on a narrow screen). Pressing Enter does not submit, and nothing checks the format of the email, phone or website.
Fields:
| Field | Required | Default | Rules and error text |
|---|---|---|---|
| Name * (placeholder "Enter vendor name") | Yes | Empty | Create Vendor stays greyed out while it is empty. Spaces at the start and end are removed. A name of only spaces leaves the button active but fails with "Vendor name is required", shown in the dialog above the buttons. A name another vendor of your store already has (capitals and spacing aside, a switched-off vendor included, a deleted one not) is refused before anything is saved: "A vendor named "…" is already on your Vendors list. Use that one, or give this vendor a different name." (or, for a switched-off one, "…, switched off. Ask a manager to switch it back on in Inventory → Vendors instead of adding it again, or give this vendor a different name.") |
| Vendor Code (placeholder "Enter vendor code") | No | Empty | Your short code for the vendor. Shown as a badge in the table, searchable, and in the CSV. Not checked for duplicates. Not printed on purchase orders |
| Description (3-line box, placeholder "Enter vendor description") | No | Empty | Shown in grey under the name in the table. Searchable |
| Vendor Type * | Yes | Supplier | Supplier, Service, Contractor, Utility, Professional, Other. Always has a value |
| Category | No | No category | The box reads No category until you choose one. Then OFFICE SUPPLIES, EQUIPMENT, SERVICES, RAW MATERIALS, MAINTENANCE, TECHNOLOGY, CONSULTING, UTILITIES. Pick No category again to undo a choice |
| Tags (placeholder "Enter tags (comma-separated)") | No | Empty | Saved, but the live page only shows tags inside Edit Vendor. Not searchable, not exported |
| Contact Email (placeholder "Enter email") | No | Empty | Shown in the Contact column and exported. Printed on purchase orders |
| Contact Phone (placeholder "Enter phone number") | No | Empty | Shown under the email in the table (only when there's an email) and exported. Printed on purchase orders |
| Website (placeholder "Enter website URL") | No | Empty | Not in the table or the CSV. Printed on purchase orders |
| Primary Contact (placeholder "Enter primary contact name") | No | Empty | Your contact person's name. Not in the table or the CSV. Printed on purchase orders |
| Active (switch), "Inactive vendors stay on file but are left out of the vendor lists when you order." | No | On | Turn it off to create a vendor you keep on file but do not order from. For staff it is greyed out, on, with "New vendors start active. Only a manager can retire one." — so nobody creates a vendor they could not then switch on |
| Preferred (switch), "Shows a Preferred badge and counts on the Preferred Vendors card." | No | Off | Turn it on to give the vendor a Preferred badge in the list and count it on the Overview card |
Buttons:
| Control | Where | What it does | Notes |
|---|---|---|---|
| X (close) | Top-right corner | Closes without saving | Esc and clicking outside also close it — even while a save is running (the save carries on). What you typed is kept for next time |
| Cancel | Footer | Closes without saving | Greyed out while saving. The form is not cleared |
| Create Vendor (reads "Creating..." while saving) | Footer, right | Saves the vendor with the Active and Preferred switches as you set them. The dialog closes, the form clears and the list reloads | No confirmation message. Greyed out while Name is empty or while saving. On an error the dialog stays open and the reason appears above the buttons |
A vendor record can also hold a billing or shipping address and business terms (payment terms, credit limit, minimum order, lead time), but this dialog has no fields for them and the live page never shows them. A printed purchase order shows the vendor's address only when one was stored some other way.
Dialog: Edit Vendor
Opened by a row's pencil icon. Same fields, labels, placeholders and options as Add New Vendor, filled in from the vendor.
Fields:
| Field | Required | Default | Rules and error text |
|---|---|---|---|
| Name * | Yes | The vendor's name | Same rules as Add. Only spaces gives "Vendor name is required", shown in the dialog above the buttons |
| Vendor Code | No | Current code | Clearing the field removes the code |
| Description | No | Current description | Clearing it removes the description |
| Vendor Type * | Yes | Current type | |
| Category | No | The vendor's category, or No category when it has none | Change it to another category, or pick No category at the top of the list to take it off. Saving then clears it |
| Tags | No | Current tags | Clearing the field removes all tags |
| Contact Email, Contact Phone, Website, Primary Contact | No | Current values | Saved as a set: the contact details are replaced by whichever boxes are filled, so clearing one removes it. Clearing all four removes the contact details altogether |
| Active (switch) | No | The vendor's current setting | Owner or manager only: for staff it is greyed out, with "Only a manager can retire or reactivate a vendor." under it, and the rest of the form still saves — a staff member's save leaves the vendor's Active setting exactly as it is, even if a manager changed it after the page loaded. Turn it off to retire the vendor: it keeps its name on its old purchase orders — in the Orders list, its Vendor filter, Order Details and the Receive tab — and disappears from every vendor list that offers a choice — New Order, Edit Order, Import, and the Link Vendor lists in Add Product and the product window. In Edit Order on one of its own orders it is still offered, marked "(inactive)", so saving that order cannot move it to another vendor. Turn it back on to use it again |
| Preferred (switch) | No | The vendor's current setting | Adds or removes the Preferred badge and the count on the Overview card |
Buttons:
| Control | Where | What it does | Notes |
|---|---|---|---|
| X (close) | Top-right corner | Closes without saving | Esc and clicking outside also close it, even while saving |
| Cancel | Footer | Closes without saving | Greyed out while saving |
| Update Vendor (reads "Updating..." while saving) | Footer, right | Saves the changes, including the Active and Preferred switches, and clears any field you emptied. The dialog closes and the list reloads | No confirmation message. Greyed out while Name is empty or while saving. On an error the dialog stays open and the reason appears above the buttons |
Dialog: Delete Vendor
Opened by a row's trash icon. Body text: "Are you sure you want to delete …? The vendor will be deactivated and removed from your list, but existing purchase orders will keep its details." (the vendor's name in bold).
| Control | Where | What it does | Notes |
|---|---|---|---|
| X (close) | Top-right corner | Closes without deleting | Esc and clicking outside also close it |
| Cancel | Footer | Closes without deleting | Greyed out while deleting |
| Delete (red; reads "Deleting..." while working) | Footer, right | Deactivates the vendor and removes it straight away from this list, the Overview counts, the Dashboard Vendors card, the vendor dropdowns in Procurement (New Order, Edit Order and Import) and the Link Vendor lists in Add Product and the product window | No confirmation message and no undo in the app. Not blocked by purchase orders or by products linked to the vendor. Afterwards existing orders show the vendor's name marked "(removed)" on the Procurement order list, its Vendor filter, Order Details and the Receive tab. Printed POs still show the plain name. On an error the dialog stays open and the reason appears above the buttons. To keep a vendor on file instead, turn Active off in Edit Vendor |
Sub-pages and other screens
| Where | What it has to do with vendors | Notes |
|---|---|---|
Demo (/inventory/vendors/demo) | Read-only copy with sample vendors and a guided tour | See the Demo mode panel |
| Procurement — New Order, Edit Order, Import | Vendor dropdowns list your active vendors that haven't been deleted | Deleted vendors disappear from these lists of choices. On the Orders list, its Vendor filter and Order Details they still read by name, marked "(removed)"; a retired one reads plainly. Edit Order also offers the order's own vendor, marked "(inactive)", when that vendor has been retired |
| Procurement Receive tab | Shows each order's vendor name | A deleted vendor reads "Name (removed)". An order with no vendor record left at all reads "Vendor no longer on file", and one filed without a vendor reads "No vendor on this order" |
| Procurement Import tab — New Vendor (top of the vendor dropdown) | Creates a vendor from Procurement | Saved as Supplier and Active. Gets the tag "import" when you give no tags |
| Procurement Import tab — "Default Vendor" | When your store has no vendors yet, the vendor dropdown starts on "Default Vendor" and the import creates a vendor with that name | Saved as Supplier and Active, tagged "import". The import's result panel says it was created. Rename it here with the pencil icon |
| Catalog → Products — Link Vendor, New Vendor | Creating a new vendor while adding or editing a product adds it here, and both Link Vendor lists read this page's vendors | Saved as Supplier and Active, with only a name. Vendors you delete or switch off here stop being offered there. If that list cannot be read, the product form says so, offers nothing and shows a Try again button rather than inviting a new name, so you don't end up with two vendors of the same name. Typing the name of a vendor you already have, whatever its capitals or spacing, links that vendor rather than adding a second one. Typing the name of one you switched off is refused with "A vendor named "…" is already on your Vendors list, switched off. …": switch it back on here, then link it |
| Printed purchase order | Shows the vendor's name, stored address, primary contact, phone, email and website | Vendor Code isn't printed |
| Dashboard — Organized level, Vendors card | Shows how many active vendors you have and opens this page | |
| Finance → Expenses | Not linked. An expense's Vendor is typed in by hand |
Messages you may see
A successful create, edit or delete just closes the dialog and updates the list, with no message. Anything a dialog refuses is shown inside that dialog, just above its buttons. The red banner at the top of the page is only about loading the list. Export is the one control that uses a pop-up.
| Message | When it appears | What to do |
|---|---|---|
| "Your sign-in isn't linked to a store, so your vendors can't be loaded. Sign out and back in. If it keeps happening, contact UpChannels support." | Red banner when the page opens and can't work out which store you belong to | Sign out and back in. If it keeps happening, contact UpChannels support |
| "Organization not set." | Red banner after Refresh or Retry when the page never worked out your store | Reload the browser page — Retry won't fix it |
| "Organization not set. Please reload the page." | Create Vendor clicked when the page never worked out your store | Reload the browser page |
| "A vendor named "…" is already on your Vendors list. Use that one, or give this vendor a different name." | Create Vendor, or Update Vendor after a rename, with a name another vendor of your store has (capitals and spacing aside) | Use the vendor you have, or type a different name. Nothing was saved |
| "A vendor named "…" is already on your Vendors list, switched off. Ask a manager to switch it back on in Inventory → Vendors instead of adding it again, or give this vendor a different name." | The same, when that vendor is switched off (retired) | A manager opens Edit Vendor on it and turns Active on. Nothing was saved |
| "Failed to initialize vendor management." | Rare fallback when the page fails to open for an unexpected reason | Reload the page |
| A technical error from the server, or "An unexpected error occurred while loading vendors" | The vendor list failed to load. If this happens as the page opens, the list shows "No vendors found" underneath; after a failed Refresh the old list stays | Click Retry. If it persists, check your connection |
| "Vendor name is required" | Create Vendor or Update Vendor clicked with a Name of only spaces. Shown in the dialog, above the buttons | Type a real name and save again |
| A technical error from the server, or "An unexpected error occurred while creating the vendor" | Create failed. The dialog stays open with the reason above the buttons | Read it and try again |
| A technical error from the server, or "An unexpected error occurred while updating the vendor" | Edit failed. The dialog stays open with the reason above the buttons | As above |
| A technical error from the server, or "An unexpected error occurred while deleting the vendor" | Delete failed. The dialog stays open with the reason above the buttons | As above |
| "Only a manager can retire, reactivate or remove a vendor. Ask a manager or the owner to do it." | Update Vendor with the Active switch changed, or Delete, by someone below manager — normally only when your role changed while the page was open, since staff don't get either control | Ask the owner or a manager. Nothing was saved; for an edit, turn Active back to how it was and the rest of the change saves |
| Pop-up "Nothing to export" / "No vendors to export." | Export with an empty list. In practice you won't see it, because Export is greyed out when the list is empty | Clear the filters or add vendors |
| "Loading vendors..." | Vendor List while the list loads | Wait |
| "No vendors found" / "Get started by creating your first vendor." | Your store has no vendors (or the list failed to load as the page opened — check for a red banner) | Click Add Vendor |
| "No vendors found" / "Try adjusting your search or filter criteria." | The search or filters hide every vendor | Click Reset |
| "Creating..." / "Updating..." / "Deleting..." | Button text while saving | Wait |
| Badge Active (green) / Inactive (red) | Status column | Inactive vendors are left out of Procurement vendor lists |
| Badge Preferred (yellow) | Status column, next to the status | Set by the Preferred switch in Add New Vendor or Edit Vendor. It marks the vendor and counts on the Overview card; nothing else in the app uses it |
| Type badges Supplier / Service / Contractor / Utility / Professional / Other | Type column and Overview | Blue / green / purple / orange / indigo / grey |
| "Demo mode — vendors list is populated with sample data. All actions are disabled." | Banner at the top of the demo | Click Exit Demo Mode to go back |
Who can use what
| Who | What they can do |
|---|---|
| Anyone in your store who can open the page (owner, manager or staff) | View, search, filter, export, add, edit the details (name, code, type, category, tags, contact details) and mark Preferred |
| The owner and managers (the Owner switch, or the Manager role) | Also retire or reactivate a vendor (the Active switch) and delete one. For staff the switch is greyed out and the trash icon is hidden, and the change is refused however it is sent |
| Plans, add-ons and feature switches | None needed. Vendors is on every plan, including the free trial |
| Everyone | The Demo button and the demo page |
The page never permanently erases a vendor — Delete only deactivates and hides it.
Demo mode (/inventory/vendors/demo)
- Open it: click Demo (Play icon, amber) in the page header, right.
- Header: "Vendors — Demo", subtitle "Sample vendor list populated with demo data. All actions are disabled."
- Banner: "Demo mode — vendors list is populated with sample data. All actions are disabled." (eye icon), with Take a Tour (question-mark icon) at its right end.
- Sample data: 8 sample vendors (9 for appliance retail) chosen to match your store's industry — appliance, furniture, electronics, liquidation or apparel retail, or HVAC, plumbing or appliance services. Any other industry gets the electronics retail set. Each set has one Inactive vendor and two Preferred vendors, and most have business terms. None of your real vendors are shown. Created dates are random within the last 180 days, change every time the page loads, and use your browser's date format.
- Disabled: Refresh, Export and Add Vendor (greyed out); the search box, Type and Status filters and Reset; the row pencil and trash icons.
- Still works: the Overview and Vendor List tabs, and clicking a row, which opens a read-only Vendor Details window.
- Tour: starts automatically the first time the demo opens. Take a Tour restarts it from step 1. The card shows progress dots, the step title and text, and "N of 6". Back (from step 2 on) goes back, Skip closes, Next moves on, and on the last step Got it! closes. Keyboard: Esc closes, Right arrow or Enter goes to the next step (or closes on the last), Left arrow goes back. Clicking the dark background closes the tour. Steps on the other tab switch the page to that tab first. If a step's target doesn't appear within about 3 seconds, the tour moves on.
- Leave: Exit Demo Mode (arrow icon, header right) returns to the live Vendors page.
| # | Tab | Tour step | What it points at |
|---|---|---|---|
| 1 | Overview | Tab Navigation | The tab bar. "Switch between the Overview tab for high-level vendor statistics and the Vendor List tab for the full searchable table of all your vendors. This tour walks through each one." |
| 2 | Overview | Quick Actions | The Refresh, Export and Add Vendor buttons (greyed out in the demo). "Refresh your vendor data, export your vendor list, or add a new vendor with the "Add Vendor" button. These actions integrate directly with your backend." |
| 3 | Overview | Vendor Statistics | The four stat cards. "At-a-glance metrics showing total vendors, active vendors, preferred partners, and supplier count — all calculated from your live vendor data." |
| 4 | Overview | Vendor Type Distribution | The type distribution card. "Visual breakdown of your vendors by type — Supplier, Service, Contractor, Utility, and Professional. Quickly see the composition of your vendor network." (The card also shows Other, which the text leaves out) |
| 5 | Vendor List | Search & Filters | The search box and the Type and Status filters (greyed out in the demo). "Search vendors by name, code, or description. Filter by vendor type (Supplier, Service, etc.) and status (Active/Inactive) to quickly find what you need." |
| 6 | Vendor List | Vendor Table | The vendor table. "Your full vendor list with name, code, type, category, status, contact details and the buttons at the end of each row. The rows themselves are not links: use Edit on a row to see and change everything about a vendor, business terms included." |
Vendor Details (demo only) — opened by clicking a row in the demo table:
| Control | Where | What it does | Notes |
|---|---|---|---|
| Title "Vendor Details" | Window header | Only in the demo — the live page has no details window | |
| Name, Code, Type, Category, Status, Tags | Top grid | Vendor name; code badge; type badge; category badge; Active or Inactive badge plus Preferred; each tag as a small chip | Code, Category and Tags only when the sample vendor has them |
| Description | Below the grid | Description text | Only when set |
| Contact Info | Section | Lines "Contact: …", "Email: …", "Phone: …", "Web: …" | Each line only when set |
| Business Terms | Section | Lines "Payment: …", "Credit Limit: $…", "Min Order: $…", "Lead Time: …" | Credit Limit and Min Order only when above 0. The live page has no way to view or enter business terms |
| Edit (pencil icon) / Delete (trash icon, red) | Footer | Nothing — both greyed out | |
| X (close) | Top-right corner | Closes the window | Esc and clicking outside also close it |
Differences from the live page:
- Exit Demo Mode replaces the Demo button, and Refresh, Export and Add Vendor are greyed out.
- Search, filters and Reset are greyed out, even though tour step 5 describes using them.
- Clicking a row opens Vendor Details (with tags and business terms). On the live page a row click does nothing.
- The row pencil and trash icons do nothing, and there are no Add, Edit or Delete dialogs.
- No loading, empty or error states.
- Created dates are random and use your browser's date format, not your store's time zone.
- The live page has no tour.
See Demo mode for how demos work across the app.
Common questions
How do I mark a vendor as Preferred or Inactive? Open Add Vendor or the pencil icon and use the two switches at the bottom of the form. Active is for the owner or a manager; anyone can set Preferred. Active starts on: turn it off to retire a vendor — it stays on file and on its old purchase orders, and disappears from the vendor lists that offer a choice — New Order, Edit Order, Import, and Link Vendor in Add Product and the product window. Preferred starts off: turn it on for a vendor's Preferred badge and the Preferred Vendors card. Both can be changed back at any time, and neither deletes anything.
Why can't I switch a vendor off or delete it? Retiring, reactivating and deleting a vendor need the owner or a manager, because a retired or deleted vendor disappears from the lists everyone orders from. You can still correct its name, phone number and other details. Ask a manager to change its Active switch or delete it.
Can I undo a vendor delete? Not in the app. Delete deactivates the vendor and hides it from this page and from Procurement. If you need the vendor again, add it again with Add Vendor. Purchase orders that used the old vendor keep their link to it.
What does a purchase order show once I delete its vendor? The vendor's name, followed by (removed) — on the Procurement list, its Vendor filter, Order Details and the Receive tab. That is what the delete dialog promises: the vendor goes from the lists you choose from, and the orders it already has keep its details. The printed purchase order still shows the plain name. Retiring a vendor with the Active switch shows the plain name too. The only thing that reads "Vendor no longer on file" is an order with no vendor record left at all. An order filed without a vendor reads "No vendor on this order" — nothing was removed there.
Where did a vendor called "Default Vendor" come from? Someone imported stock on the Procurement Import tab while your store had no vendors. The import creates "Default Vendor" (Supplier, Active) so the order has a vendor, and its result panel says so. Open the pencil icon to rename it and fill in its details, or pick a real vendor on your next import.
How do I take the Vendor Code (or Description, or Category) off a vendor? Empty the box in Edit Vendor and press Update Vendor — the field is cleared. Category is a list rather than a box, so pick No category at the top of it. The contact details work the same way: clearing one box removes it, and clearing all four removes the contact details altogether.
Why is the phone number missing from the Contact column? The table only shows the phone under an email. Add a Contact Email, or open the pencil icon to see the phone. The phone is still in the CSV export and on printed purchase orders.
What's in the CSV export? Name, Code, Type, Category, Status, Preferred, Email, Phone and Created — for the vendors currently shown in Vendor List after your search and filters. Description, Tags, Website and Primary Contact aren't included. Click Reset first to export every vendor.
Where do the vendor's details show up on a purchase order? A printed purchase order shows the vendor's name, stored address, primary contact, phone, email and website. The vendor code isn't printed.
My Save seemed to do nothing and the dialog is still open. What happened? The save failed, and the reason is in the dialog itself, just above the buttons. Fix the problem and press the button again. The message clears whenever you close the dialog or open another one, so it is always about the save you just tried. The red banner at the top of the page is a different thing — it only reports a vendor list that would not load, which is what its Retry button repeats.