Expenses
Expense Management (Finance → Expenses) records every business cost across three tabs — Expenses Records, Create Expense, and Bulk Import.
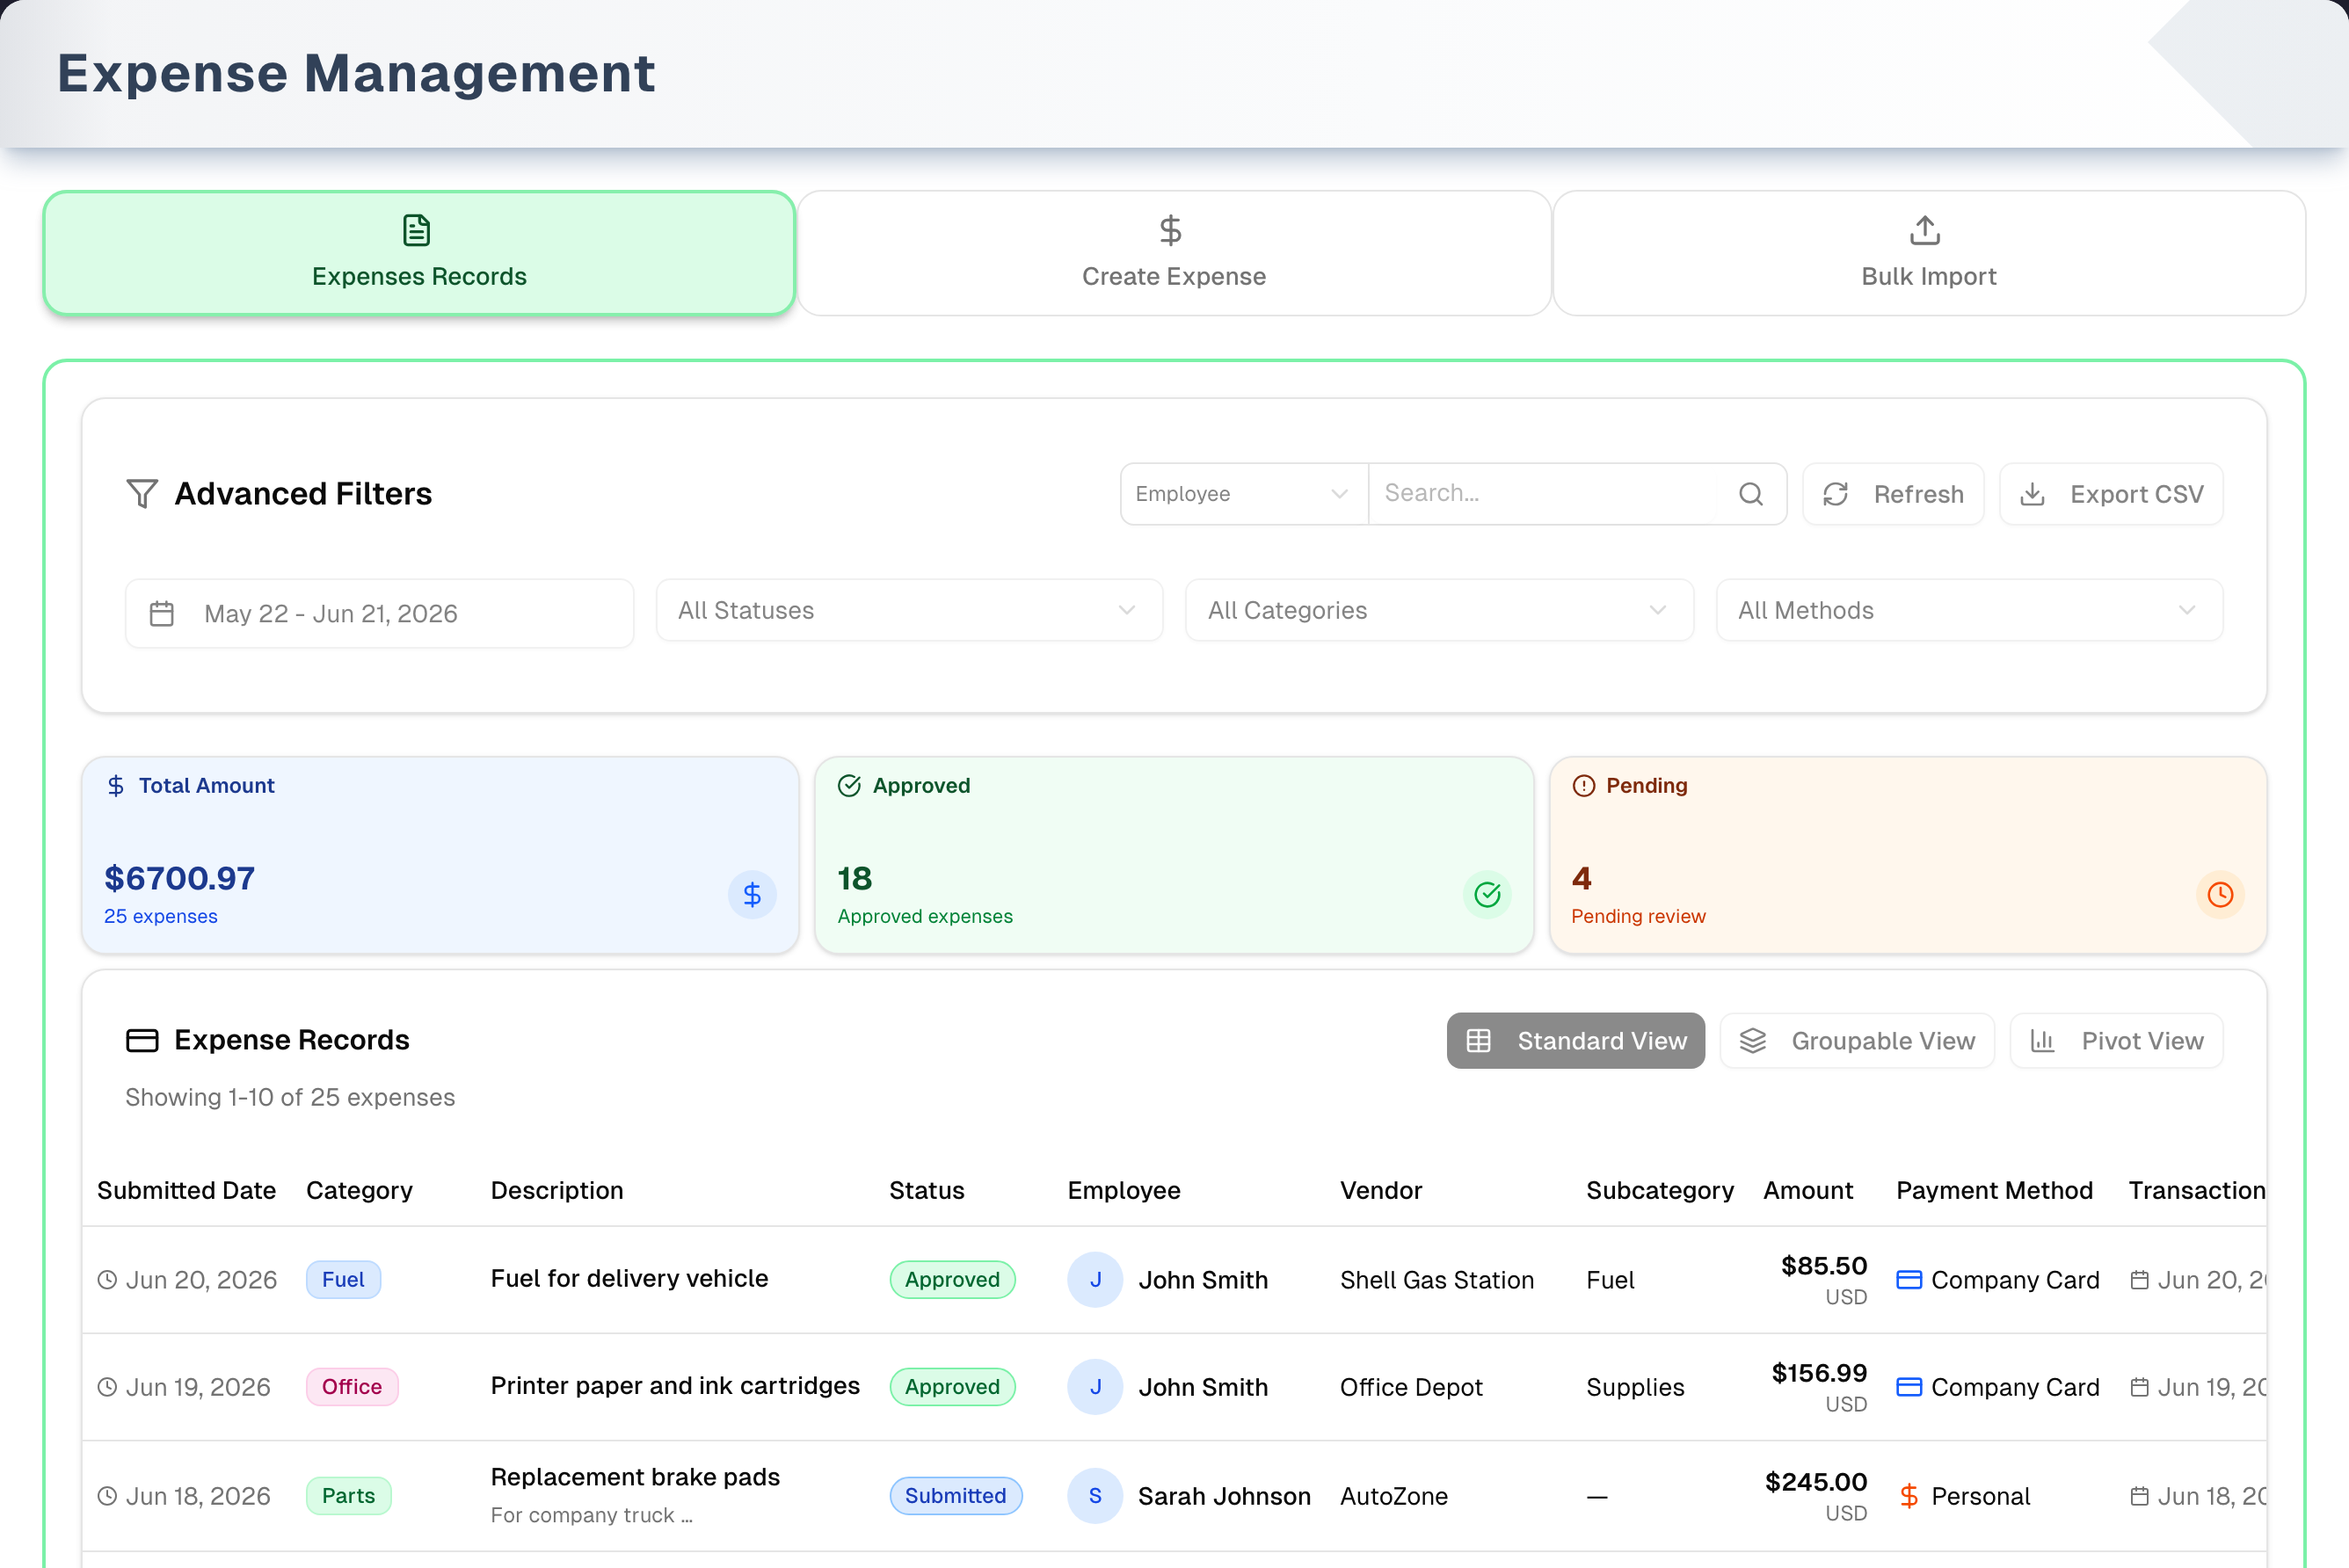
Overview
Enter expenses one at a time or in bulk, attach receipts, and have an owner or manager approve or reject them. Every new expense starts as Submitted and counts as spend straight away — in the Total Amount card, the Profit & Loss report and the ledger — until someone rejects or deletes it. Reimbursed is a status you set by hand to note that the employee was paid back; UpChannels does not make that payment.
- Plans: the page needs Pro or a trial. On Basic it is greyed out behind an upgrade card and the sidebar shows a small Pro tag next to Expenses. Groupable View, Pivot View and Export CSV need Premium or a trial; on Pro they show an upgrade card instead.
- Approvals: only the store owner (the Owner switch or the Owner role) and Managers (set in Settings → Team) can approve, reject or mark an expense Reimbursed — with Approve, Reject, the row Status dropdown or the Status field in Edit. Nobody can review their own expense, owners included; it needs a different owner or manager. The one exception is a store that has never had anybody else who could approve — a genuine one-person shop — where you approve your own claim and the expense is marked self-approved. The one status change anybody else can make on their own expense is sending it back from Rejected to Submitted after fixing it. UpChannels records who approved and when.
- After approval: once an expense is Approved or Reimbursed, only a different owner or manager can change its amount, date, category, payment method or Reimbursable setting. The employee can still edit the description, vendor, notes and receipt, and can untick Reimbursable until the expense is marked Reimbursed.
- From the bank feed: an expense made with Record to books in Bank Reconciliation is saved as Approved straight away, in the name of the person who records it and not reimbursable — it skips review, which is why only an owner or manager can record one.
- Demo: the amber Demo button in the header opens a read-only copy with sample data and an 11-step guided tour. It works on every plan.
There are no recurring expenses, no drafts and no custom categories: the category list is fixed.
Tabs in detail
Expenses Records
- Search: pick a field (Employee, Description, Vendor, Notes, Category, Project, Approver or Reviewer), type at least 2 characters, then press Enter or click the magnifier. Searching Category matches the name you see (Fuel, Office Supplies) as well as the short code (gas, supplies).
- Filters: date range, Status, Category, Payment Method and Tax deductible. The date range is required, starts at the last 30 days, can span at most 13 months, and filters on the Transaction Date (the day of the purchase) — not the Submitted Date in the first column.
- Stat cards: Total Amount (dollar total of everything except Rejected), Approved (a count) and Pending (a count of Submitted expenses). All three follow the filters.
- View modes: Standard (a table, 10 per page, newest first), Groupable (Premium) and Pivot (Premium).
- Status column: the owner and Managers get a dropdown that saves the new status the moment they pick it — on other people's expenses. Their own expenses, and everything for everyone else, show plain text.
- Receipt column: View opens the receipt, Missing means one is required but not attached, N/A means none is needed.
- Details dialog (click a row): every field, Edit, receipt preview and replace, Approve/Reject (the owner and Managers, on other people's Submitted expenses only) and Delete (the owner and Managers).
- Export CSV (Premium): downloads every expense that matches the filters, not just the page you are on.
Create Expense
- Fields: Date (today by default), Amount, Category, Payment Method (Credit Card by default), Vendor and Description. Everything except Vendor is required — the same rule Bulk Import and the edit dialog use.
- Tax deductible starts ticked; untick it for spending the business can't deduct. Reimbursable starts unticked; tick it only when you paid with your own money and the business owes it back to you. Only reimbursable expenses count toward Pending Reimbursements on the Expenses Report.
- Categories: Fuel, Parts, Meals, Tools, Travel, Office Supplies, Vehicle Maintenance, Training & Education, Payroll & Wages, Other.
- Payroll & Wages is for wages paid outside a pay run. It lands on the Payroll & Wages line of the Profit & Loss report, next to anything a finalized pay run posted there. A pay run never creates an expense, so the two never double count. Bulk Import takes this category as PAYROLL, and reads "Wages", "Salary" and "Payroll expense" as that category too.
- Receipt: tick I have a receipt for this expense, then Choose File (PNG, JPG or PDF, up to 10 MB). A receipt is required over $25 — $25.00 exactly doesn't need one. The file uploads when you submit.
- Submit Expense saves it as Submitted with you as the employee, then clears the form (the two checkboxes go back to Tax deductible ticked, Reimbursable unticked). You stay on the tab.
Bulk Import
- Download a template: Excel (.xlsx) — date cells, dropdowns for Category, Payment Method, Tax Deductible and Reimbursable, and a "How to fill" sheet — or CSV. Both hold 6 sample rows: delete them before you upload, or they are imported as real expenses.
- Required columns: Date (any date cell in Excel; YYYY-MM-DD in a CSV), Amount (up to $10,000 per row), Category, Description. Optional: Payment Method (blank means Credit Card), Vendor, Notes, Tax Deductible and Reimbursable (Yes or No; blank means Tax Deductible Yes and Reimbursable No). A file without those two columns imports with the same defaults.
- Max 500 rows / 10 MB; upload an Excel (.xlsx) or CSV file. Old .xls files are refused. Category and payment-method spellings are normalized (e.g. "Fuel" → GAS, "Wages" → PAYROLL), and a phrase is read a whole word at a time, so "Truck repair" is Maintenance and "Air filter" is Parts. A category the importer can't place becomes OTHER — check the preview before you import.
- A row with a blank Date, Amount, Category or Description is shown in the preview in red, marked Error, and left out of the import. It keeps its own line number from your file, so you can go and fix it.
- Two identical rows in one file are two expenses: a repeat charge (two $12 parking tickets on the same day) is imported as often as it is listed. Only a row an earlier attempt in this visit already created is left out, and Import Results counts those under Already Imported and lists them by row.
- Import Results shows Total Records, Successfully Imported, Already Imported and Failed, lists each error, and offers Download Error Report. Rows counted under Already Imported are not part of Successfully Imported.
- Imported expenses are saved as Submitted with no receipt, so every imported row over $25 shows Missing in the Receipt column.
Step by step: record an expense
- Open Create Expense; enter Date, Amount, Category and Payment Method.
- Add a Vendor and Description. Over $25, tick I have a receipt for this expense and choose the file.
- Click Submit Expense. The expense appears on Expenses Records as Submitted, waiting for the owner or a manager.
Step by step: approve or reject
- On Expenses Records, click a Submitted expense to open its details.
- Click Approve, or click Reject, type an optional reason and confirm with Reject expense (Cancel leaves the expense alone). The reason then shows on the expense, so the person who claimed it can see why. You can also pick the status in the row's Status dropdown, or in the Status field after clicking Edit. None of these are offered on your own expense.
- The dialog shows the new status at once, and Approve and Reject go with it. The table behind updates too.
Step by step: send a rejected expense back
- Open your rejected expense on Expenses Records and click Edit.
- Fix what was wrong — for example Replace Receipt → Choose File for a missing receipt.
- Set Status to Submitted and click Save Changes. It waits for review again and counts as spend again. Only the person whose expense it is can do this.
Step by step: bulk import
- Open Bulk Import, click Download Template and pick Excel or CSV. Delete the sample rows and fill in yours.
- Click Choose File and pick your file. Review the preview: rows marked Error will be skipped.
- Click Import … Valid Expenses under the preview (or Import … Expenses in the upload card — both name the number that will actually be created). Valid rows are created. Fix any failed rows and upload the file again without leaving the tab — the rows that already went in are left out, and listed under Already Imported. If choosing the same file does nothing, save the fixed copy under a new name and choose that.
Tips & best practices
- Snap receipts at purchase — expenses over $25 need one to submit.
- Delete the template's sample rows before uploading.
- Default date range is the last 30 days — widen it (up to 13 months) to find older expenses. It filters on the purchase date.
- Stay on the Bulk Import tab while you fix and re-upload a file. Leaving the tab or reloading forgets which rows were already imported.
- Nobody approves their own expense: an owner's or manager's own expense needs a different owner or manager. In a store that has never had anybody else who could approve, the owner approves their own and the expense is marked self-approved. Where the store has had somebody else — a manager who is switched off today, say — your own expenses stay Submitted until they are switched back on; they still count as spend, and Create Expense says so before you file one. See "I'm the only owner" under Common questions.
Troubleshooting
| Issue | Fix |
|---|---|
| Receipt upload fails | Use a PNG, JPG or PDF under 10 MB; refresh and retry |
| Import shows errors | Fix the listed rows (date format, an amount above 0 and up to $10,000) and re-upload |
| The preview shows more rows than will be imported | The extra ones are red, marked Error — usually a blank Date, Amount, Category or Description. Fill those cells and upload the file again |
| Filters hide expenses | Check the date range (purchase date, up to 13 months), Status, Category, Payment Method and the search box |
| A category search finds nothing | Check the spelling — Category matches the name in the list (Fuel, Office Supplies) or the code (gas, supplies), and needs at least 2 characters |
| No Approve or Reject buttons | They appear only on Submitted expenses, only for the store owner or a Manager, and never on their own expense. A new role shows here after the person signs in again (or within about an hour) |
| No Status dropdown on my own expense | Nobody reviews their own expense. Ask a different owner or manager. If it was rejected, you can send it back: Edit → Status → Submitted |
| "Update Failed" when saving an approved expense | Once an expense is Approved or Reimbursed, only a different owner or manager can change its amount, date, category, payment method or Reimbursable setting. Those fields are greyed out for everyone else, except that the employee can untick Reimbursable while it is Approved |
| "Delete Failed — Deleting an expense is limited to managers and the store owner." | Only the store owner or a Manager can delete an expense. Ask one of them |
| "Delete Failed — That expense is not on this store any more" | Somebody else deleted it first. Reload the page |
| Groupable View, Pivot View or Export CSV shows "Unlock Premium Features" | These need Premium or a trial |
| Imported expense shows Missing receipt | Imports can't carry receipts. Open the expense, click Edit, Replace Receipt, then Save Changes |
| "An expense needs an amount greater than zero.", "An expense needs a category." or "An expense's date is years in the future." | The store's own check, behind the form's. You will normally see the form's wording first; this one appears if a save reaches the store another way. Fix the amount, pick a category, or correct the year |
What's next
- Analyze spend: Reports → Expenses Report
- See it in profitability: Reports → Profit & Loss
- Match expenses to your bank feed: Finance → Bank Reconciliation
- Pay your team from their hours instead: Team → Workforce
- Track supplier costs: Inventory → Vendors
Detailed reference
Every button, icon, field and message on this page, for when you need the exact detail. Each panel starts closed — open the one you need.
Page header and toolbar
| Control | Where | What it does | Notes |
|---|---|---|---|
| Sidebar Finance → Expenses | Sidebar | Opens this page on Expenses Records | On Basic, a small Pro tag shows beside it. No tag during a trial |
| Shortcuts cards Expenses Records, New Expense, Import Expense Records | Shortcuts page, Finance group | Open this page on Expenses Records, Create Expense or Bulk Import | All three are gone from Shortcuts for anyone an owner has hidden Expenses from, along with the sidebar item |
| Figure cards Expenses (MTD) and Pending approvals, and the Expenses quick link | Dashboard, level 05 Sustainable | Open this page | Pending approvals counts Submitted expenses |
| Title Expense Management and the line "Track and manage your business expenses efficiently." | Header | Page heading | Always shown |
| Demo (Play icon, amber) | Header, right | Opens the read-only sample copy with a guided tour | Works on every plan, even while the page is locked. See the Demo mode panel and Demo mode |
| Tab Expenses Records (green) | Tab bar, first | The expense list, filters, totals and views | Opens by default |
| Tab Create Expense (blue) | Tab bar, second | The new-expense form | — |
| Tab Bulk Import (purple) | Tab bar, third | The Excel or CSV importer | — |
| Tab link in the web address | Address bar | /finance/expenses?tab=expenses-records, ?tab=create-expense or ?tab=import-expenses opens that tab | Read on first load only; any other value opens Expenses Records. Switching tabs updates the address |
| Leaving a tab | Tab bar | The tab you leave is reset | You lose its filters and page number, a half-filled form, or a loaded import file with its preview and its memory of rows already imported |
| Upgrade card Unlock Pro & Premium Features — "SMS, insights, finance tools & more" | Over all three tabs | Greys out the tabs (showing sample records) so nothing underneath can be clicked | Basic plan with no trial. Hidden while the plan is loading, during a trial, and when the plan can't be determined. See the Upgrade prompts panel |
Tab: Expenses Records — search, filters, totals and views
| Control | Where | What it does | Notes |
|---|---|---|---|
| Spinner | Top of the tab | Shows while the list loads | — |
| Card Advanced Filters (Filter icon) | Top card | Holds search, Refresh, Export CSV and the filters | — |
| Search field picker (shows Employee until you change it) | Search box, left | Chooses what the search matches: Employee (default), Description, Vendor, Notes, Category, Project, Approver, Reviewer | Changing the field alone doesn't search again — press Enter or the magnifier. Category matches both the name you see (Fuel, Office Supplies) and the stored code (gas, supplies), so either spelling finds the row; an older category that has no name in the list still matches its code. Project isn't set anywhere on this page, so it only finds older records. Approver and Reviewer match the name of the person who approved or reviewed the expense; pasting their ID code from an export finds it too |
| Search box (placeholder "Search...") | Search box, middle | Press Enter to search | Case-insensitive "contains" match. Needs at least 2 characters. Empty the box and press Enter to clear the search. Goes back to page 1 |
| Magnifier (Search icon) | Search box, right | Runs the search | Greyed out while exactly 1 character is typed |
| Refresh (circular arrows, spin while loading) | Card header | Reloads the list, the three stat cards, and the Groupable or Pivot data if that view is open | Greyed out while loading |
| Export CSV (Download icon) | Card header | Premium or trial: downloads every expense that matches the filters (all pages) as expenses-export-YYYY-MM-DD-HHmm.csv. Pro: opens Unlock Premium Features instead | Greyed out while loading. Columns: Description, Employee, Category (as a code such as GAS), Amount, Currency, Payment Method, Transaction Date, Status, Vendor, Project Code, Location, Mileage, Receipt, Receipt Number, Reimbursable, Tax Deductible, Submitted Date, Approved By, Approved Date, Reviewed By, Review Date, Review Notes, Rejection Reason, Notes, Created Date, Updated Date. Times are in your store's time zone. Approved By and Reviewed By give the reviewer's name. A cell starting with = + - or @ gets a leading apostrophe so Excel can't run it as a formula. The rejection reason also shows on the expense itself, under the status pill |
| Date range button (Calendar icon, e.g. "Aug 19 - Sep 18, 2026") | Filter row, first | Opens a two-month calendar: click a start day, then an end day | Starts at the last 30 days. Required — it can't be cleared. An end date more than 13 months after the start is pulled back to 13 months. With only a start picked, the button reads "Sep 01, 2026 - ..." and the list shows everything from that day on. Filters on Transaction Date. Caption under the calendar: "Required · up to 13 months" |
| Status filter (placeholder "All statuses") | Filter row, second | All Statuses, Submitted, Approved, Rejected, Reimbursed | Goes back to page 1 |
| Category filter (placeholder "All categories") | Filter row, third | All Categories, then Fuel, Parts, Meals, Tools, Travel, Office Supplies, Vehicle Maintenance, Training & Education, Payroll & Wages, Other | Older categories found in the loaded expenses (for example OFFICE) are added at the end, shown by their code. Goes back to page 1 |
| Payment Method filter (placeholder "All Payment Methods") | Filter row, fourth | All Methods, Cash, Credit Card, Debit Card, Check, Bank Transfer, Digital Wallet, Other | Goes back to page 1 |
| Tax deductible filter (placeholder "Tax deductible: All") | Filter row, fifth | Tax deductible: All (the default), Tax deductible, Not tax deductible | Narrows the list, the three stat cards and Export CSV together. Goes back to page 1. There are still no amount, reimbursable, receipt or mileage filters |
| Card Total Amount (dollar sign) | Stat cards, first | Dollar total, with "… expenses" underneath | Counts Submitted, Approved and Reimbursed. Rejected expenses are left out of both the total and the count. When the totals can't be read it shows "—" and "Totals unavailable — click Refresh" rather than $0.00 |
| Card Approved (check circle) | Stat cards, second | Count, with "Approved expenses" underneath | A count, not dollars. Reimbursed expenses are not included. Shows "—" when the totals can't be read |
| Card Pending (alert / clock icon) | Stat cards, third | Count, with "Pending review" underneath | Counts Submitted expenses. Shows "—" when the totals can't be read |
| Card Expense Records (card icon) | Records card title | Holds the view switch and the list | — |
| Standard View (table icon) | Records card header, right | The paged table (see the next panel) | Default. Highlighted while active |
| Groupable View (layers icon) | Records card header, right | Groups the expenses by one or more columns, with subtotals | Premium or trial. On Pro: sample data under Unlock Premium Features |
| Pivot View (bar-chart icon) | Records card header, right | A cross-tab table | Premium or trial. On Pro: sample data under Unlock Premium Features |
| "Showing 1-10 of … expenses" | Under the view buttons | The range on this page | Standard View with at least one result |
Tab: Expenses Records — Standard View table
No column can be sorted. Rows are ordered by when they were created, newest first.
| Control | Where | What it does | Notes |
|---|---|---|---|
| Row click (or Tab to the row and press Enter or Space) | Any row | Opens Expense Details | — |
| Submitted Date (clock icon) | Column 1 | When the expense was submitted, in your store's time zone ("—" if none) | Not the purchase date |
| Category | Column 2 | Colored badge with the category name | Older categories show their code |
| Description | Column 3 | The description, with the notes underneath after a small note icon (cut short) | — |
| Status dropdown | Column 4 | Pending Approval (Submitted), Approved, Rejected, Reimbursed. Picking one saves at once: "Updated — Status changed to …." (the message uses Submitted for Pending Approval) | The store owner and Managers only, on other people's expenses. Every change records who made it and when. Approved also records you as the approver and clears any rejection reason. Reimbursed keeps the original approver (or records you, if it skipped Approved). Rejected — with no reason from here — and Pending Approval clear the approval |
| Status text | Column 4 | Grey text: Submitted, Approved, Rejected or Reimbursed | Everyone else, and the owner and Managers on their own expenses |
| Employee | Column 5 | Initial avatar and name ("Unknown" and "?" if blank) | The name comes from the store's people list, so renaming somebody in Settings → Team changes it here too, on old expenses as well as new ones. Someone who has left, or a claim brought in from elsewhere, keeps the name that was stored with it |
| Vendor | Column 6 | Shop icon and vendor, or "N/A" | — |
| Subcategory | Column 7 | Text, or "—" | Only settable in the edit dialog |
| Amount | Column 8 | "$0.00" with the currency (USD) underneath | — |
| Payment Method | Column 9 | Icon and method name | — |
| Bank-verified icon (bank building in a green circle) | Column 9, after the method | Tooltip: "Bank-verified — matched to a bank transaction during reconciliation" | Only when the bank feeds add-on is on and the expense is part of an automatic or confirmed match in Bank Reconciliation. Suggested matches don't count |
| Transaction Date (calendar icon) | Column 10 | The purchase date, e.g. "Sep 3, 2026", exactly as entered | This is the date the filters use |
| View badge (receipt icon, green) | Column 11 | Opens the receipt in a new browser tab | The link stops working after 5 minutes; click View again for a fresh one. Clicking it doesn't open the details. If the link can't be made, nothing happens |
| Missing badge (red) | Column 11 | Status only | Receipt Required is on and no receipt file is attached. New expenses over $25 have Receipt Required on, so every imported row over $25 shows Missing |
| N/A badge (grey) | Column 11 | Status only | No receipt, and none required |
| Previous page (left arrow) | Under the table, left | Goes back one page | Greyed out on page 1. The page controls show only with more than 10 results |
| Page numbers (1 2 3 … last) | Under the table | Jumps to that page | Up to 5 numbers with "..." gaps. Current page highlighted |
| Next page (right arrow) | Under the table | Goes forward one page | Greyed out on the last page |
| "Page … of …" | Under the table, right | Where you are | — |
| Empty state "No expenses found" / "Create your first expense to get started" | Records card | Nothing matches the filters | Only when the list really came back empty. Anything that failed — the list itself, or reading your account when the page opened — shows "Couldn't load your expenses" instead |
Statuses
| Status | Meaning |
|---|---|
| Submitted (blue; Pending Approval in the owner/manager dropdown and in Groupable View) | Waiting for review. Already counted as spend in Total Amount, the Profit & Loss report and the ledger |
| Approved (green) | Reviewed and accepted |
| Rejected (red) | Not accepted. Taken out of spend totals and the ledger |
| Reimbursed (purple; grey in the details dialog) | Marked as paid back to the employee. A status only — no payment is made |
Tab: Expenses Records — Groupable View (Premium)
Works on the same filtered expenses as the page (all pages), then applies its own date range on top.
| Control | Where | What it does | Notes |
|---|---|---|---|
| Card Row Grouping | Top of the view | Holds the grouping controls | — |
| Expand all / Collapse all | Card header, right | Opens or closes every group at every level | Shown once at least one grouping is chosen |
| Clear all | Card header, right | Removes all groupings | Shown once at least one grouping is chosen |
| Transaction Date Range button (Calendar icon) | Card body | A second date filter for this view only | Starts at the last 30 days. Can only narrow the page's date range, never widen it. Can be cleared; it then reads "Select date range" and the view shows everything the page's filters allow |
| × | Right of that date button | Clears this view's date range | Shown while a date is set |
| Group by (Add one or more columns) (placeholder "Select column") | Card body | Adds a grouping level: Category, Subcategory, Status, Approval Status, Payment Method, Employee, Vendor, Month, Quarter, Year, Reimbursable, Has Receipt | Columns already used drop out of the list. The order you add them is the order they nest |
| "Showing … of … expenses" | Card body | How many expenses are inside this view's date range | Shown while a start date is set |
| "Select a column to group your expenses" | Card body | Hint | No grouping chosen |
| "Grouping hierarchy:" chips (e.g. Category → Status), each with X | Card body | X removes that level | — |
| Group row (click anywhere) or its arrow button | Table | Opens or closes that group | Shows the value, an "… expenses" badge, Total:, Avg:, Reimbursable: and Receipts:. Total and Avg leave out Rejected; the count includes them. Mileage: is shown as well, but only when at least one loaded expense carries mileage — nothing on this page records it |
| Expense row click | Table | Opens Expense Details | Premium or trial |
| Columns | Table | Expense ID (last 6 characters), Date, Employee, Vendor, Category, Subcategory, Amount, Payment Method, Status, Approval Status (Pending Approval / Approved / Rejected / Reimbursed), Reimbursable (Yes/No), Receipt (Yes / Missing / N/A) | Category and Payment Method read the same names as the standard list (Fuel, Credit Card), and grouping by either groups by the name. An older category or method with no name of its own is shown exactly as stored. Has Receipt groups read Yes, Required (Missing) or N/A. Click a row to open the expense |
| Total Summary row | Table footer | Grand total (Rejected left out), "… expenses", reimbursable count, receipts count | — |
| "Loading expenses..." / "No expenses found in the selected date range" / "No expenses found" | Table area | Loading and empty states | A load that failed replaces the whole view with "Couldn't load your expenses" and a Try again button. On Basic and Pro this view is sample data, so it always shows the demo table and the upgrade panel, never a load error |
Tab: Expenses Records — Pivot View (Premium)
| Control | Where | What it does | Notes |
|---|---|---|---|
| Card Pivot Configuration | Top of the view | Holds the pivot controls | — |
| Reset (rotate icon) | Card header | Back to Rows: Subcategory, Columns: Category, Values: Amount (Sum), and turns the pivot off | — |
| ▶ Activate Pivot / ✓ Pivot Active | Card header | Turns the pivot table on or off | Starts off. Nothing shows until you click it |
| Transaction Date Range button and × | Card body, first column | This view's own date filter and its clear button | Starts at today and the 29 days before. Can only narrow the page's date range; once cleared it reads "Select date range". "Showing … of … expenses" underneath while a start date is set |
| Row Fields chips (each with X) and "Add row field" | Card body, second column | Adds or removes a row dimension | Options: Category, Subcategory, Status, Approval Status, Payment Method, Employee, Vendor, Month, Quarter, Year, Reimbursable, Has Receipt — minus any already used as a row or column. Chips can't be dragged; use X and the drop-down to change them |
| Column Fields chips (each with X) and "Add column field" | Card body, third column | Adds or removes a column dimension | Same options and rules |
| Value Fields (Measures) chips, e.g. "Amount" with a Sum drop-down, each with X | Card body, fourth column | Shows or removes measures, and sets how each one is totalled | The drop-down on a chip changes that measure only: Sum, Average, Count, Min or Max |
| "Add measure" | Card body, fourth column | Adds Amount or Count, always as Sum | Change it afterwards with the drop-down on its own chip. Mileage is offered as well, but only when at least one loaded expense carries mileage — nothing on this page records it |
| "Add at least one value to enable pivot view." | Card body | Hint | No measures chosen |
| Pivot table | Below the card | Row labels, one column per column value and measure (headed by the value, the measure and its aggregation in brackets), and a Total row | Rejected expenses are left out unless Status or Approval Status is a row or column. The Total row adds up Sum and Count columns; for Average, Min and Max it recalculates over every expense in that column. Cells can't be clicked. Category and Payment Method read the same names as the rest of the page |
| 'Configure pivot fields above and click "Activate Pivot" to see the pivot table' | Table area | Placeholder | Pivot is off, or it is on but has no measures |
| "Loading expenses..." / "No expenses found in the selected date range" / "No expenses found" | Table area | Loading and empty states | A load that failed replaces the whole view with "Couldn't load your expenses" and a Try again button. On Basic and Pro this view is sample data, so it always shows the demo table and the upgrade panel, never a load error |
Tab: Create Expense
Card Create New Expense (dollar icon). The fields have no visible labels: you see placeholders and a red * inside each required field.
Fields:
| Field | Required | Default | Rules and error text |
|---|---|---|---|
| Date (date picker) | Yes | Today | "Validation Error — Please select a date for this expense". Saved as the Transaction Date |
| Amount (placeholder "0.00") | Yes | Blank | Above 0, cents allowed: "Validation Error — Please enter a valid amount greater than $0". The store refuses a zero or negative amount as well, so the rule holds whatever saved it. No upper limit here (Bulk Import caps a row at $10,000) |
| Category (placeholder "Select category") | Yes | None | Each option has a hint: Fuel (Vehicle fuel and transportation costs), Parts (Equipment parts and materials), Meals (Business meals and client entertainment), Tools (Work tools and equipment purchases), Travel (Business travel expenses), Office Supplies (Office and administrative supplies), Vehicle Maintenance (Vehicle repairs and maintenance), Training & Education (Professional development and training), Payroll & Wages (Wages, salaries and other pay), Other (Other business expenses). Error: "Validation Error — Please select an expense category" |
| Payment Method (placeholder "Select method") | Yes | Credit Card | Cash, Credit Card, Debit Card, Check, Bank Transfer, Digital Wallet, Other. Error: "Validation Error — Please select a payment method" |
| Vendor (placeholder "Where purchased?") | No | Blank | — |
| Description (placeholder "What was this expense for?") | Yes | Blank | Checked last, after the date: "Validation Error — Please enter a description". Spaces alone don't count |
| Tax deductible (checkbox) | No | Ticked | Untick it for spending the business can't deduct. Saved as the expense's Tax Deductible setting |
| Reimbursable (checkbox), with "Tick only if you paid with your own money and the business owes it back to you." | No | Unticked | Saved as the expense's Reimbursable setting. Approved reimbursable expenses make up Pending Reimbursements on the Expenses Report |
| I have a receipt for this expense | No | Unticked | Shows the file picker. If you untick it after choosing a file, the picker hides but the file is still uploaded on submit |
| Receipt file | Over $25 | None | PNG, JPG or PDF, up to 10 MB. Over $25 (strictly — $25.00 needs none): "Validation Error — Receipts are required for expenses over $25. Please attach a receipt file." |
Buttons and indicators:
| Control | Where | What it does | Notes |
|---|---|---|---|
| Spinner next to the title | Card header | Loading your account | — |
| "Creating expense for: Amy Rivera (Conroe Appliance)" | Card header | Names you and your store | The display name you chose, or your first and last name, or any other name saved for you, or your sign-in email if the store holds none of those. That is the same order every screen uses to show who an expense belongs to, so an expense is filed under the name you are shown by. If your store has no name saved it reads "Creating expense for: Amy Rivera", and the line is left out entirely when neither is known |
| Panel Receipt Information (receipt icon) with a red Required badge | Below Description | Groups the receipt controls | The badge appears once Amount is over $25 |
| Warning "Receipt is required for expenses over $25" (red, with a warning sign) | Receipt panel | Reminder | Amount over $25 and no file chosen |
| Attach Receipt → Choose File (Upload icon), hint "PNG, JPG, or PDF — uploads automatically on submit" | Receipt panel, dashed box | Opens the file browser | Only after ticking I have a receipt for this expense. Click to browse — files can't be dragged in |
| "Selected: …" | Under Choose File | Shows the chosen file name | — |
| Submit Expense (send icon) / "Uploading receipt..." | Bottom, full width | Checks amount, category, payment method, date, description and receipt in that order, uploads the receipt, then saves: "Success — Expense submitted successfully". The form clears and you stay on this tab | Greyed out while saving. Saved as Submitted, with Tax Deductible and Reimbursable as the checkboxes say, Receipt Required on when over $25, in USD, with you as the employee, under your own name. The form then resets, checkboxes included. If the receipt upload fails the expense isn't created: "Receipt upload failed — Could not upload the receipt. Please retry before submitting." |
Tab: Bulk Import
| Control | Where | What it does | Notes |
|---|---|---|---|
| Card Bulk Expense Import (spreadsheet icon) | Top | Three numbered steps | — |
| Step 1 Download Template — "Start with our template to ensure your data is properly formatted. Excel is the easiest to fill in." | Instructions card | Text | — |
| Download Template (Download icon, with a menu arrow) | Step 1 | Opens a menu with two choices | Greyed out, with a spinner, while the Excel file is being built |
| Menu item Excel (.xlsx) — "Recommended. Date cells, dropdowns for Category, Payment Method, Tax Deductible and Reimbursable, and a how-to sheet." | Download menu | Downloads expense_import_template.xlsx: "Template Downloaded — Excel template has been downloaded to your device." | Sheet Expenses has 6 sample rows; red headers are required and grey optional, and clicking a header shows a hint. Excel refuses an Amount outside 0.01 to 10,000 and a Date that isn't a date. Category, Payment Method, Tax Deductible and Reimbursable have dropdowns; typing another value only gets a warning. Sheet How to fill has the steps. Failure: "Could not create the Excel template — Try again, or download the CSV version instead." |
| Menu item CSV (.csv) — "Plain text, for other software or your own exports." | Download menu | Downloads expense_import_template.csv: "Template Downloaded — CSV template has been downloaded to your device." | Same 6 sample rows. Delete them before uploading, or they are imported as real expenses |
| Step 2 Upload Your File — "Upload your completed Excel or CSV file with expense data." | Instructions card | Text | — |
| Step 3 Review & Import — "Review the validation results and import your expenses." | Instructions card | Text | — |
| Card Upload Expense Data | Second card | Holds the file picker | — |
| Choose File (dashed box: "Excel (.xlsx) or CSV files", "Maximum 500 rows / 10 MB") | Upload card | Opens the file browser and reads the file at once | Click to browse — files can't be dragged in. The browser also lists .xls files, which are then refused. Column names match loosely (case, spaces, _ and - are ignored). In Excel, the first sheet with a header row naming at least 2 known columns in its top 20 rows is used. A CSV may open with title lines above its header row (for example "Expense report — August"): the first line within the top 20 naming at least 2 known columns is taken as the header, and Row numbers still match your file. CSV text can be UTF-8 or Windows (Western) encoding. After an import with failed rows the loaded file stays chosen, so picking the same file again may do nothing — save the fixed copy under a new name |
| File line (name, "… KB • Excel workbook • sheet “Expenses”" or "CSV file") and Ready badge | Upload card | Confirms the file was read | Also shows after "Invalid File" or "Too many rows"; the Import button then reads Import 0 Expenses and is greyed out |
| Import … Expenses (arrow icon, green) / "Processing..." | Upload card | Imports the rows | Greyed out while importing, and when no row in the file can be imported. The number is the rows that will actually be created, the same as the preview's Import … Valid Expenses button — rows marked Error are not counted |
| "Ready to import … expense(s)" (with "of the … rows in this file" when some will be skipped) / "Total amount to import: $…" | Upload card, blue box | Summary of what the import will do | Both figures cover only the rows that will actually be created, so the amount is what is about to be booked, not the sum of the file |
| Card Required Data Format — "Your file should include the following columns:" | Third card | Date (Required, e.g. 2024-03-15), Amount (Required, 25.50), Category (Required, GAS), Description (Required, Gas for service calls), Payment Method (CreditCard), Vendor (Shell Station), Notes (Weekly fuel expense), Tax Deductible (Yes), Reimbursable (No) | — |
| Important Notes: | Format card | "Dates: any date cell in Excel; YYYY-MM-DD in a CSV" · "Amounts should be numeric (no currency symbols)" · "Categories: GAS, PARTS, MEALS, TOOLS, TRAVEL, SUPPLIES, MAINTENANCE, TRAINING, PAYROLL, OTHER" · "Payment Methods: Cash, CreditCard, DebitCard, Check, BankTransfer, DigitalWallet, Other" · "Tax Deductible and Reimbursable: Yes or No. Blank means Tax Deductible Yes, Reimbursable No" · "Maximum 500 rows per import" | Amounts such as "$25.50" and "1,149.00" are still read correctly. European decimals ("1,14") and text such as "12 pcs" are refused |
| Card Data Preview (… records) (eye icon) | After a file is read | One line per row of the file, none left out: Row, Date, Amount, Category, Description, Payment Method, Vendor, Tax Deductible, Reimbursable, Status | Rows with a problem are red with an Error badge; the rest show Valid. Category, Payment Method, Tax Deductible and Reimbursable show the value that will be saved (Yes or No, blanks already filled in); an answer that isn't Yes or No shows as typed, in red. An unreadable amount shows $0.00 in red. Row is the row number your own spreadsheet shows down its left edge, so it always matches — blank lines in the middle of a file, and a workbook whose headings sit under a title row, do not shift it |
| Hide Preview (X icon) | Preview card header | Hides the preview | Show Preview (eye icon) then appears in the upload card, under the blue summary, and brings it back. The Import button in the upload card works either way |
| Tiles Total Records, Valid Records, Invalid Records, Amount to Import | Preview card | Counts and sum | Total Records is every row in the file; Invalid Records counts the ones marked Error, including those with a blank required cell; Amount to Import adds up only the valid ones, so it matches what the Import button is about to create |
| Validation Issues Found — "… of the … rows in this file will be skipped. They are marked in red above, and the Row numbers are the ones your own spreadsheet shows down the left, so you can find them, fix them and upload it again." | Preview card | Warning | At least one row marked Error |
| Import … Valid Expenses (large, green) / "Processing Import..." | Preview card, bottom right | Same import as the upload-card button; rows marked Error are skipped either way | Greyed out while importing |
| Card Import Results — tiles Total Records, Successfully Imported, Already Imported, Failed | After an import | Outcome of the last run | Rows under Already Imported are listed underneath with their row number and the reason. They are never counted as imported. When nothing failed, the file and preview clear and only this card stays |
| Errors Found: list | Results card | Each problem: "Row …" plus the column at fault (date, amount…), the error, and 'Value: "…"' | A row the system refused ("Failed to create expense: …") shows only its row number. Rows left out for a blank required cell are listed here too, as "Missing required fields: …" |
| Download Error Report (Download icon) | Results card | Downloads expense_import_errors.csv (Row, Field, Value, Error): "Error Report Downloaded — Exported … error(s)." | Only when there are errors |
How each row is read
| Rule | What happens |
|---|---|
| Blank Date, Amount, Category or Description | The row shows in the preview in red, marked Error, and is left out of the import. It is listed again under Errors Found: as "Missing required fields: …" with its line number |
| Date | Must be YYYY-MM-DD (Excel date cells arrive that way; any time part is dropped). Otherwise "Invalid date format. Use YYYY-MM-DD" |
| Amount | A positive number up to 10,000. Otherwise "Amount must be a positive number" or "Amount exceeds maximum limit of $10,000" |
| Category | Never fails. Known spellings are mapped first: Fuel, Gasoline, Petrol → GAS; Part, Material(s) → PARTS; Meal, Food, Lunch, Dinner → MEALS; Tool, Equipment → TOOLS; Transport(ation), Lodging, Hotel, Airfare → TRAVEL; Supply, Office, Stationery → SUPPLIES; Repair(s), Service → MAINTENANCE; Education, Course, Certification → TRAINING; Payroll expense, Wage(s), Salary, Salaries, Pay → PAYROLL; Misc, Miscellaneous → OTHER. The category names shown in the app (Fuel, Office Supplies, Payroll & Wages…) also work. Otherwise a whole word inside a longer phrase decides: pay words win first, then maintenance ("Truck repair", "Van servicing"), then parts ("Air filter", "Head gasket", "Drive belt", "Wheel bearings"), then travel ("Airfare to Dallas", "Hotel in Dallas"), then fuel ("Gas station", "Diesel"), meals, tools, supplies and training. A word is only matched whole, so "Partnership dues" is not parts and "Gasket" is not fuel. A phrase run together with no spaces ("truckrepair") is still placed, using the longer words only. Anything else becomes OTHER — check the preview |
| Tax Deductible, Reimbursable | Optional. Yes, Y, TRUE, 1 or x means yes; No, N, FALSE or 0 means no, in any case (Excel TRUE/FALSE cells work too). Blank → Tax Deductible Yes, Reimbursable No — also when the file has no such column. Anything else: "Use Yes or No" |
| Payment Method | Never fails. Blank → CreditCard. cc, Visa, Mastercard, Amex → CreditCard; cheque → Check; wire, ACH → BankTransfer; Apple Pay, Google Pay, PayPal → DigitalWallet; words containing credit, debit, cash, check, bank, transfer, pay or wallet map to the matching method; anything else → Other |
| Duplicates | Two rows with the same date, amount, category, description and vendor in one file are imported as two expenses — identical charges are real. A row is only left out when an earlier attempt in this visit already created that same charge, and only as many times as it created it: a file listing a charge three times when one is already in imports the other two. Leaving the tab or reloading forgets what was imported, so the whole file would go in again |
| Saved values | Submitted, you as the employee under your own name, no receipt, Receipt Required on when over $25, Tax Deductible and Reimbursable from the file (blank: Tax Deductible on, Reimbursable off), Vendor and Notes kept |
Dialog: Expense Details / Edit Expense
Opens when you click a row in Standard View or an expense in Groupable View. The title is Expense Details while reading and Edit Expense after you click Edit.
Fields:
| Field | Required | Default | Rules and error text |
|---|---|---|---|
| Amount * | Yes | The saved amount | Reading: green "$… USD". Editing: number box (placeholder "0.00"). Must be above 0: "Validation Error — Please enter a valid amount greater than $0". The store checks this too, so an expense can never be recorded at zero or below however it is saved. Greyed out on an Approved or Reimbursed expense unless you are the owner or a Manager and it isn't your expense |
| Currency | — | USD | Display only; the app works in US dollars |
| Category * | Yes | The saved category | Editing: dropdown (placeholder "Select category") of the 10 categories. Older categories show their code while reading. Greyed out after approval, like Amount |
| Subcategory | No | Blank ("None" while reading) | Free text (placeholder "Optional subcategory"). This dialog is the only place to set it |
| Description * | Yes | The saved description | 3-line box (placeholder "Enter expense description"). Required to save: "Validation Error — Please enter a description". An older expense saved with no description is asked for one the first time it is edited |
| Transaction Date | No | The saved date | Date picker. Kept as a plain calendar date, so it never shifts a day. Greyed out after approval, like Amount |
| Payment Method | No | The saved method | Dropdown (placeholder "Select payment method"): Cash, Credit Card, Debit Card, Check, Bank Transfer, Digital Wallet, Other. Greyed out after approval, like Amount |
| Vendor | No | "Not specified" while reading | Free text (placeholder "Vendor name") |
| Status | No | The saved status | Reading: colored pill (Approved green, Submitted blue, Rejected red, others grey), with a line underneath naming who signed it off and when — "Approved by Amy Rivera on Sep 4, 2026", "Approved by Amy Rivera on Sep 4, 2026 (self-approved)" where the person who filed it approved it themselves, or "Rejected by Amy Rivera on Sep 4, 2026 — No receipt attached" on a rejected one, with whatever reason the reviewer gave. Editing: dropdown Submitted / Approved / Rejected / Reimbursed for the store owner and Managers on someone else's expense; the change is recorded the same way as the row Status dropdown. On your own Rejected expense: dropdown Rejected / Submitted, with "Only … can approve or reject your expense. To send it back for review, set Status to Submitted and save." underneath — saving Submitted clears the rejection reason. Everyone else keeps the pill, with "Only … can change the status, and not on their own expense." underneath |
| Has Receipt | No | As saved | Checkbox; greyed out while reading |
| Receipt preview | — | — | Reading, when a receipt is attached: image thumbnail (click for full size in a new tab) or an inline PDF preview, plus Open original. The preview link expires after 5 minutes; reopen the expense for a fresh one |
| Current Receipt preview | — | — | Editing, when a receipt is attached: the same preview |
| Receipt Required | No | On for expenses over $25 | Checkbox; greyed out while reading. Drives the red Missing badge |
| Is Reimbursable | No | As chosen on Create Expense or in the import file (off unless someone said yes). Some older expenses have it on although nobody chose it | Checkbox; greyed out while reading, and after approval like Amount — except on your own Approved expense, where you can untick it (not tick it) |
| Tax Deductible | No | As chosen on Create Expense or in the import file (on unless someone said no) | Checkbox; greyed out while reading |
| Notes | No | "No notes" while reading | 3-line box (placeholder "Additional notes") |
| Created: / Updated: | — | — | Date and time in your store's time zone |
| Note at the top: "This expense is approved, so its amount, date, category, payment method and Reimbursable setting can only be changed by the owner or a manager other than the employee. The employee can still untick Reimbursable until it is marked Reimbursed." | — | — | Editing an Approved or Reimbursed expense you can't review. The other fields stay editable |
Buttons:
| Control | Where | What it does | Notes |
|---|---|---|---|
| Replace Receipt → Choose File (Upload icon) | Editing, under Has Receipt | Uploads the PNG, JPG or PDF straight away and ticks Has Receipt: "Uploaded — Receipt replaced for this expense (save to persist)." | Click Save Changes to keep it. Up to 10 MB. Failure: "Upload Failed — Could not upload receipt" |
| Remove Receipt | Editing, under Choose File | Detaches the receipt and unticks Has Receipt | Only when a receipt is attached. Takes effect on Save Changes |
| Delete (trash icon, red) | Footer, left | Opens Are you absolutely sure? | While reading, and only for the store owner and Managers — the people who can actually delete. Everyone else doesn't see the button |
| Reject | Footer, right | Opens Reject this expense?, with a Reason (optional) box. Reject expense sets Rejected and records the reviewer: "Rejected — Expense rejected." | The store owner and Managers, on someone else's Submitted expense, while reading. Cancel closes the question and changes nothing. An empty box records no reason. The reason is shown on the expense afterwards, under the status pill, and in Export CSV |
| Approve (green) | Footer, right | Sets Approved and records who approved and when: "Approved — Expense approved." | Same conditions as Reject |
| Close / Cancel (X icon) | Footer, right | Reading: closes the dialog. Editing: leaves editing and throws away your changes | Greyed out while saving |
| Edit (pencil icon, blue) | Footer, right | Switches to editing | While reading. Shown to everyone |
| Save Changes (save icon, green) | Footer, right | Saves the fields you changed: "Success — Expense updated successfully." Back to reading; the list and totals reload. With nothing changed: "No changes — Nothing was changed, so nothing was saved." | While editing. When the change isn't allowed, "Update Failed —" gives the reason (see Messages you may see); otherwise "Update Failed — Failed to update expense. Please try again." |
| X (close), Esc key, or a click outside | Dialog | Reading: closes the dialog. Editing: leaves editing and discards changes, but the dialog stays open | — |
| After Save Changes, Approve or Reject | Dialog | The dialog shows what was saved straight away: the new values, the new status, and Approve and Reject gone once the expense has been reviewed. No need to close and reopen it | The table behind updates too |
Dialog: Are you absolutely sure? (delete)
| Control | Where | What it does | Notes |
|---|---|---|---|
| Text "This action cannot be undone. This will permanently delete the expense "…" for $…." | Dialog | Names the expense | The expense and its ledger entry are removed for good |
| Cancel | Footer | Closes the confirmation; nothing is deleted | — |
| Delete (red) → "Deleting..." | Footer | Deletes the expense. The confirmation stays up, reading "Deleting..." with both buttons greyed out, until it finishes; then it and the details dialog close: "Success — Expense deleted successfully." | Failure: "Delete Failed" with the reason — the store says whether it was your access or an expense that had already gone — and the confirmation stays open, so you can Cancel or try again. "Success — Expense deleted successfully." only shows when the expense really went |
Dialog: Upgrade prompts
| Control | Where | What it does | Notes |
|---|---|---|---|
| Card Unlock Pro & Premium Features — "SMS, insights, finance tools & more" | Over the whole page | Lists Pro ("500 SMS/month + a dedicated phone #", "SMS campaigns & review invites", "Ads-vs-store insights", "Finance: expenses, assets, reports", "Customer Portal: tracking, payments, scheduling") and Premium ("Everything in Pro", "2,000 SMS/month", "Advanced reporting (grouped/pivot)", "CSV / PDF data export", "Workforce: time clock, timesheets, pay runs") | Basic plan, no trial. Apart from the card's own buttons, only Demo in the header still works |
| Card Unlock Premium Features — "Advanced reporting & data export" (lock icon) | Over Groupable or Pivot View, or as a pop-up after Export CSV | Lists Premium: "Everything in Pro", "2,000 SMS/month", "Advanced reporting (grouped/pivot)", "CSV / PDF data export" | Pro plan. Behind it, Groupable opens on sample data grouped Category → Status with an "Available groupings:" row, and Pivot on sample data (Category by Status, Amount Sum) — marked Demo Data, statuses in capitals, nothing clickable |
| Check Details (green) | Upgrade card header | Opens Billing | The upgrade card header's only button; the Export CSV pop-up also has a ✕ beside it. The Export CSV pop-up closes first |
| Grey area around the card | Groupable or Pivot View | Click it (or focus it and press Esc) to go back to Standard View | The Export CSV pop-up closes with a click outside the card, its ✕ or Escape |
Messages you may see
| Message | When it appears | What to do |
|---|---|---|
| "Loading Error — Failed to load expense data. Please refresh the page." | Expenses Records or Create Expense couldn't load your account | Refresh the page; sign in again if it repeats |
| "Couldn't load your expenses" — then "We couldn't read your account, so your expenses weren't loaded." | Your account or store couldn't be read when the page opened, so the list never ran | Click Try again. Sign in again if it repeats. Your expenses are untouched |
| "No expenses found" / "Create your first expense to get started" | Nothing matches the filters | Widen the date range (up to 13 months), reset Status, Category and Payment Method, clear the search, click Refresh |
| "Couldn't load your expenses" — then the reason, and "Your expenses are still there — this page just couldn't read them." | The list could not be read (connection lost, signed out elsewhere), or your account couldn't be read when the page opened | Click Try again — it re-reads your account as well as the list. Reload the page, or sign in again, if it keeps failing. Nothing has been lost |
| "Updated — Status changed to …." | Row Status dropdown saved | — |
| "Update failed — Unable to change status" | Row Status save failed | Retry; check your connection |
| "Update failed — Only the owner or a manager can change an expense's status, and not on their own expense. The employee can only send a rejected expense back to Submitted." | Row Status dropdown when your Manager or Owner access was removed after the page loaded | Ask a different owner or manager |
| "No Data — No expenses found to export." | Export CSV with nothing matching | Widen the filters |
| "Export Successful — Exported … expenses to expenses-export-….csv" | Export finished | Open the file from your downloads |
| "Export Failed — Failed to export expenses. Please try again." | Export error | Retry |
| "Unlock Premium Features" card | Groupable View, Pivot View or Export CSV on Pro | Upgrade to Premium in Billing — a plan change only the store's owner can make |
| "Unlock Pro & Premium Features" card | The whole page on Basic | Upgrade to Pro or Premium in Billing. Only the store's owner can change the plan; everyone else sees that page read-only and has to ask the owner |
| "Validation Error — Please enter a valid amount greater than $0" | Submit Expense or Save Changes with an empty or zero amount | Enter an amount above 0 |
| "Validation Error — Please enter a description" | Submit Expense or Save Changes with a blank description | Type what the expense was for. An older expense saved without a description is asked for one the first time it is edited |
| "Success — Expense updated successfully." | Edit saved | The dialog shows the new values at once |
| "Update Failed — Failed to update expense. Please try again." | Edit save failed | Retry |
| "No changes — Nothing was changed, so nothing was saved." | Save Changes with every field as it was | — |
| "Update Failed — This expense is already approved. Only the owner or a manager other than the employee can change its amount, date, category or payment method." | Saving a change to one of those fields on an Approved or Reimbursed expense you can't review | Ask a different owner or manager to make the change |
| "Update Failed — This expense is already approved. Only the owner or a manager other than the employee can change Reimbursable. The employee can untick it until the expense is marked Reimbursed." | Saving a Reimbursable change on an Approved or Reimbursed expense you can't review, other than the employee unticking it while it is Approved | Ask a different owner or manager |
| "Update Failed — Only the owner or a manager can change an expense's status, and not on their own expense. The employee can only send a rejected expense back to Submitted." | Saving a new Status from Edit when you can't review this expense | Ask a different owner or manager |
| "Uploaded — Receipt replaced for this expense (save to persist)." | New receipt chosen while editing | Click Save Changes |
| "Upload Failed — Could not upload receipt" | Receipt upload while editing failed | Use a PNG, JPG or PDF under 10 MB; retry |
| "Reject this expense?" | Reject clicked | Type a reason if you want one, then Reject expense. Cancel leaves the expense as it was |
| "Approved — Expense approved." / "Rejected — Expense rejected." | Approve or Reject done | The dialog shows the new status at once, and Approve and Reject are gone |
| "Approval failed — Unable to approve expense" / "Rejection failed — Unable to reject expense" | Approve or Reject failed | Retry. When your access no longer allows it, the message says so instead |
| "This action cannot be undone. This will permanently delete the expense "…" for $…." | Delete clicked | Confirm with Delete, or Cancel |
| "Success — Expense deleted successfully." | Delete confirmed and the expense really was removed | — |
| "Delete Failed — Deleting an expense is limited to managers and the store owner." | Delete refused: your access changed while the dialog was open | Ask the owner or a Manager |
| "Delete Failed — This expense has been matched to a bank line. Unmatch it under Bank Reconciliation first." | The expense is part of a confirmed or automatic bank match. Deleting it would leave that match pointing at nothing and a closed statement period that no longer ties out | Open Bank Reconciliation, unmatch the line, then delete the expense |
| "You're the only person who has ever been able to approve expenses here, so you can approve this one yourself once it's saved. It will be recorded as self-approved. Make someone else a manager, or turn their Owner switch on, in Settings → Team to have expenses reviewed by another person instead." (grey, on Create Expense) | The store has never had a second owner or Manager | Nothing has gone wrong. File it, then approve it; make somebody a manager in Settings → Team if you would rather someone else reviewed |
| "You're the only person who can approve expenses here right now, so this stays Submitted. It still counts as spend. Switch another owner or manager back on, or make someone else a manager, in Settings → Team to have it reviewed." (amber, on Create Expense) | The store has had another owner or Manager, but nobody active can review your claim today | Switch them back on, or make somebody else a manager, in Settings → Team. Self-approval is not offered here: it is only for a store that has never had a second reviewer |
| "Delete Failed — That expense is not on this store any more" | Somebody else deleted it first | Reload the page |
| "Delete Failed — Failed to delete expense. Please try again." | Delete error | Retry |
| "Validation Error — Please enter a valid amount greater than $0" | Submit Expense without an amount above 0 | Enter the amount |
| "Validation Error — Please select an expense category" | Submit Expense without a category | Pick one |
| "Validation Error — Please select a payment method" | Submit Expense without a method | Pick one |
| "Validation Error — Please select a date for this expense" | Submit Expense without a date | Pick the date |
| "Validation Error — Receipts are required for expenses over $25. Please attach a receipt file." | Submit Expense over $25 with no file | Tick I have a receipt for this expense and choose the file |
| "Receipt is required for expenses over $25" (red box) | Create Expense, amount over $25 and no file chosen | Same |
| "Error — Organization information is required" | Submit Expense before your account finished loading | Wait a moment or refresh |
| "Receipt upload failed — Could not upload the receipt. Please retry before submitting." | Receipt upload failed during submit; nothing was saved | Use a PNG, JPG or PDF under 10 MB; submit again |
| "Success — Expense submitted successfully" | Expense created | — |
| "Error — Failed to create expense. Please try again." | Create error | Retry |
| "Error — Failed to load user information" | Bulk Import couldn't load your account | Refresh the page |
| "Template Downloaded — Excel template has been downloaded to your device." / "…CSV template…" | Template downloaded | Fill it in; delete the sample rows |
| "Could not create the Excel template — Try again, or download the CSV version instead." | The Excel template couldn't be built | Retry, or use CSV |
| "File too large — File is … MB. The maximum is 10 MB." | File over 10 MB | Split the file |
| "Unsupported file — Choose an Excel (.xlsx) or CSV (.csv) file." | Another file type | Save as .xlsx or .csv |
| "This Excel file can’t be read — It is in the old .xls format or password-protected. In Excel, remove any password, choose File → Save As → Excel Workbook (.xlsx), and upload the new file." | .xls or password-protected file | Follow the message |
| "This Excel file could not be opened — It may be damaged, or not really an Excel workbook. Open it in Excel, save a fresh copy as .xlsx, and try again." | Damaged or renamed file | Follow the message |
| "Parse Failed — Could not read the file. Please check the format." | Any other read error | Start again from the template |
| "Invalid File — The file must contain a header row and at least one data row." | Empty file | Add rows under the header |
| "Too many rows — File has … rows. The maximum is 500 per import." | More than 500 rows | Split into files of 500 or fewer |
| "Rows are missing required values — … rows are missing a Date, Amount, Category or Description. They are marked in red in the preview below, with their row numbers, and will not be imported." | At least one row has a blank required cell | Fill those cells and upload the file again |
| "File Parsed — Successfully parsed … expense records." | File read with no missing values | Review the preview, then import |
| "Error — No data to import or missing organization context." | Import with nothing loaded | Choose the file again, or refresh |
| "Import Complete — Imported … of … expenses." followed by "… rows were already imported earlier and were left out." when an earlier attempt had already created them | Import finished with at least one row created or left out | Check Import Results for failures and for the Already Imported list |
| "Import Failed — An unexpected error occurred during import." | Unexpected import error | Retry — rows already imported during this visit are skipped |
| "Invalid date format. Use YYYY-MM-DD" | Import Results, per row | Fix the date |
| "Amount must be a positive number" / "Amount exceeds maximum limit of $10,000" | Import Results, per row | Fix the amount, or split a large expense |
| "Use Yes or No" | Import Results, per row, for the Tax Deductible or Reimbursable column | Write Yes or No, or leave the cell blank for the default |
| "Failed to create expense: …" | Import Results, a row the system refused | Retry |
| "Validation Issues Found — … of the … rows in this file will be skipped. They are marked in red above, and the Row numbers are the line numbers in your own file, so you can find them, fix them and upload it again." | Preview with rows marked Error | Fix them, or import the valid rows now |
| "Error Report Downloaded — Exported … error(s)." | Error report downloaded | — |
| Tooltip "Bank-verified — matched to a bank transaction during reconciliation" | Hover the bank icon in Payment Method | — |
Who can use what
| Who or what | What changes |
|---|---|
| Basic plan, no trial | The page is greyed out under Unlock Pro & Premium Features with sample records. Only the card's Check Details button and the header Demo button work. The sidebar shows a Pro tag on Expenses |
| Pro plan | All three tabs work. Groupable View, Pivot View and Export CSV show Unlock Premium Features |
| Premium plan or an active trial | Everything. A trial counts as Premium unless the store already picked a plan during the trial, in which case that plan applies |
| Plan can't be determined | Everything opens |
| Store owner (the Owner switch or the Owner role) or Manager role | Sees the row Status dropdown and the Approve / Reject buttons, and can change Status in Edit — on other people's expenses. Can also change the amount, date, category, payment method and Reimbursable setting of someone else's approved expense. A role given or taken away in Settings → Team shows here after the person signs in again (or within about an hour) |
| Everyone in the store | Sees all of the store's expenses (not only their own), can create and import (always as Submitted, in their own name), can open Edit on any expense. Delete is shown only to the store owner and Managers. In Edit they can't change the Status, and once an expense is Approved or Reimbursed they can't change its amount, date, category, payment method or Reimbursable setting |
| Your own expenses | Nobody can approve, reject or reimburse their own expense, owners included — unless the store has never had a second owner or Manager, in which case you can, and the expense is marked self-approved. Otherwise the row dropdown and Approve / Reject aren't offered on it, and Edit offers no Approved, Rejected or Reimbursed choice. Two things you can do: send your own Rejected expense back to Submitted (Edit → Status), and untick Is Reimbursable on your own Approved expense. In a store where the owner is the only one who can approve, the owner's own expenses stay Submitted and still count as spend — Create Expense carries an amber note saying so, with a link to Settings → Team |
| Record to books in Bank Reconciliation | An owner or manager can record a bank line as an expense. It is saved as Approved in their own name, not reimbursable, without a review — the money has already left the bank. Because it is Approved and in their own name, they can no longer change its amount, date, category or payment method here; an owner or manager who isn't them has to |
| Delete rights | Only the store owner and Managers can delete, and the Delete button is hidden from everyone else. The store checks again when the button is used, so a refused delete says "Deleting an expense is limited to managers and the store owner." instead of reporting success. An expense a bank line has been matched to can't be deleted at all: "This expense has been matched to a bank line. Unmatch it under Bank Reconciliation first." |
| How a save reaches the store | Every filing, change, status change, delete and import goes through UpChannels' server, which names the person making it so the review rules above judge them; nobody's browser can change the expense list directly. The ledger follows each save: an entry is posted when an expense is filed, re-posted when its amount, date or status changes, and removed when it is rejected or deleted |
| Bank feeds add-on | Adds the bank-verified icon to matched expenses |
Demo mode (/finance/expenses/demo)
- Open it: Demo (Play icon, amber) in the Expense Management header. Works on every plan.
- Header: "Expense Management — Demo" — "Sample expenses populated with demo data. All actions are disabled." Exit Demo Mode (left arrow) goes back to the live page.
- Banner: "Demo mode — expenses are populated with sample data. All actions are disabled." with Take a Tour (question-mark icon), which restarts the tour at step 1.
- Tour: starts by itself the first time you open the demo. Progress dots and "… of 11", Back (from step 2), Skip (closes), Next, and Got it! on the last step. Clicking the dark backdrop closes it. Keys: Esc closes, right arrow or Enter goes on (and closes on the last step), left arrow goes back. When a step belongs to another tab, the page switches tab first.
- Still works: switching between the three tabs, the Standard View / Groupable View / Pivot View buttons, Take a Tour, Exit Demo Mode.
- Disabled: everything else inside the tabs — search, Refresh, Export CSV, the filters, page buttons, every form field, Submit Expense, and Download Template and Choose File. Rows don't open a details dialog, and the demo's Bulk Import tab has no preview or import buttons. Inside Groupable and Pivot view the grouping and pivot controls are disabled too — the sample is shown grouped by category and status, and pivoted category by status.
| # | Tab | Tour step | What it points at |
|---|---|---|---|
| 1 | Expenses Records | Expense Tabs — "Switch between three sections: Expenses Records shows all your expenses, Create Expense lets you add new ones, and Bulk Import allows batch uploading from Excel or CSV. This tour walks through each one." | The tab bar |
| 2 | Expenses Records | Advanced Filters — "Filter expenses by date range, status (Submitted, Approved, Rejected, Reimbursed), category (Fuel, Travel, Meals, etc.), and payment method. Use the search bar to find specific expenses." | The Advanced Filters card |
| 3 | Expenses Records | Expense Overview — "At-a-glance metrics showing total expense amount, number of approved expenses, and expenses pending review — all calculated from your filtered results. Rejected claims are left out of the amount and the count, because a denied claim is not spend." | The three stat cards |
| 4 | Expenses Records | View Modes — "Switch between Standard table view, Groupable view (group by category, status, or any field), and Pivot view for cross-tabulation analysis. These three buttons work here in the demo — try them." | The Standard / Groupable / Pivot buttons. They are the one set of controls the demo lets you use, so the step can be followed |
| 5 | Expenses Records | Expense Records — "Your full expense list with columns for date, category, description, status, employee, vendor, amount, payment method, and receipt info. Click any row to view details." | The records table (rows don't open in the demo) |
| 6 | Create Expense | Create Expense — Details — "Add a new expense in one place: capture the date, amount, category, payment method, vendor, and a description of what the expense was for." | The form |
| 7 | Create Expense | Receipt Attachment — "Attach a receipt to back up the expense. Tick the box to confirm you have one, then browse for a PNG, JPG or PDF. It uploads when you submit." | The receipt panel. Files are browsed for, never dragged in |
| 8 | Create Expense | Submit — "Submit the expense into the approval workflow. It is saved as Submitted straight away, for the owner or a manager to review; nothing is held back to finish later." | The button row, which holds Submit Expense and nothing else. There are no drafts |
| 9 | Bulk Import | Bulk Import — How It Works — "Import many expenses at once in three steps: download the Excel or CSV template, upload your completed file, then review the validation results before importing." | The instructions card |
| 10 | Bulk Import | Upload Your File — "Drop in a completed Excel (.xlsx) or CSV file up to 10 MB — the parser reads each row and prepares it for import." | The upload card. On the live page, click Choose File to browse |
| 11 | Bulk Import | Required Data Format — "See exactly which columns your file needs — Date, Amount, Category, and Description are required — plus formatting rules like dates and a 500-row limit." | The Required Data Format card |
Sample data: 25 expenses (3 pages) by John Smith, Sarah Johnson and Mike Davis: 18 Approved, 4 Submitted, 2 Reimbursed, 1 Rejected. Every category and payment method in it is one your own store can use: Fuel, Parts, Meals, Tools, Travel, Office Supplies and Other; Credit Card, Debit Card, Cash, Check, Bank Transfer and Digital Wallet. The same rows are the sample behind the lock on Basic, and behind Groupable and Pivot View on Pro. The Create Expense tab is pre-filled: today, 245.00, Parts, Credit Card, AutoZone, "Replacement brake pads for company truck maintenance", receipt box ticked, and "Creating expense for: John Smith (Demo Organization)".
Differences from the live page: the search field offers only Employee, Description and Vendor; the Category filter only Fuel, Travel, Meals and Office Supplies; the Payment Method filter only Credit Card, Cash and Bank Transfer. The date button has no calendar. Status is a plain colored pill, never a dropdown. The Receipt column shows only View or N/A, and there is no bank-verified icon. The Create form is read-only, so its ticked Tax deductible and unticked Reimbursable boxes cannot be changed. Download Template has no Excel/CSV menu, the upload box reads "Maximum file size: 10 MB", and the Important Notes list has 3 lines without the Categories and Payment Methods lines.
The figures and the lists match the live page: Total Amount and the expense count leave the Rejected sample out, exactly as your own total does, and the Create form's category and payment-method dropdowns are the live form's own lists.
Common questions
Why don't I see Approve and Reject? They appear only on expenses with status Submitted, only while reading (not editing), only for the store owner and Managers, and never on their own expense. A role change shows up after the person signs in again (or within about an hour). Nobody can approve or reject their own expense — ask a different owner or manager.
Who can change an expense after it is approved? Anyone can still edit its description, vendor, notes and receipt. Its amount, date, category, payment method and Reimbursable setting can only be changed by the owner or a Manager, and not by the person whose expense it is. That way an expense can't be approved for one amount and then edited to another. The one exception: the person whose expense it is can untick Is Reimbursable while it is Approved, because that only lowers what the business owes them.
My expense was rejected. How do I send it back? Open it: the reason the reviewer gave is under the status pill, next to their name and the date. Click Edit, fix what was wrong (for example Replace Receipt → Choose File), set Status to Submitted and click Save Changes. It waits for review again and counts as spend again; the old rejection reason is cleared. Only the person whose expense it is can do this — for anyone else's, ask an owner or Manager.
I'm the only owner. What happens to my own expenses? You approve them yourself, and each one is marked self-approved so the books show that nobody else signed it off. That applies where the store has never had a second owner or Manager: a genuine one-person shop. Create Expense says so as you file one: "You're the only person who has ever been able to approve expenses here, so you can approve this one yourself once it's saved. It will be recorded as self-approved."
If your store has ever had somebody else who could approve — a bookkeeper you have since switched off, for instance — the exception does not apply, and your own expenses stay Submitted until another owner or Manager is active again. That is deliberate: it stops a larger store from switching the second reviewer off, approving its own claims and switching them back on. They still count as spend in Total Amount, the Profit & Loss report and the ledger meanwhile. Give someone the Manager role in Settings → Team to have them reviewed. For your own expenses that are already Approved: untick Is Reimbursable on company-paid ones, or once you have paid yourself back, so they leave Pending Reimbursements. To change their amount, date, category or payment method, have the new Manager do it. Deleting the expense and entering it again is not a good way round it, and is refused outright once a bank line has been matched to it.
I deleted an expense and it came back. Why? Only the store owner or a Manager can delete expenses, and the Delete button isn't shown to anyone else. The store checks again when the button is used, so a delete that is refused says why — "Deleting an expense is limited to managers and the store owner." if your access changed while the dialog was open, "That expense is not on this store any more" if somebody else deleted it first, and "This expense has been matched to a bank line. Unmatch it under Bank Reconciliation first." when it is part of a bank match — rather than reporting success. A delete that works is permanent: the expense and its ledger entry are gone.
Does an expense count before it is approved? Yes. A Submitted expense counts toward Total Amount, the Profit & Loss report and the ledger as soon as it is saved. Rejecting or deleting it takes it back out. Approved and Reimbursed expenses keep counting.
Does marking an expense Reimbursed pay the employee? No. Reimbursed is a status the owner or a Manager picks in the row Status dropdown or in Edit (never on their own expense), to note the employee was paid back. No money moves.
What do Tax deductible and Reimbursable mean? Tax deductible marks spending the business can deduct; it starts ticked, and the Expenses Records export has a Tax Deductible column for your accountant. Reimbursable means the person paid with their own money and the business owes it back; it starts unticked. Approved expenses with Reimbursable ticked make up Pending Reimbursements on the Expenses Report until you mark them Reimbursed. Set both on Create Expense, in the import file's Tax Deductible and Reimbursable columns, or later with Edit. Some older expenses are marked both although nobody chose it, so untick Is Reimbursable on older company-paid ones. On a Submitted or Rejected expense anyone can untick it; once it is Approved, only the person whose expense it is or a different owner or Manager can.
An imported expense is in the wrong category. Will it be corrected? No — nothing is moved for you, because an expense in the wrong category can't be told apart from one somebody chose on purpose. Open it, click Edit, and set the right Category. The importer reads whole words, so "Truck repair" imports as Vehicle Maintenance and "Air filter" as Parts, and anything it can't place becomes Other: check the preview before you import.
Why do my imported expenses say Missing in the Receipt column? Bulk Import can't attach receipts, and every imported row over $25 is marked as needing one. Open the expense, click Edit, use Replace Receipt → Choose File, then Save Changes.
I can't find an expense I know I entered. First check the page isn't showing "Couldn't load your expenses" — that means the list couldn't be read, not that anything is missing; click Try again. Otherwise: the date range filters on the Transaction Date (the day of the purchase), not the Submitted Date in the first column, and starts at the last 30 days. Widen it (up to 13 months), reset Status, Category and Payment Method, clear the search and click Refresh. To search a category, type its name (Fuel, Office Supplies) or its code (gas, supplies), or use the Category filter.
Can I set up recurring expenses, save a draft, or add my own categories? No. Every expense is entered on its own and saved straight away as Submitted, and the 10 categories are fixed. There is one button, Submit Expense, on the live page and in the demo.
Why is the Edit dialog asking for a description when Create Expense didn't? Create Expense lets you leave Description blank, but Save Changes in the edit dialog needs one: "Validation Error — Please enter a description." Add a short description and save again.